Problem Statement:
My client is a famous publishing company known for publishing, selling and distributing comics, books and educational materials for schools, teachers, parents and children. They use many applications most of which are On-Premise based due to security Reasons. With Advent of Cloud, all less critical servers which does not require Office Premise were moved to AWS cloud. Unfortunately, all Software were placed under one Bucket without segregating them on Line of Business(LOB). Due to which
- Managing and providing access for each applications became a cumbersome process.
- It became difficult to identify what all applications are really needed and what have become obsolete.
- Cost/overhead of each LOB became difficult to identify as Client used to get bill for entire bucket instead so it was difficult to identify cost spent on each servers for their respective LOB’s.
Solution: Client decided to build AWS group for each LOB and put their respective servers. It will help them to manage, provide access to dedicated groups and Billing will also be easier to manage.Here comes challenging part:
AS400 application is using one software which is used for printing. There are 2 EC2 instances are part of LOB which host printing software.The software is used by Client to generate Ink Jet file formats that Kit Mailing partners uses to print out the labels for Application kits. This process is controlled by ECS and the simplified workflow is as follows:
- AS400 process creates a ZIP file in the IFS on the I-Series (Shared folder)
- The AWS process is then kicked off – the process:
- Maps a network drive to the i-series IFS
- Copies the ZIP file over to local storage
- Unzips the ZIP file locally
- S/W processes the unzipped files and generates output files
- ZIP up the S/W output files
- Copies the Zipped output files over to the IFS on the I-series
- Deletes the input and output files from local storage.
The process is pretty much pull/read/write/push/cleanup.
Migration Steps:
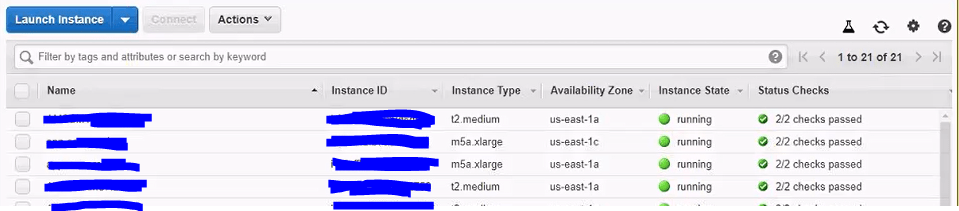
List of Already executing instances:
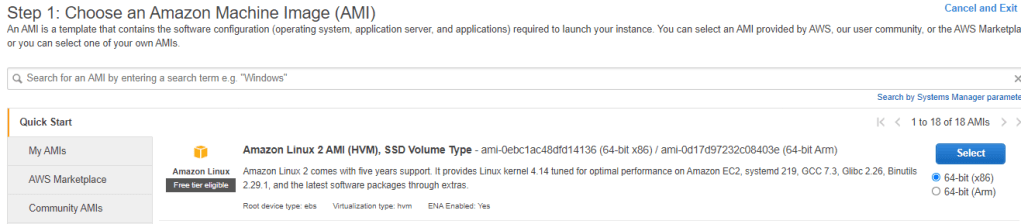
Step 1: Launch an Instance : Choose Instance which is shared with Client. We will choose AMI as Windows-2016-base-V1.01
Step 2: Instance type : Choose Instance type as t2.Medium with vCPUs = 2, Memory(GiB) = 4.
Step 3: Configure Instance Details : Set all options as default and select below options
- Network : ams-nonprod
- Subnet : amp-nonprod-private-us-east-1a
- IAM role : EC2-Global-Profile
- Protect against accidental termination : Mark it as “Yes” to prevent accidental termination. By this it will choose 2 step process.
- Enable CloudWatch detailed monitoring : “Yes”
- Tenancy : Shared- Run a shared hardware Instance.
- User Data : As soon as Instance is launched, DNS Server is setup. So to do it code is inserted in Powershell.
Step 4: Add Storage : Since Server has 2 Drives of 80 GB each so below will be chosen.

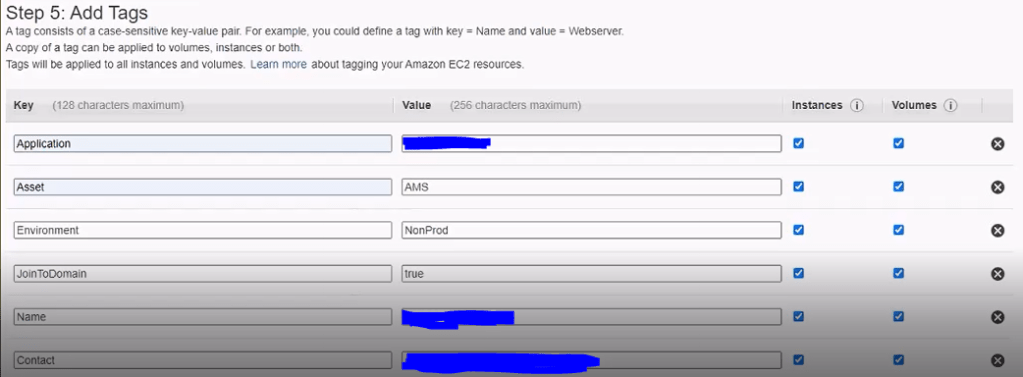
Step 5: Add Tags: If its public facing server Joint to Domain should always be False. In case of Private, it should always be True.
Step 6: Configure security group : Choose from already setup up Security group.

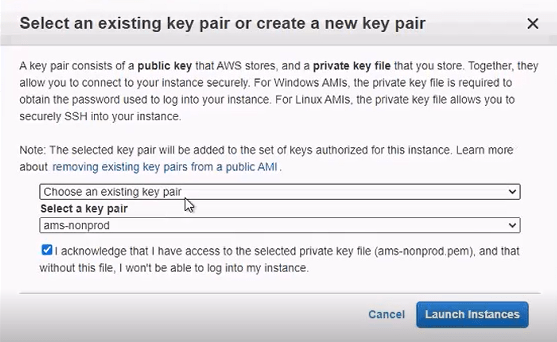
Step 6: Review and Launch : Review the already predefined processes and Launch the instance.
A mail is received once Instance is configured and initialized.
Launching Instance:
Step 1: Launch Instance : Click on connect to launch the instance

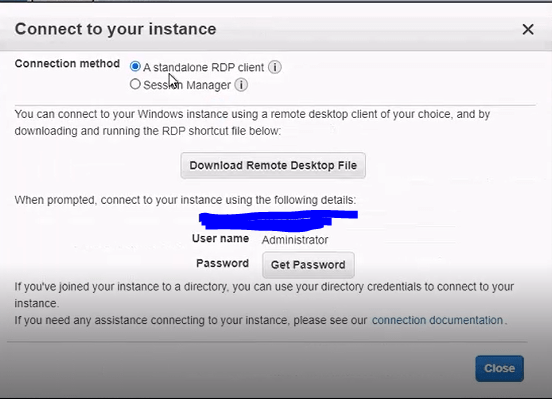
Step 2: Connect to Instance : Connect to Instance using options A standalone RDP client or using Session Manager.
Step 3: Instance Verification :Verify Instance Details.
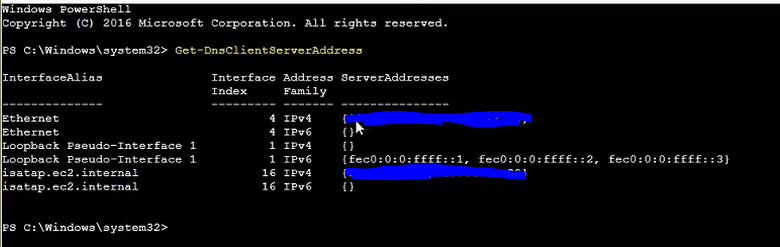
Powershell gets invoked by default.

To verify list of IP Address: Type command Get-DnsClientServerAddress. It will show below list of IP address by default.
To see List of Admins : Type command Get-LocalGroupMember -Group “Administrators”. It will show list of all users and groups. Users are local users to machine and they get added by default.

To grant access to List of Users and Group : Type command Add-LocalGroupMember -Group “Administrators” -Member “CORP\XXXX”

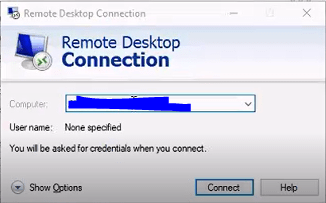
Type in the New Server Name in RDP and press Enter to connect to Server.
Step : Go to Ethernet-> Properties and Select IPV4

Step : Click Properties-> View the list of Allowed IP address

Step : Click Advanced-> DNS Tab -> Append DNS Suffix -> Click on Add to add Domain Suffix. It will allows Corp server to connect to other server using Short Name like AWSSTR*****.

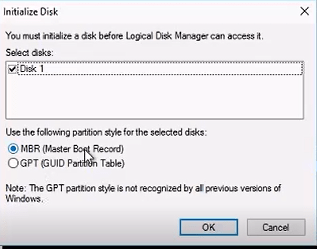
Step : Go to Computer Management-> Storage -> Disk Management

Step : Bring D drive online

Step : Initialize D drive


Installation of Software

