What is Processing Constraint
Processing Constraints in Oracle Fusion regulate the changes that an order entry specialist makes on a sales order in Oracle Fusion Order Management Cloud. The controls can be of three types – Who, What and When:
1. Who:
Determines which users can make the said changes. This will depend upon the roles assigned to the user
Example: A person having custom role ATLANTA_ORDER_ENTRY_SPECIALIST cannot submit orders with Supply warehouse as SEATTLE Warehouse
2. What:
Determines on what field we have the constraint
Example: Constraint will apply if Warehouse Name is not “Atlanta”
3. When:
Determines the stage of order processing when the constraint should apply
Example: Constraints can apply when you Submit / Validate / Update etc an order
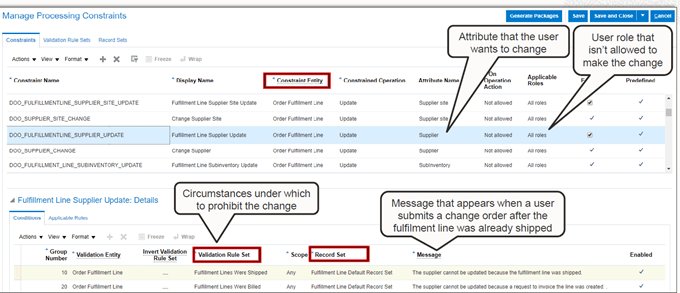
Components of Processing Constraint
1. Record Set:
2. Validation Rule Set:
3. Processing Constraint
4. Constraint Entity

How Processing Constraint Looks in Fusion
Steps to Setup Processing Constraint
Navigation for Processing Constraint.
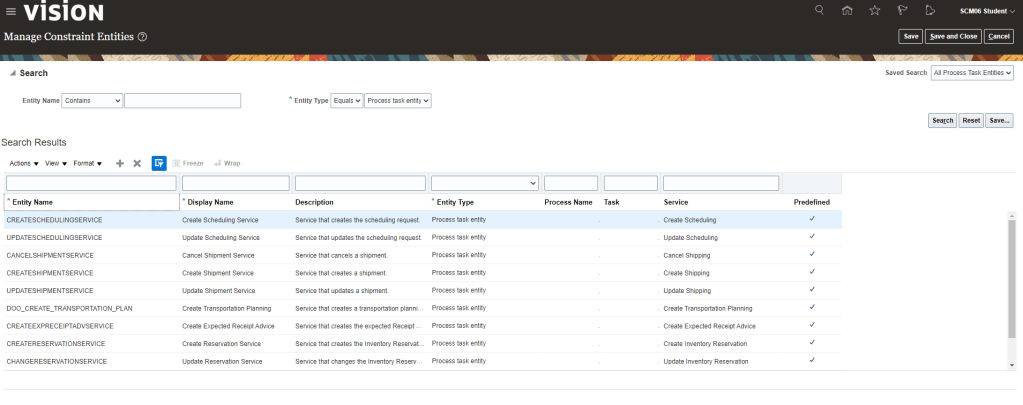
- Go to Others -> Setup and Maintenance -> Order Management -> Enter Task “Manage Constraint Entities“
- In Entity Type search for View Entity and select Order Header Level. Take any field for which processing constraint needs to be enable and Check the box.
Step1: Processing Constraints Setup
- Navigation: Go to Others -> Setup and Maintenance -> Order Management -> Enter Task “Manage Processing Constraint”.

- Create a Record Sets -> Select Entity -> Order Fulfillment Line and Attribute Name(Order Line ID) and Click Save

- Create Validation Rule Sets
- Select Validation Type as “Table”
- Entity as “Order Fulfillment Line”
- Go to Details section and in Attribute Name give “Status”.
- Valid Operations = “Equal to”
- Value String = “Awaiting Shipping”
- Click on Save and Generate Packages

- We should see Confirmation Message after Generation of Packages.

- Create a Constraint
- Constraint Name = ” SHIPPING CONSTRAINT”
- Display Name =” SHP01″
- Constraint Entity = “Order Fulfillment Line”
- Constraint Operation = “Update”
- Attribute Name = “Order quantity”
- Ensure Enabled is Checked
- Under Details section
- Group Number = “10”
- Validation Entity = “Order Fulfillment Line”
- Validation Rule Set = “Shipping VRS 01” -> What we created at Validation Rule Set
- Record Set = “Fulfillment Line” -> What we created at Record Sets
- Message = “The Fulfillment Line wasn’t updated because it is Awaiting Shipping”.
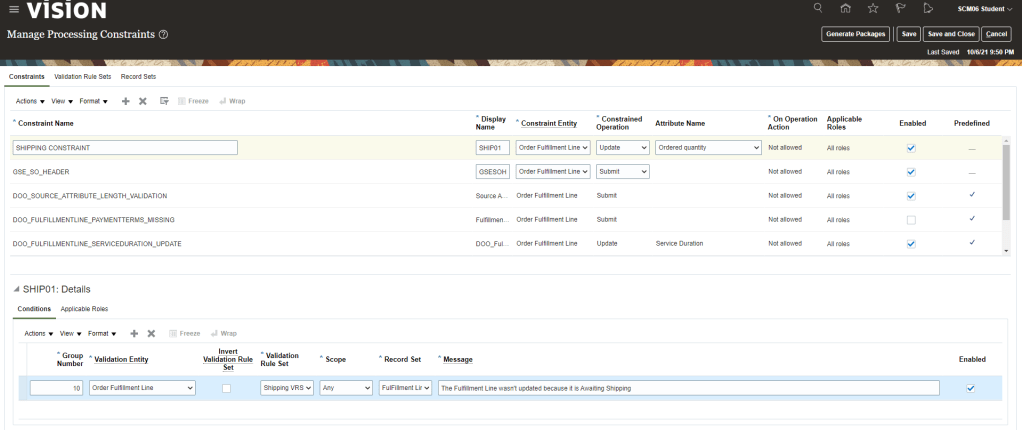
- Under SHIP01 Details, Choose Applicable Roles is set to “All Roles”. Click on Save and close

Step2: Application/Testing of Processing Constraint on Order.
- Create Order and setup QTY to 1 and Submit the order

- Once Order gets submitted, wait till it status changes to “Awaiting Shipping”
- Create Revision of Order. Order changes to Draft Status.

- Try changing the Qty from 1 to 2

- Processing constraint will come into effect and will prevent order Qty to be changed. Error Message setup in Processing Constraint will display and QTY automatically changes from 2 to 1.

- In case we want to disable above applied Processing constraint, uncheck Enabled field at the Header level not the one at Detail level.
- Click on Save and then Generate Packages.
- If Header level has more than one constraint entries at detail level and we want to retain one detail level constraint but disable other then in such case we will uncheck Enabled field for that detail line which we do not want to keep and then click on Generate package. Do ensure Enabled field remains checked at Header level.
