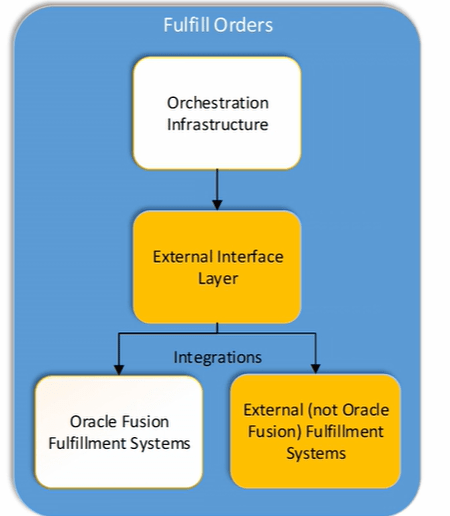
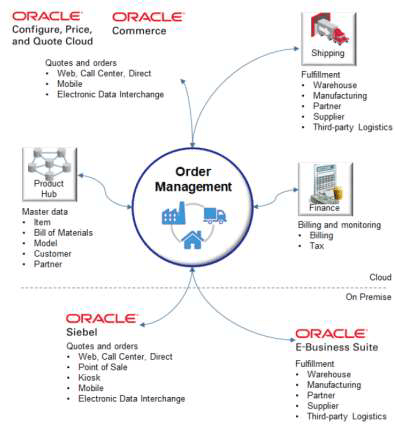
Order management can be integrated with both upstream and downstream systems like fulfillment and billing. Order Management comes predefined with integrations to other Oracle Cloud services. To integrate with non Oracle systems integrations need to be built.
External Integration Flow and Setup.
Platform that enables integrations between Oracle Cloud applications and External applications uses SOAP services and Business Events exposed by Oracle Cloud Applications
- Services
- OrderInformationService
- OrderFulfillmentResponseService
- Events
- OrderStatusUpdated event
- SalesOrderNotification event
Step 0 : Different Roles for Integration process
- For Upstream Integration :
- Manage Order Specialist.
- For Downstream Integration :
- Manage Orchestration Generic Web Service.
- Manage Orchestration Order Activity Interface Web Service.
- Manage Orchestration Order Fulfillment Interface Web Service.
- Manage Orchestration Order Modification.
- Manage Orchestration Purchasing Interface Web Service.
- Manage Orchestration Order Receiving Interface Web Service.
- Manage Orchestration Order Shipping Interface Web Service.
- Manage Orchestration Order Template interface Web Service.
- Manage Web Service Interface to Transportation Data for Sales Order.
Step 1: Manage Task Types
- Navigation Go to Others -> Setup and Maintenance -> Order Management -> Enter Task “Manage Task Types”
- Go to Actions -> Click on Add Custom-> Enter Task Type and Description
- Under Detail Section -> Services gets added by default.
- Please note : Task type and Name of Services will be used in Orchestration Steps.
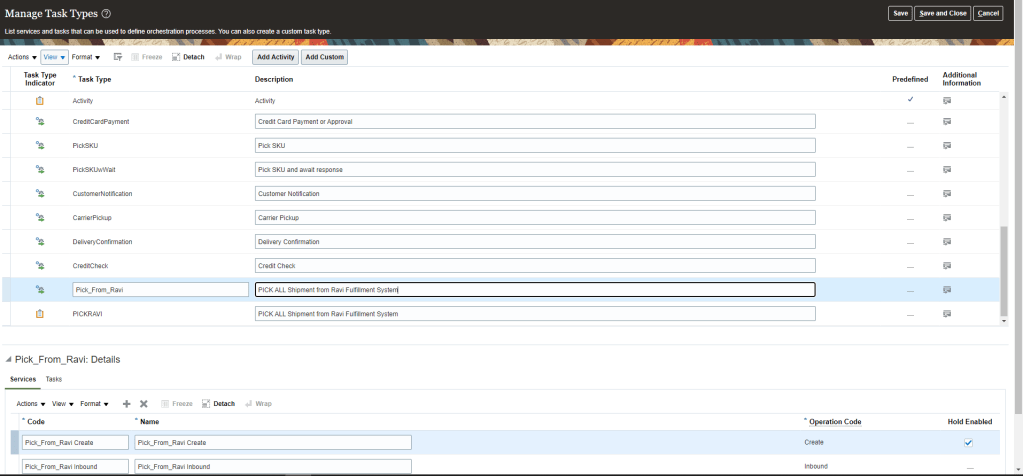
- Under Detail Section -> go to Task tab and add Necessary Task.
- Click on Save and Close

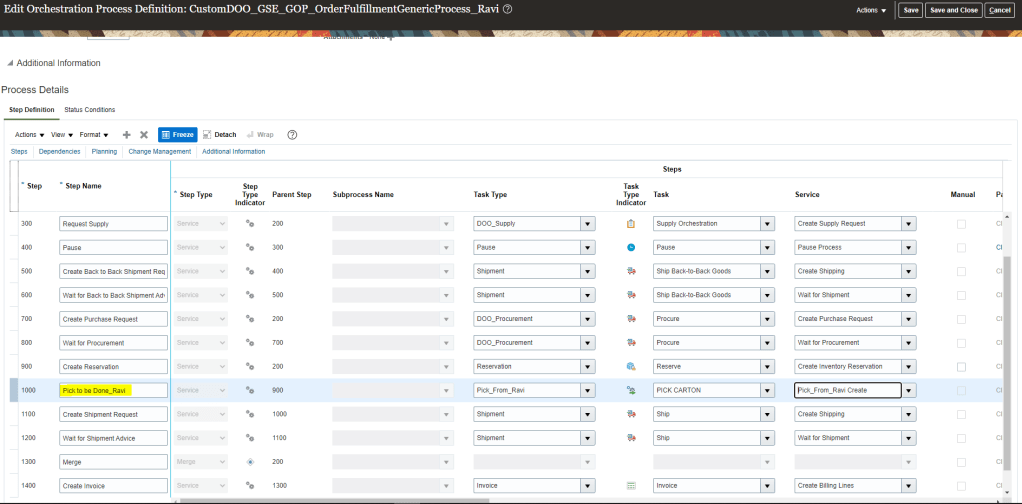
Step 2: Orchestration Process Steps
For external fulfillment integration custom task steps need to be added to the orchestration process to invoke the integration. Task type and services created in previous step will be used in Orchestration step
- Navigation : Go to Others -> Setup and Maintenance -> Order Management -> Enter Task “Manage Orchestration Process Definitions”
- Go to Edit and then under Process Details -> Step Definition > Enter Step Name ” Pick to be done from Ravi”
- Under Task Type , Select Task, created in Manage Task Type , “Pick_From_Ravi”.
- Select Task ,created in Manage Task Type, “Pick Carton”.
- Select Service, created in Manage Task Type, “Pick_From_Ravi_Create”.
- Click on Save and close.
- Go to Actions and follow general steps of Orchestration Process Definition Deployment. For more detail click on link.
Step 3: Connector Setups
Connectors need to be defined to allow capturing of external systems details.
- Navigation : Go to Others -> Setup and Maintenance -> Order Management -> Enter task “Manage Trading Community Source Systems“.
- Go to Actions under Search Results -> Click on Create -> Create Source System
- Enter value Code = “CSS01”
- Type = “Spoke”. Valid type values are
- “Spoke” for Legacy System
- “Purchased” for Data from Third Party provider
- Enable for Order Orchestration and Planning. Other Valid values are
- Enable for Items -> It is used for Import Data for Items
- Enable for Trading Community Members -> It is used to import data for the trading Community. It Establishes the Original System Unique Reference(OSR) for customer Entities.
- Enable for Order Orchestration and Planning -> it is used to import data for Order Orchestration
- Enable for Assets -> It is optional and used to import data for assets
- Click on Save and Close and then Done.

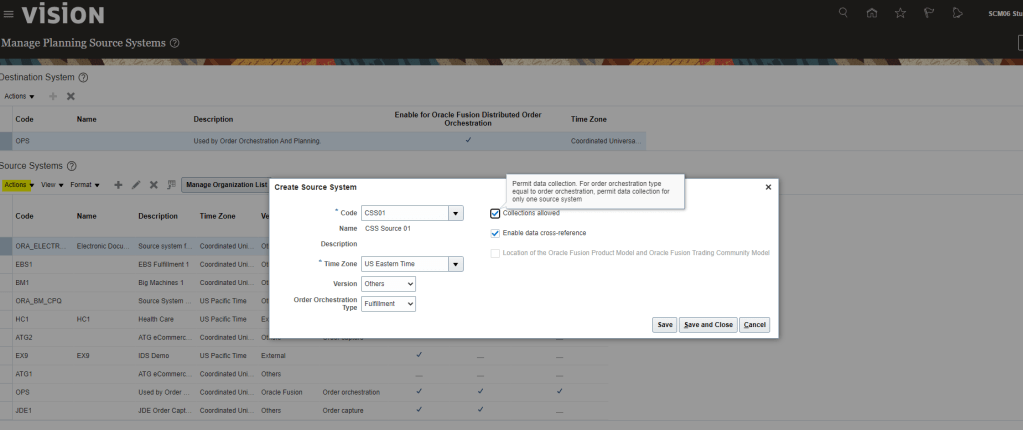
Step 4: Manage Planning Source Systems
- Go to Others -> Setup and Maintenance -> Supply Chain Planning -> Enter task “Manage Planning Source Systems“.
- Under Source Systems Tab -> click on Actions -> click on Create
- Code = “CSS01”. Code created in Step 3.
- Time Zone = “US Eastern Time”
- Order Orchestration Type = select Fulfillment from dropdown
- If we choose Order Capture, it specify the source system as an order capture system that sends source orders to Order Management. It is typically chosen with Import Web Service
- If we choose Fulfillment, Order management of Source System will send fulfillment requests and receives fulfillment replies.
- Check Enable data cross-reference if Source system expects Order Management to perform cross-reference.
- In case if Source system and Oracle fusion uses same values then do not Check, “Enable data cross-reference” . These values should be setup in fusion.
- Check Collections Allowed.
Step 4.1 : Manage Upstream and Fulfillment Source System
- Navigation : Go to Others -> Setup and Maintenance -> Order Management -> Enter Task “Manage Upstream and Fulfillment Source Systems“
- Under Destination System -> Go to Actions -> Create Code
- Under Source System -> Go to Actions -> Create Code
- Enter Code = “CSS02”
- Time Zone = “US Eastern Time”
- Version = “Others”
- Order Orchestration type = “Order Capture”.
- If we choose Order Capture, it specify the source system as an order capture system that sends source orders to Order Management. It is typically chosen with Import Web Service
- If we choose Fulfillment, Order management of Source System will send fulfillment requests and receives fulfillment replies.
- Check Enable data cross-reference if Source system expects Order Management to perform cross-reference.
- In case if Source system and Oracle fusion uses same values then do not Check, “Enable data cross-reference” . These values should be setup in fusion.
- Check Collections Allowed.

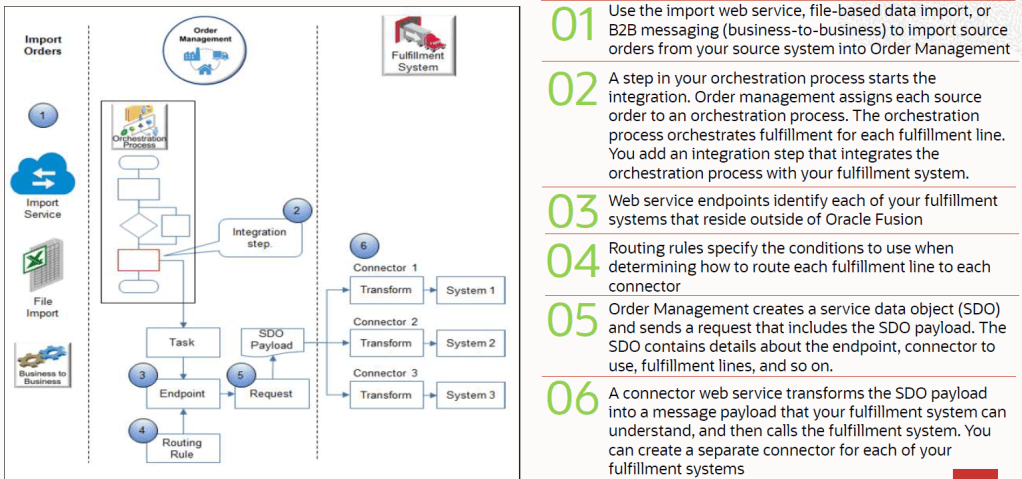
Step 5: Manage External Interface Web Service Details
This is used to establish connection between Oracle fusion and Middleware/SOA server using Connectors.
- Navigation: Go to Others -> Setup and Maintenance -> Order Management -> Enter task “Manage External Interface Web Service Details“
- Enter following details
- Target System created in Step 3 = “CSS01”.
- Connector Name =
- “Event Connector” for Business Event
- “Connector01” Connector for Target System CSS01.
- Connector URL = URL of SOA server which will be used to connect with Oracle Fusion

- Username and Password are not directly added in the setup. Instead below steps are performed
- Use Oracle Wallet Manager to add user credential key to a credential map. To do this one should have Administrator Privilege and Administrator role.
- In Oracle Wallet Manager, in list Selected map, select Oracle.WSM.Security.
- Enter User Credential key, Username and Password from the service that we will be integrating with Order Management
- Sign into Order Management with administrative privileges and then enter the username and Password
- Response Processing Option : from the three values select anyone of them
- Reject all Lines on First Error(Default option)
- Reject all Lines on when error on at least one line occur.
- Reject group with lines that contains error
- Ensure Send Attachments should be “Yes” if Order Management sends attachments to fulfillment Systems.
- Invocation Mode
- For OIC integration select “Business Event“.
- For Web service Integration select “Asynchronous“(Default) or “Synchronous Service“.

- Repeat step to enter details for Business Event.
Step 6 : Identifying Hosts and Ports
- Navigation: Go to Others -> Setup and Maintenance -> Enter Tasks “Review Topology”.

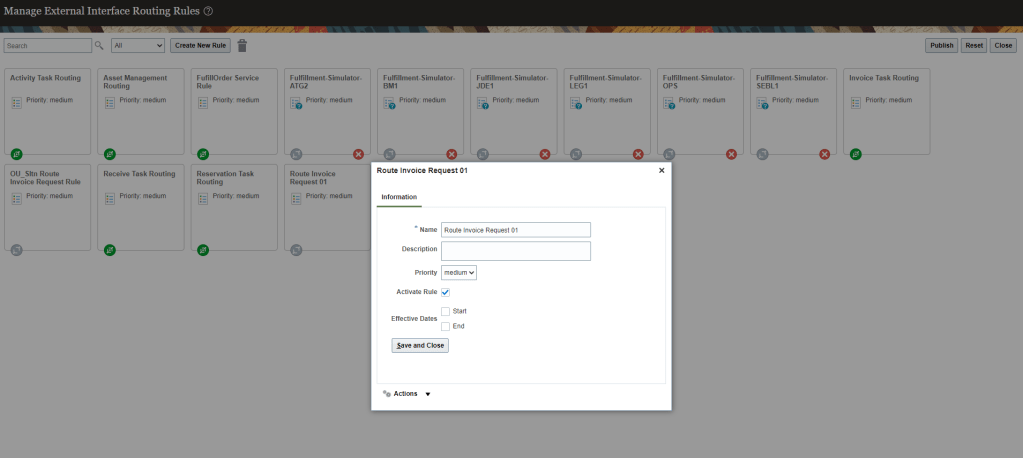
Step 7 : Manage External Interface Routing Rules
- It create rules to route fulfillment requests to appropriate connectors to external fulfillment systems.
- We can use order, fulfillment line and process definition attributes to select the fulfillment system connectors.
- The routing rules gets executed in Oracle Business Rules Engine.

- Navigation: Go to Others -> Setup and Maintenance -> Order Management -> Enter task “Manage External Integration Routing Rules for Sales Orders“.
- Click on Create New Rule.
- Rule Description : Route Invoice Request 01.
- For IF condition.
- Enter text for IF condition “Item is CM5008 and Task Type is Invoice”.
- In condition section, Enter condition “Item” and choose Order Fulfill Line.
- Operator should be “=”.
- Click on Search Icon box and search for Item “CM5008” and then select it.
- Click on AND Icon.
- In condition section, enter condition Task Type and choose the one for Order Header.
- Operator should be “is equal to”.
- Click on Search Icon box and search for task “Invoice” and then select it.

- For Then Section
- Select “DO”.
- Enter text for Then Section “Route to Oracle Fusion Invoicing System”.
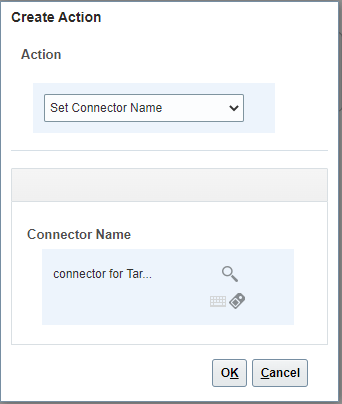
- In create action dialog box select “Perform an Action”.
- For Action select “Set Connector Name”.
- Under Connector Name select search icon and search for value “Connector01” which was created in Step 5.
- Click on Save and Close
- Click on your new rule and select Activation Rule to activate your newly created rule.
- In case we want it to run under specific date give the Start and End Date.
- Click on Save and Close.
- And then click on Publish button to publish this new Routing Rules.
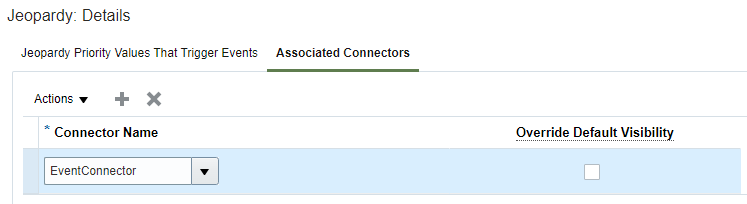
Step 8: Setting up Jeopardy Business Event for a channel system
- This is primarily use when source system is sending bulk Order messages to be processed by Oracle Fusion.
- So in event where it exceeds the limit and orders might get delayed, Order Management in such case will raise an event when Jeopardy Party value is high and send event notification to receiving Event connector which will notify the source system of the delay.

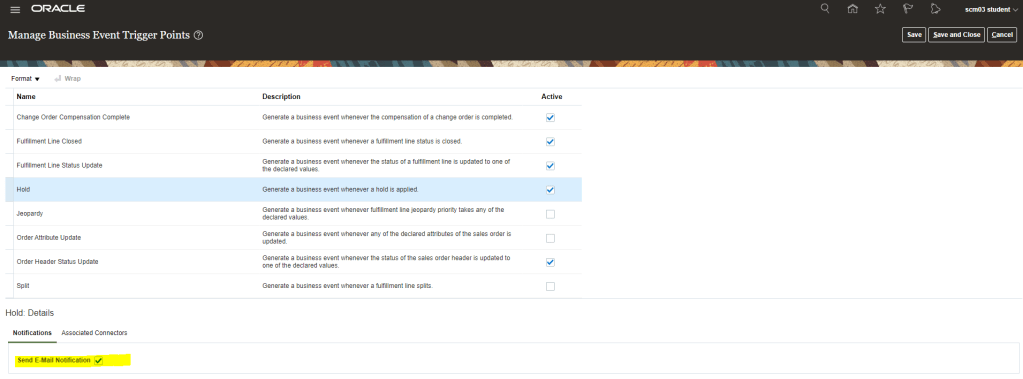
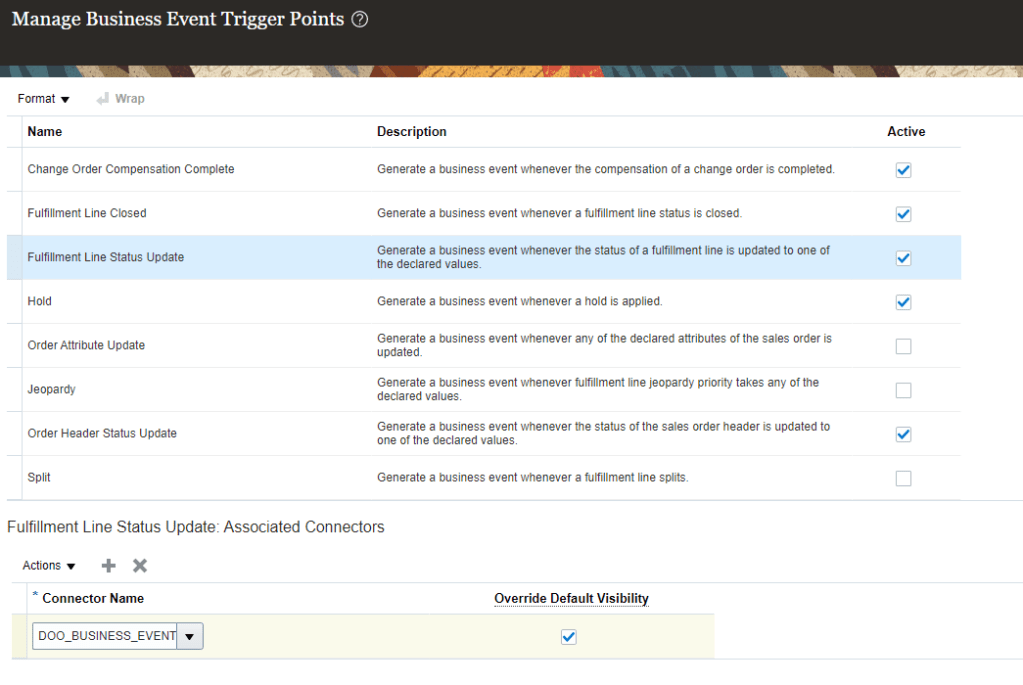
- Navigation Go to Others -> Setup and Maintenance -> Order Management -> Enter task “Manage Business Event Trigger Points“.
- Select Format “Jeopardy”
- Under Jeopardy Detail section, for Jeopardy Priority High, check the box for Raise Event.
- Click on Associated Connectors Tab and click on Actions and Add Row
- Enter Connector Name “EventConnector” created in Step 3.

- Click on Associated Connectors Tab and click on Actions and Add Row
- Enter Connector Name “EventConnector” created in Step 5.

- We can similarly create Business Event Trigger points based on our Business scenarios.
- In below case we want to notify our source system in case of Fulfillment Line Shipment Update.
Step 9 : Setting up Jeopardy Business Event for a channel system
- Navigation Go to Others -> Setup and Maintenance -> Order Management -> Enter task “Manage Business Event Trigger Points“.
- Select Format “Order Header Status Update”
- It has Send E-Mail Notification under various status Value which can be checked. In below example for Status Value , Submitted, Raise Event is “Checked” as well as Send E-mail Notification is “Checked”
- Email will be triggered once Order Header Status Changes to Submitted
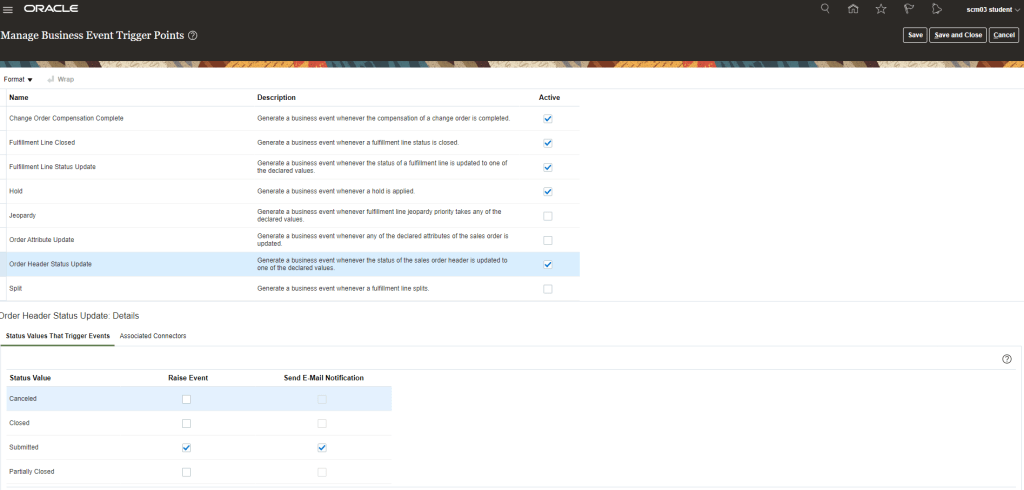
- Same goes true for “Hold” for sending Email Notification.