In this topic we are going to discuss about Configurator Modelling, Snapshots, Steps to perform configurator Modelling (workspaces, supplemental structure, rules and UI), Versioning and release of workspace.
Need of Oracle Fusion Configurator
Oracle Fusion Configurator is used for following
- Product Configured to Unique Customer Needs
- Centralized Management of Configurator Models
- Simplified Configuration of Complex Solutions
- Cloud Enabled which is Integrated with Order Management.
Configurator Runtime UI
- The UI is dynamically assembled at run time by using templates.
- Template provide look-and-feel which is Interaction based.
- Seeded templates are available for all major navigation and controls.
- Visual UI editing of pages is possible in the configurator Models Work Area.
- Oracle Application Development Framework(ADF) and Java Server Faces(JSF)
Template Driven User Interfaces (UI)
It quickly Generate Run time UIs. It has following items
- Configurator Models and Components Items
- UI Template which controls the behavior of navigation through responses to fulfill the configuration components.
- Different Templates
- Shell Templates -> As name suggest, its the outermost layer
- Layout Templates -> It determines the layout i.e. if its form, stack time of presentation
- Control Templates -> It represent the selectable representation within the items.
- Message Templates
- Utility Templates

Integration with Order Management
- The Configurator UI is embedded within the Order management UI when a product is being configured.
- Reconfiguration is supported during the revision of an order.
- Configuration and Validation Services are provided for models.
- Configuration details are not saved until the order is saved.
- Pricing Segment and Strategy information to price the configuration are obtained from the order.
- For Pick to Order (PTO) models, Included Items are added to the order when configuration details are returned to the order.
- End users see real time pricing at run time
- Defined configured item pricing in Oracle Fusion Pricing application
- Display accurate pricing at run time
- Display prices for items
- Display prices and totals on the Review Page.
Item Structures
- we Define Item Structures which comprises of Items and Item Structures i.e Structure Component Attributes
- Create Items using the structure
- Define Item Classes, User Define attributes and Transactional Attributes.
- Define Attribute Groups and Value Sets.
For Car Model if we need to define Item Structure in PIM work area then it should contain following

Snapshots
These are the Read-Only copy of approved Product Model entities/data which are imported from PIM work area into the configurator model work area. There is a scheduled job which runs to import the copy into work area . Job name is “Import Model Action”. Model Item Snapshot contains following
- Item Structure
- Structure Component attributes
- Operational attributes
- User-defined attributes
Below is the good example of Baseline version and Snapshot taken into Configurator model work area.
- Import creates the initial baseline version of a model and then creates corresponding snapshots for all standard items and option classes beneath it.
- Any reference models that exists in the item structure are imported along with the model item.

Snapshots are shared across models and all models use the same snapshot of that item. E.g. below 4 different Car Models uses same snapshot of Item “Seat Trim”.

Purpose of Refreshing Snapshots
Its brings updates from Product Model into Configurator Snapshot. The Manage Snapshots task provides snapshot refresh actions
- The refresh runs as a scheduled process similar to import
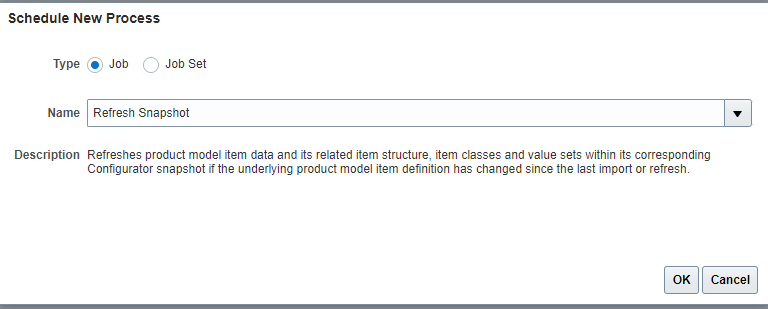
- The snapshots that can be refreshed include:
- Items(Models, option classes, and standard items)
- Value Sets for Item attributes like color
In below example, Option Class Seat Trim had three options Leather, Cloth and Sport. Import option causes it to flow to Product Configurator Manager. Later on Limited Edition got address to Seat trim option class in Product Manager. Refresh Option will copy the added item to Product Configurator Manager.

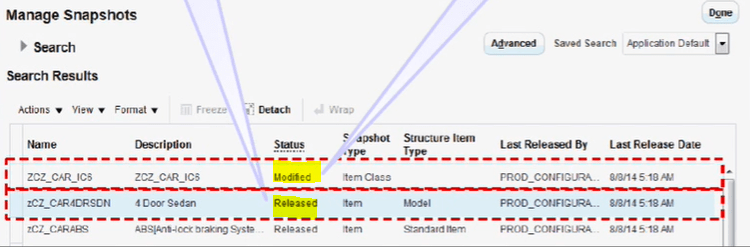
- The Snapshot Statuses include
- Released -> When snapshot of new configured Item is brought first time into Configurator Workspace, its status is Released and it is automatically moved to production as there will be almost no changes to be done in Product.
- Modified -> After update on Items and/or their components are done in PIM are, refresh snapshot will bring changed item in configurator workspace. Status of Snapshot will be Modified. Once updates to items and their components are tested successfully and on release of Workspace, status of Snapshot changes from Modified to Released.
- Changes to an item class can be refreshed without refreshing any item
- When the updated item class snapshot is added to a workspace, the corresponding changes are seen in the items in that workspace that belong to the item class.
Snapshot Refresh Models
- The Snapshot refresh models are of 3 types
- Refresh(Single Item Snapshot)
- Refresh, including descendant structure
- Refresh, including descendant and reference structure.
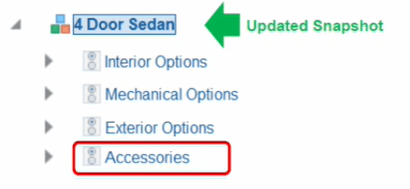
- Refresh Single Item Snapshot
If modification happens at accessories level, and user select Refresh Single Item Snapshot then snapshot of 4 door Sedan gets updated
- Refresh including Descendant structure
If modification happens at accessories level and Limited Edition gets added in option class Seat trim, and user select Refresh Single Item Snapshot including Descendant structure then snapshot of 4 door Sedan and Seat trim gets updated

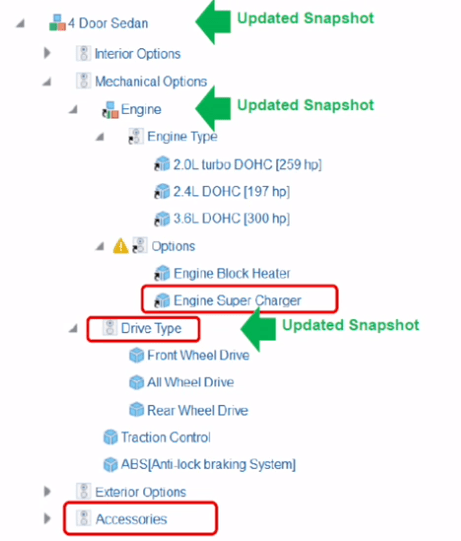
- Refresh including Descendant and reference Structure.
If modification happens at accessories level and Engine Super Charger and user select Refresh Single Item Snapshot including Descendant and reference structure then snapshot of 4 door Sedan, Engine, and reference type Drive Type gets updated
Purpose of Workspaces
- Workspaces enable us to modify and test one or more draft models before they are released into production.
- Modified snapshots can also be added to workspaces along with models.
- Multiple workspaces allow concurrent draft development
- After testing, workspaces can be released into production. All changes made to the models are effective as of the effective start date of the workspace
Participants in Workspaces
- Models
- Snapshots
- Items
- Item Classes
- Value Sets

Configurator Life Cycle
It starts with Defining Item structure in PIM to Release of workspace. Below snapshot gives a holistic view of different steps between Initial Product Definition to Ongoing Draft Model Management.

Configurator Modelling
Below is the snapshot of steps which takes place during Configurator Modelling. Right from Import/Refresh PIM data to Workspace, to creation of supplemental structures, creating/updating rules, Manage User Interfaces, Test Model UI and Behavior and finally release it to production environment.
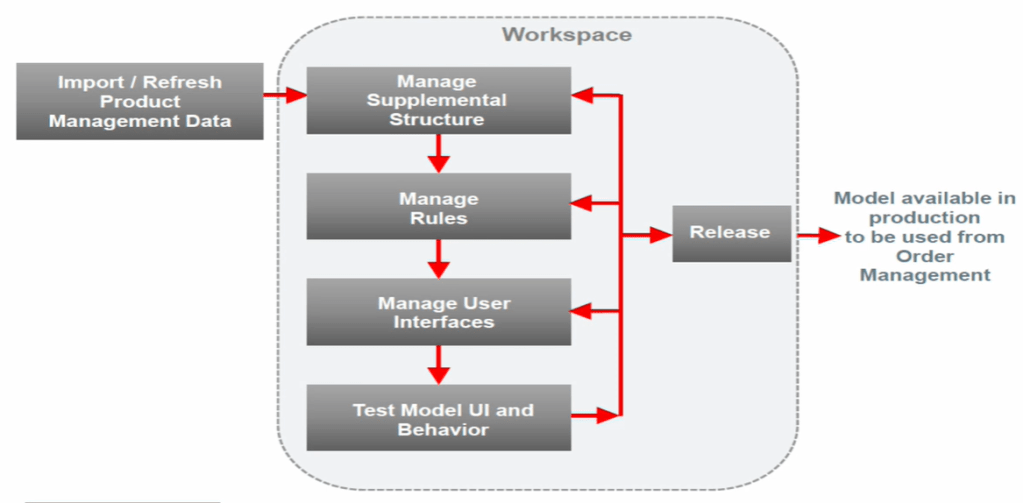
Configurator Modelling Steps
Step1 : Create Work Space
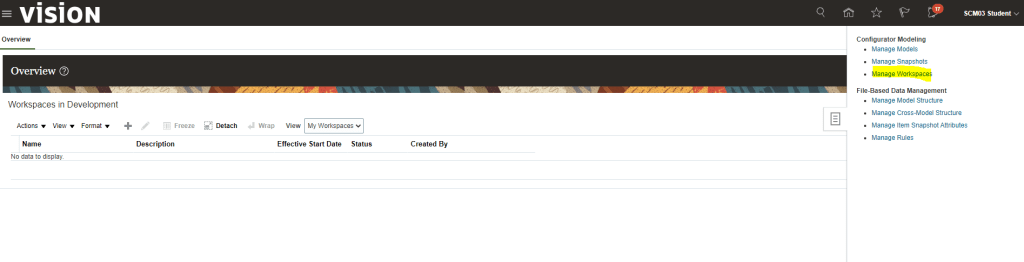
- Navigation : Product Management -> Configurator Model -> Manage WorkSpace
- Click on ‘+” Button to Create Work Space. Enter following details for workspace
- Name
- Description
- Effective Start Date
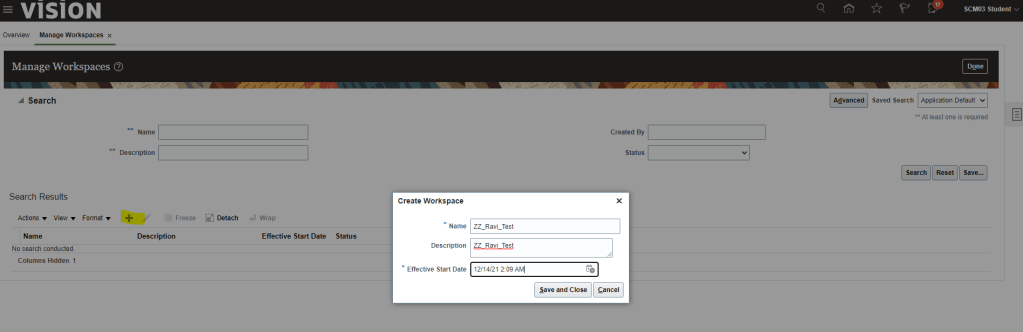
- Once WorkSpace gets created, Status becomes “In Development”.
- Click on Actions -> Select and Add -> Models
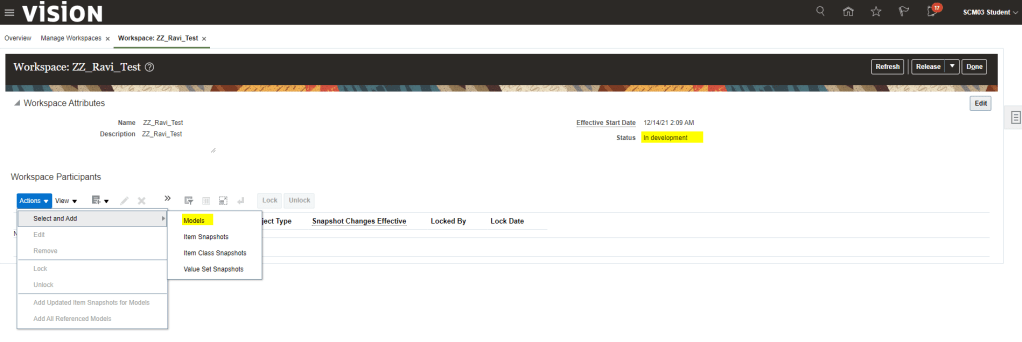
- On Selecting Models above, Add models page appear. Enter Item Model which you want to add and click Ok.
- In below case search for “AT6751000” and click on Search button. Once it appears, select the line, select the Include all Referenced Models and click on Apply and OK.
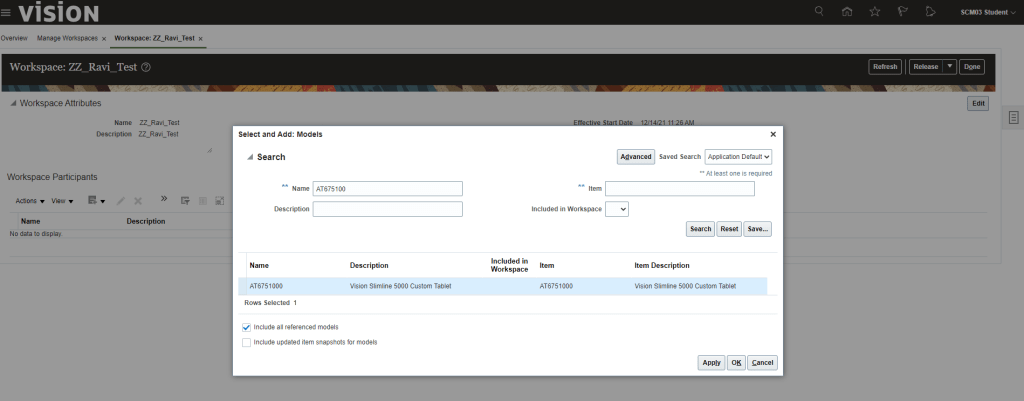
- Once Ok button is clicked Model and its reference item both gets added to workspace. Do notice they are in Locked state by my user profile.
- Note: When any Models/Item class gets added into workspace, by default it is in Locked State. Locking and Unlocking helps in preventing conflicting changes done by other users.

- If we do not lock the Model and try to save the changes, we will get below error.

- Select Model and click on Pencil/Edit Button to reach the edit screen where we can Edit Structures, Rules and User Interfaces

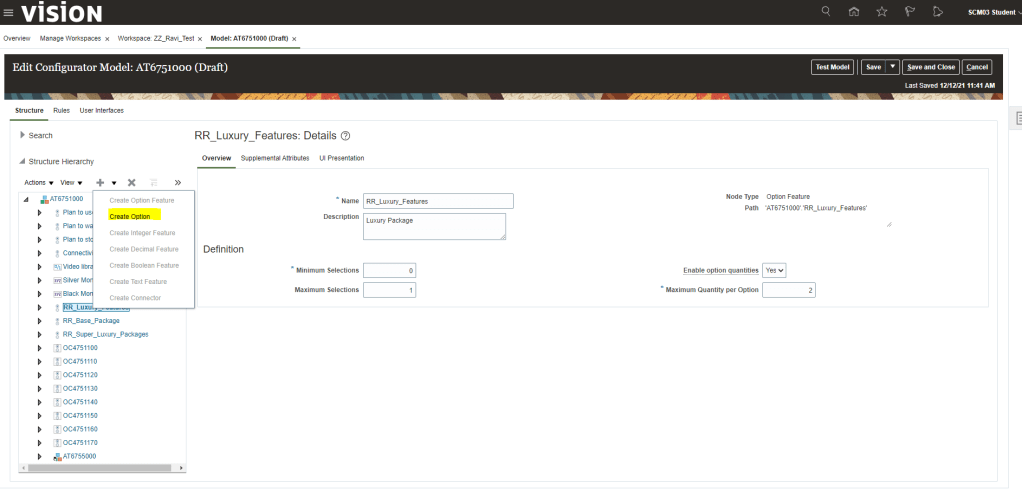
Step 2: Creating Supplemental Structure
- Select “+” button and from the dropdown select Create Option Feature.

- Enter Details as shown below and click on Apply and Create another in case we want to add more options features or we can simply click Ok.
- Minimum Selection =
- If “0”, we will have option of None in our UI.
- If “1”, then we will need to have options in the Option feature else it will give error while testing Model.
- Maximum Selection = It implies how many options can be chosen. If we select 2 then we can choose 2 options in our User interface
- Enable Option Quantities = If enabled it will allow the quantity of the option to be selected
- Maximum Quantity Per Option = for the selected option, what is the maximum value you can choose.
- see the Test Model below to get more clarity on above concept.
- Minimum Selection =

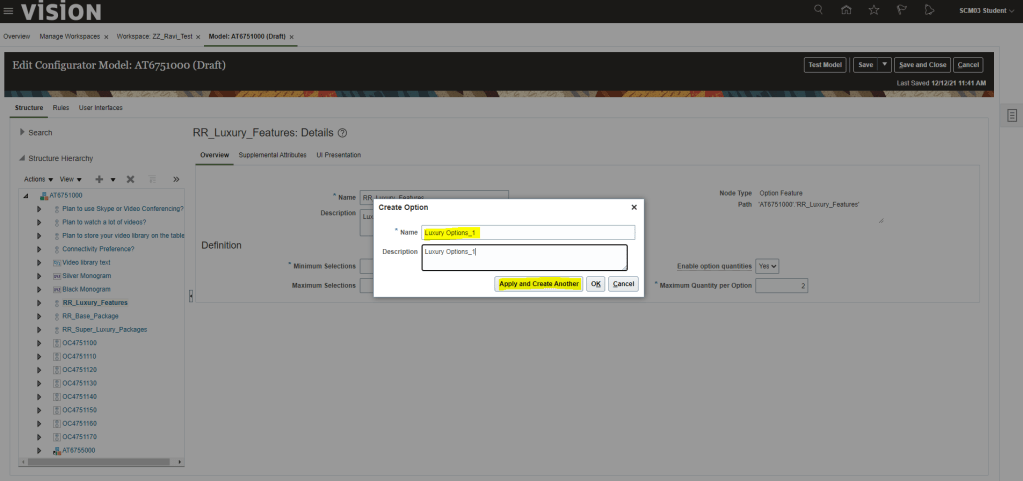
- After adding Option Features, select the option Features and click on “+” button and choose Create Option.
- Enter Details for Options and click on adding few more by choosing Apply and Create Another.
- After adding Option Features and Option, click on Save.

- Testing of Supplemental Structure :
- Click on Test Model. It gives following option of Date, UI and Root quantity. Make necessary changes or leave the default value and click on Ok.

- Notice the difference between the 3 Option Features packages while doing testing. Difference is explained in below excel chart


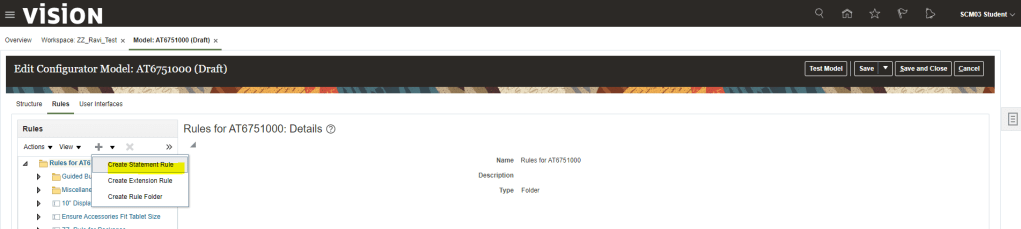
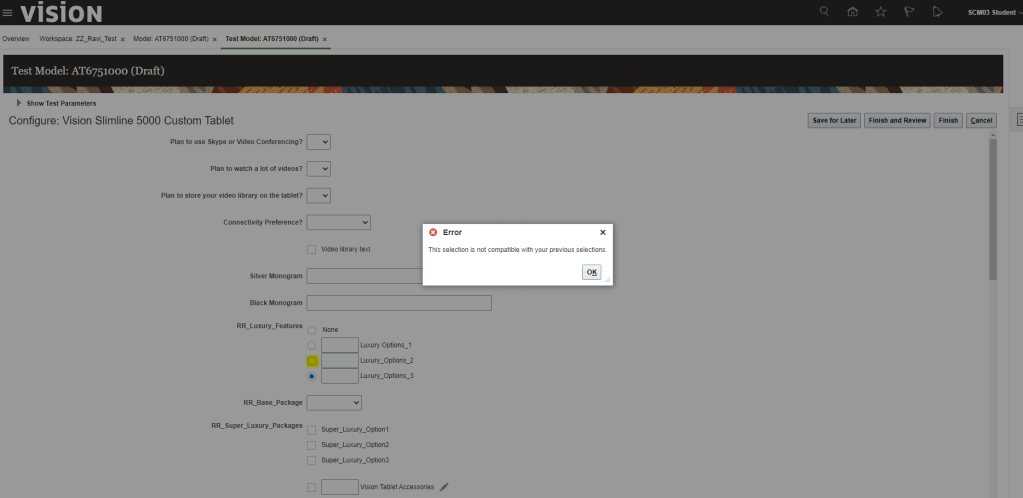
Step 3 : Creating Rules
- Select Rule from the Tab and then click on “+” button to add new rule. Enter description as entered below.

- Click on Structures -> Select the newly added Option Features and click on “+” button. It gets added to the rule.
- From Logic Operator select “implies” from dropdown list and then select option “Luxury_Options_3” and click on “+” button to insert into rule.
- Click on Validate to verify syntactically our rule is good.

- Testing of Rules :
- Once rule is set we need to test our model. Since I had selected Rule Class as “Constraint“, so either we can select “None” or “Luxury_Options_3′ from the option feature which we had entered in rule. Any other option will lead to error.
Step 4 : Build User Interface
If Option class has mutually exclusive item, it will be in Radio Button control root template. If it has more than 1 item can be selected from children then it will be Check Box.
User Interface has different styles
- Single Page Navigation Styles -> When configured Model Work area is used to create UI.

- Dynamic Tree Navigation Styles -> User can navigate using tree Link. Drill down to reference model UI’s.
- Step by Step Navigation Styles -> as name suggest navigation is done using steps like a train
Below are the steps for creation of User Interface.
- Click on User Interface tab, “+” button to create New User Interface
- Give Name of User Interface , UI Template Map can be of different type. Choose Template Map according to your need.

- Under Applicability section -> Under Applications -> select “Selected”, Click on Select to choose which application you want this UI to appear.

- Under Design Tab -> Under Page section -> click on Actions -> click Page

- Under Design section -> Resources -> Under UI Elements -> select the Text
- Enter Text Description and give Inline Style. Display can be controlled by selecting Conditionally.
- Give Condition under which this page needs to be displayed.

- Under Design section -> Resources -> Under Structures -> select the “RR_Super_Luxury_Pages” -> add it as Page Item.
- Give Run time Condition = “Always”

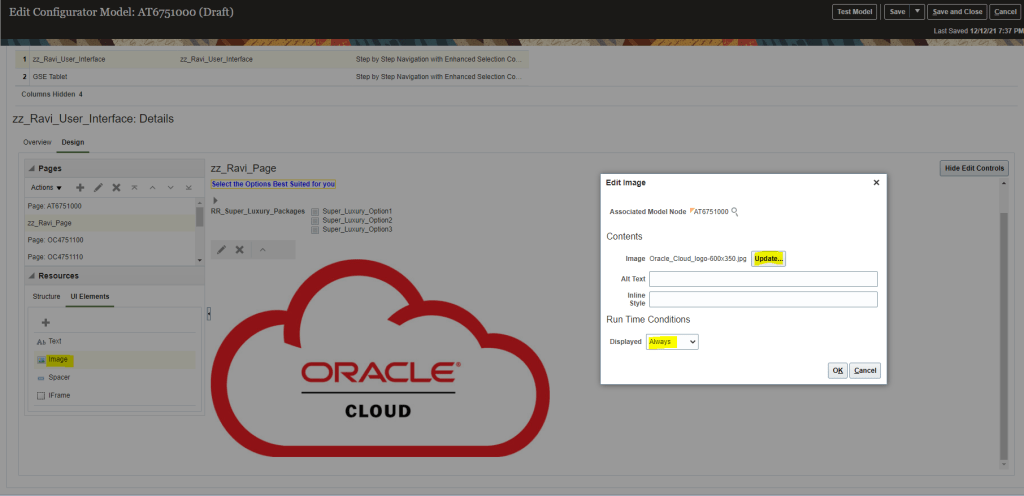
- Under Design section -> Resources -> Under UI Elements -> select the Image.
- Under Image Section -> select Image which you want to add for your test.
- Display option can be conditional.
Step 5: Test Model UI and Behavior
In previous steps, we have already tested model while creation of and rules. Below is the steps for testing User Interface.
- Testing of User Interface. Click on Test Model. Select User Interface = “zz_Ravi_User_Interface” and click OK
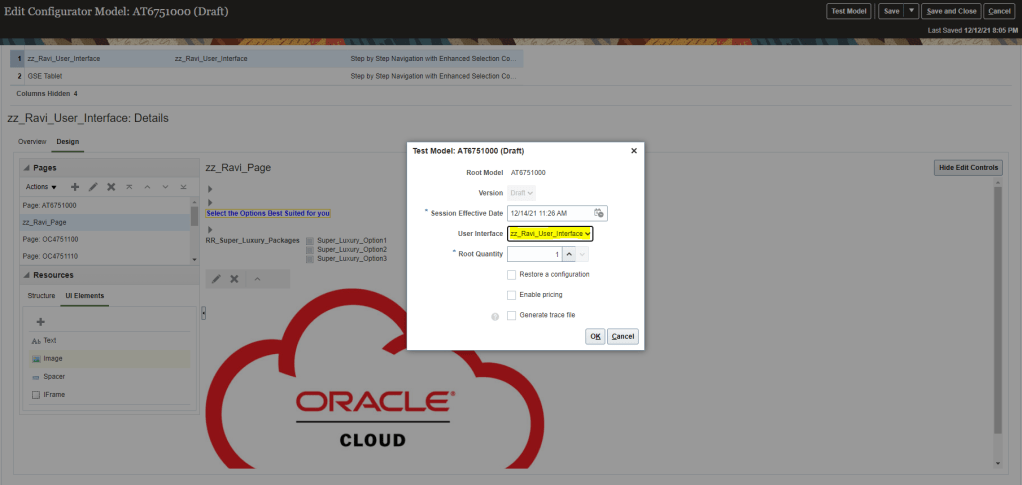
- Your User Interface will appear with the new page created by you

Versioning and Release
Below picture depicts how versioning and Release are handled during concurrent development. Versioning is Dynamic(Baseline gets changed as and when version gets released) and Cumulative( Latest version is cumulative of all prior version).

What gets Versioned in Configurator
- Below components of Models gets versioned
- Supplemental Structure
- Rules
- User Interface
What all gets Released in configurator
A workspace with all its contents gets released, i.e. Models and Snapshots
- Models
- Supplemental Structure
- Rules
- User Interface
- Snapshots with changes
- Value Set
- Item Class
- Item
When Model version gets stored in Models Work Area
- No Data Duplication Happens
- Only deltas gets stored for each version
- Version Start Date = WorkSpace Effective Start Date
What are called Model Drafts
- Created when added to WorkSpace
- Changes scoped under the workspace
- Change not in Production
Below is the versioning of Card Model.
- Time T1 – Initial Version V1, Packages has Base Trim and Luxury
- Time T2 – It has new Version V2, Packages has now Super Luxury added to existing Packages
- Time T3 – It has new Version V3, Packages has now Base Trim removed and Sports Super Luxury added to existing Packages

Steps for Version and Release of Model
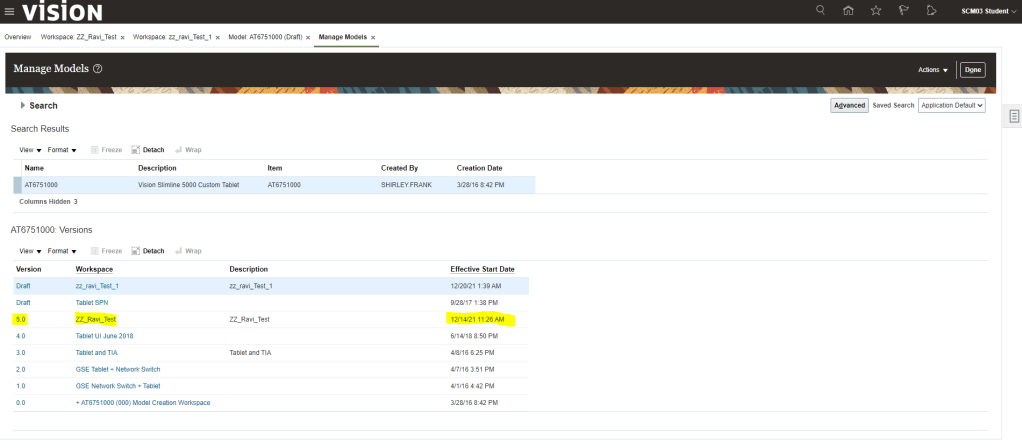
- Navigation : Product Management -> Configurator Model -> Manage Models -> Enter Model = “AT6751000”. It will show under what all workspace changes are going on for the model. Current status is 4.0 while 3 of them are in Draft Status.
- I have created one concurrent Workspace zz_ravi_test_1 along with workspace zz_ravi_test created earlier to see the impact of change done in Model. Both workspace versions are in Draft Status as none of them got released.

- Go to workspace zz_ravi_test, select Model AT6751000 and Click on Release

- Warning message comes which we can click “Yes”.

- On clicking Submit, confirmation message appears. Status changes to “Release in Progress”

- After clicking refresh, Status changes to Released and we get option to “Unreleased Models”.
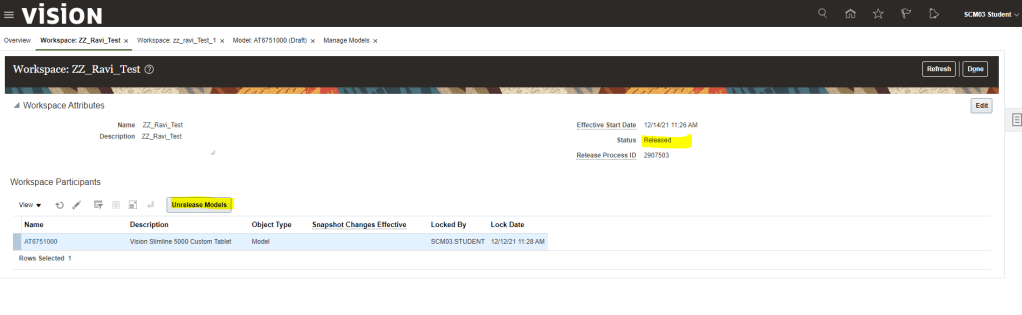
- Now verify the version of Model “AT6751000”, It will change from 4.0 to 5.0 of the workspace zz_ravi_test
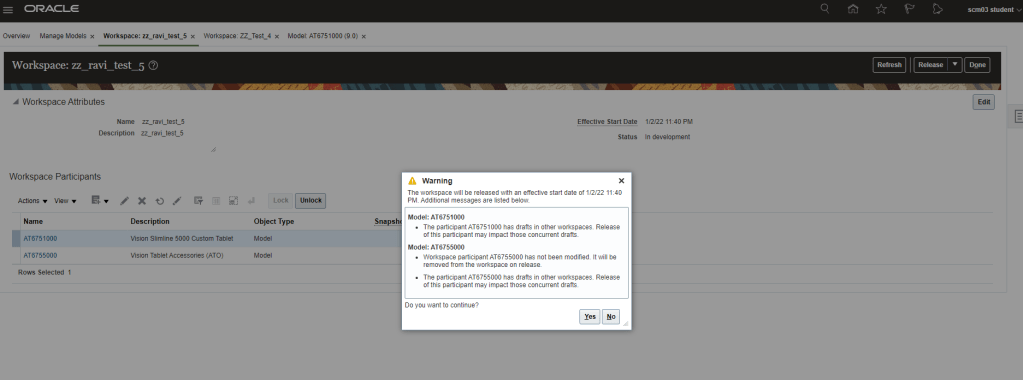
Scenario where Model with Release date of future is changed again in Work Space
- Verify the Model version “AT6751000”. Just for Note, model gets added zz_Ravi_test_5 after workspace was created

- Create workspace zz_Ravi_test_5 and add model “AT6751000”. It gives a warning that there is a release model with effective start date of future date.

- Make changes to UI with below changes
- Text “ZZ_Ravi_test_5” is added under current workspace Text ZZ_Ravi_test_5.

- Text “ZZ__Ravi_test_4” which was added under workspace ZZ__test_4 is not visible on above page as it is still not released into production .

- Save and Compile the changes.
- Test the model.
- On releasing the workspace, It gives error of future date

- Change the Effective date of Workspace zz_ravi_test_5 to future release date, release date greater than release date of workspace zz_test_4.

- Workspace gets released with Warning.

- Save and compile the changes.
- Release the Workspace.
- Workspace gets released

- Workspace zz_ravi_Test_5 gets released

- Version 10 gets created for Workspace zz_ravi_Test_5.

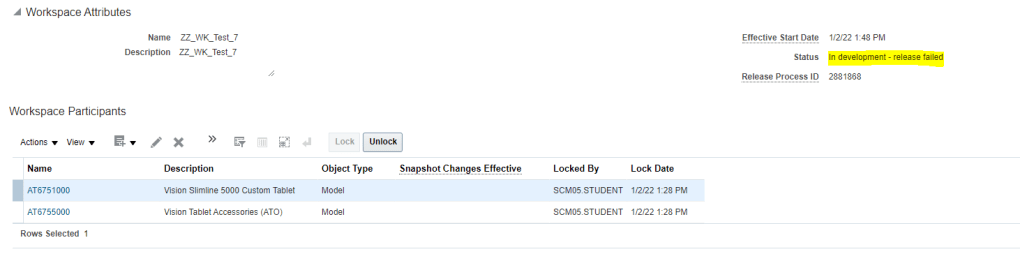
Scenario where Configurator has rule and we try to release it
- We can make modification to Model, add structures and rule.
- If rule has error

- It will allow to save and compile as well as also let Test the model with a warning.

- But if we release it, it will execute the process of release and fail with error.

- Error log depicts that there is Rule Compilation Errors.

- If we check the workspace status, its in Development-release Failed state
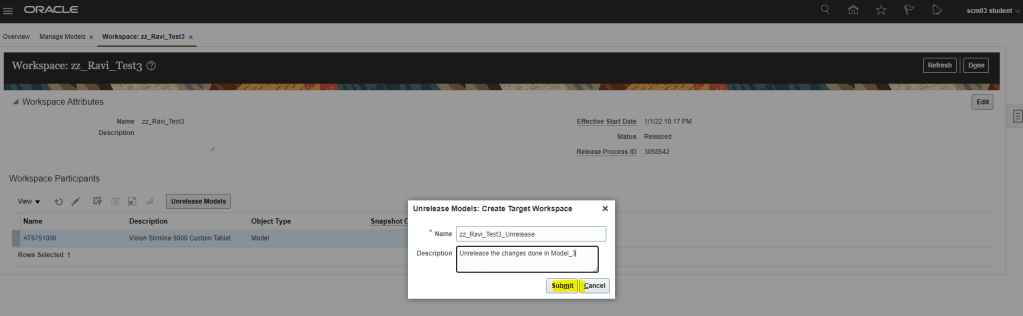
How to Unrelease a Model which was already released .
- In scenario if we have made changes in a model and would like to undo the change, Fusion gives a capability of unreleasing the model but it comes with a caveat.
- Models with release date of future can only be unreleased else it will return in error

- Click on Unrelease model.
- Enter Name and Description and click on Submit.
- Unrelease Job gets submitted
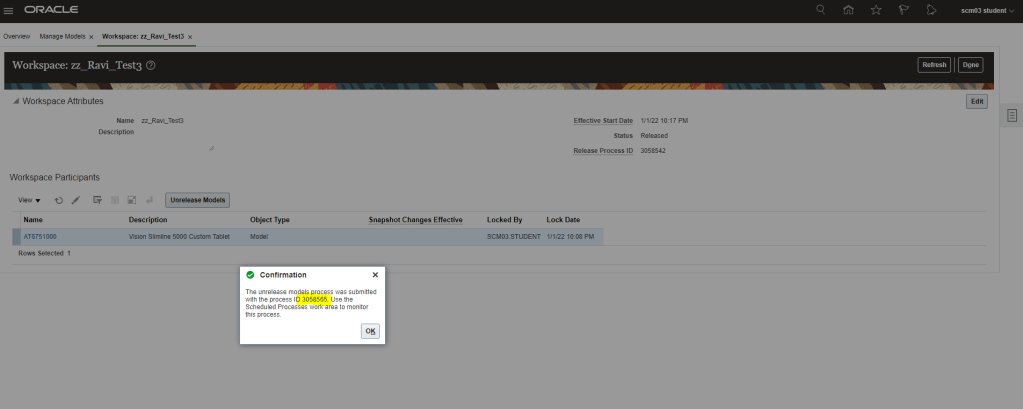
- Job resulted in Error.

- Log clearly says, Models in a workspace with future Effective date can be unreleased.

