Oracle Fusion: Drop Ship in Order management

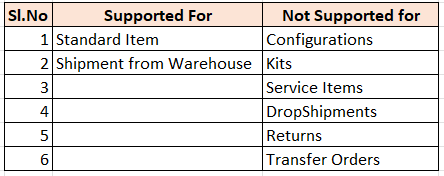
  • Dropship: It is an Order fulfillment strategy where the Seller does not keep product(s) in it inventory, but relies on suppliers or contract manufacturers to build, store and ship orders to end customers.
  • When a customer places on order for a drop shipped product, the seller issues a purchase order to the supplier/contract manufacture, for the item and provides instructions for shipping directly to the end- customer.
  • The Suppliers or Contract manufacturers ships the product and then sends Invoice to Seller as part of ASN(Advance Shipping Note).
  • Seller then send invoice to End Customer and get payment from Customer.

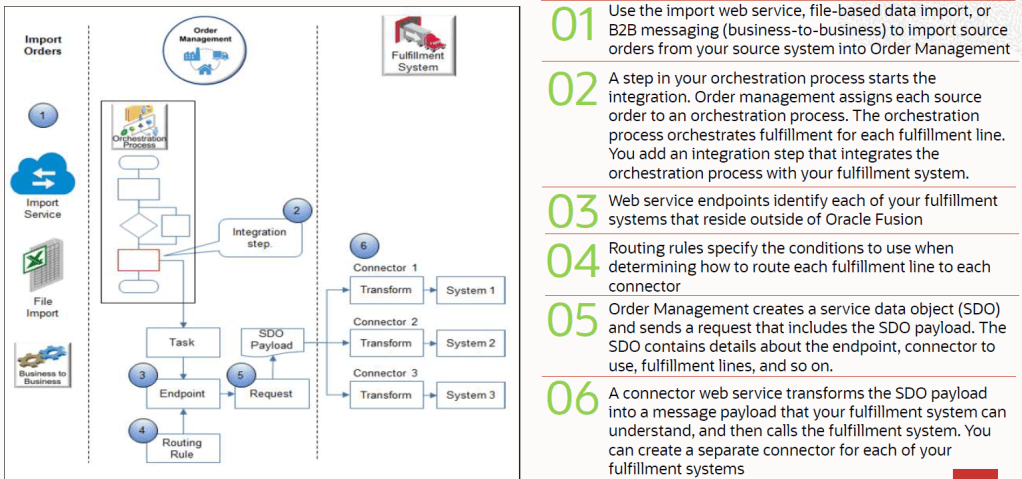
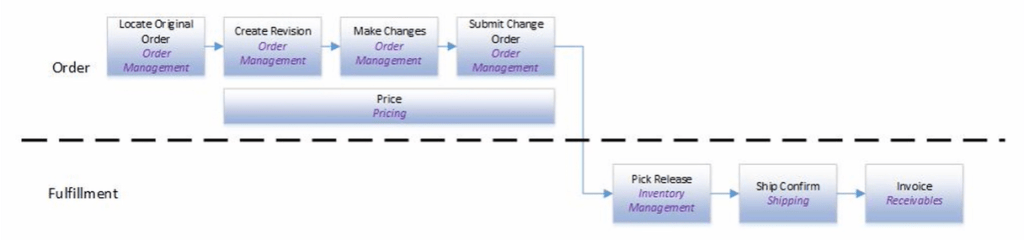
Different stages and communication happening in Drop Ship.

Stage 1: Interaction between Order Management(OM) and Global Order Promising(GOP).

  • Scheduling is the first step in Orchestration Process. OM sends request to GOP to schedule order.
  • GOP checks sourcing rules and to figure out Supplier based on suppliers lead time, supplier capacity etc. and then assign Supplier to the order and responds to OM.
  • OM knows that order will Drop Shipped.
  • Fulfillment line is set to Scheduled Status.

Stage 2: Interaction between Order Management(OM) and Supply Chain Financial Orchestration(SCFO).

  • OM sends request to SCFO for requisition Business unit and organization.
  • SCFO determine the Drop Ship financial flow.
  • SCFO returns requisition BU and Organization to OM which is used by OM for purchase request.

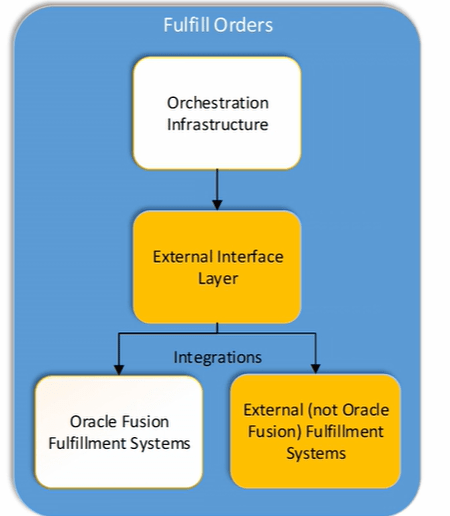
Stage 3: Interaction between Order Management, Procurement and Supplier.

  • OM sends a purchase request to Procurement which then creates a requisition.
  • Blanket Purchase agreement for Item and Supplier if exist, details are fetched from it to get the price amount etc.
  • Fulfillment line status in OM, changes from “Scheduled” to “Requisition Created”.
  • Purchase order gets created and sent to supplier for fulfillment and notification is sent to OM.
  • Fulfillment line status changes to “Awaiting Shipping”.

Stage 4: Interaction between Order Management, SFO/SCFO, Supplier and Receiving.

  • Supplier ship goods against PO and creates Advance shipment Notice(ASN).
  • Oracle fusion Receiving records a logical receipt for ASN and notifies OM.
  • OM calls “getshipment” web service to gets shipment details from receiving such as ASN, WAYBILL, Bill of Lading, Item and Shipped Quantity .
  • If entire order quantity is shipped then Fulfillment line status changes to “Shipped”.
  • SFO identifies and execute the financial flow once ASN gets created.

Stage 5: OM and Receivables.

  • OM sends requests to Receivables to bill the customer.
  • Fulfillment line status changes to “Awaiting Billing“.
  • Receivables creates invoice and notifies OM, post which Fulfillment line status changes to “Billed“.
  • OM closes the fulfillment line once the customer is billed.

Drop ship Mandatory Setups

Below are the setups to be done for Drop Ship Order Fulfillment.

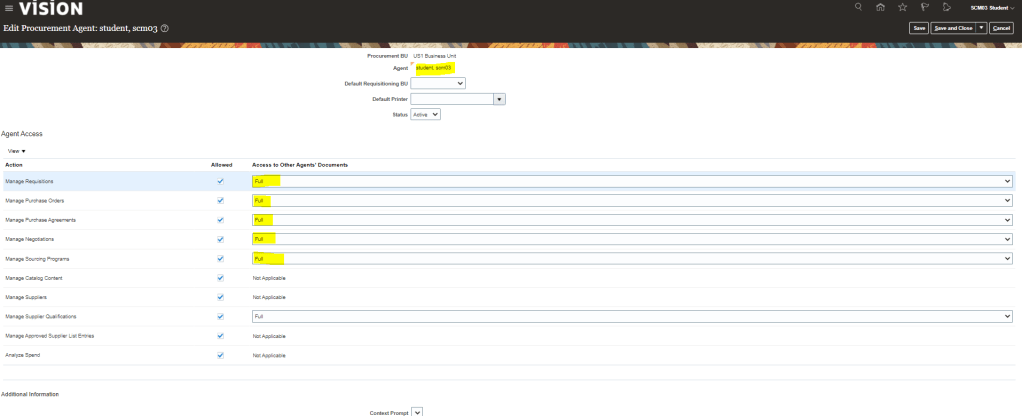
Setup 1 : Configure User profile to enable them to create BPA

  • Navigation : Setup and Maintenance -> Click on Search task next to Task Carousel -> Enter task “Manage Procurement Agent“.
  • Ensure User profile is setup else while creating Purchase Agreement, Procurement BU, will not appear.

Setup 2 : Create Blanket Purchase Agreement (BPA).

  • Navigation : Under same user profile of SCM03, Go to Procurement -> Purchase Agreement -> on right side “Create Agreement”.
  • Create Agreement for Supplier “Lagring Systems”.
  • Add Items which needs to be added as part of BPA.
  • Under Control tab, ensure below boxes are checked.
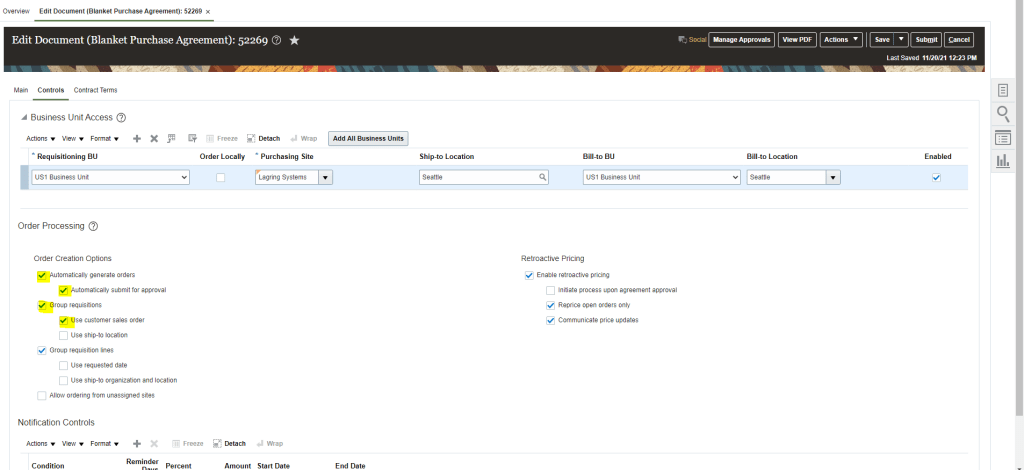
  • Click on Submit and BPA gets created
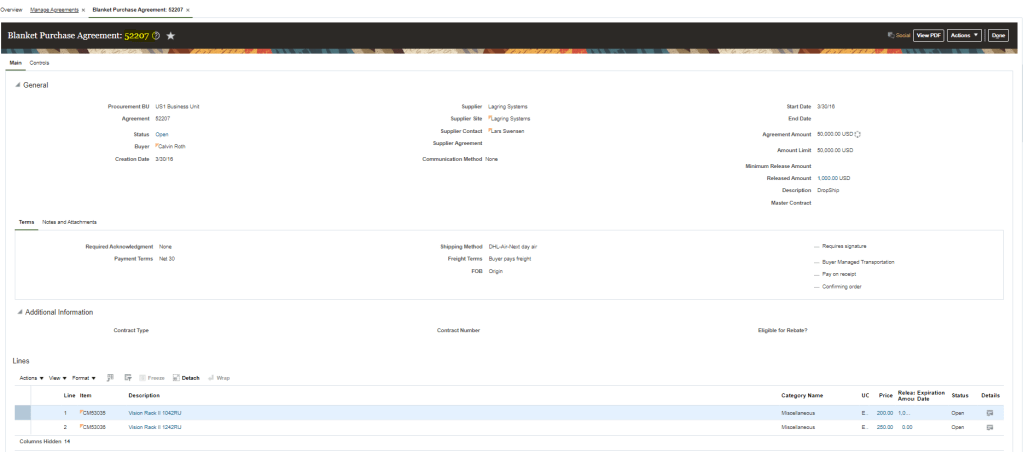
  • For our testing purpose we will be using BPA created for user profile “ROTH.CALVIN.” BPA number is “52207“.

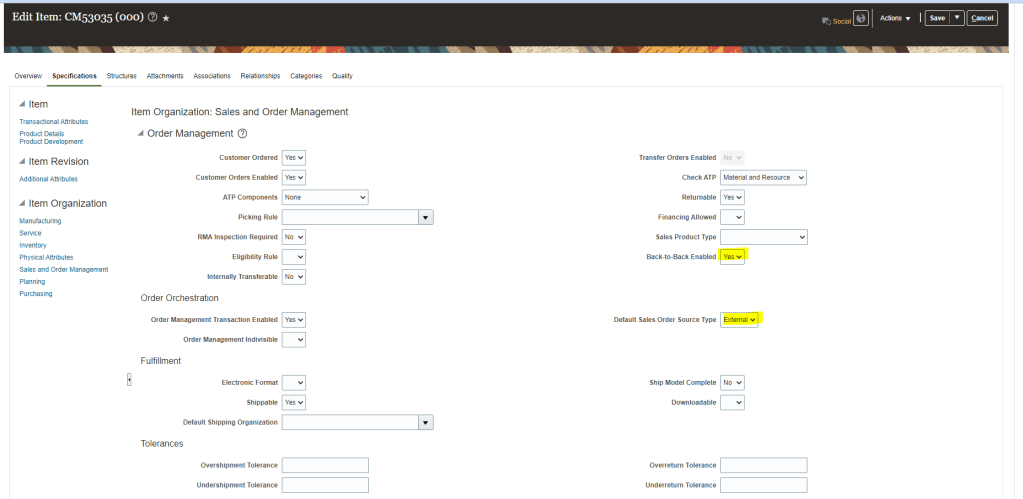
Setup 3: Item should be Setup with Back to Back Enabled as “Yes”

  • Navigation : Product Management -> Product Information Management -> Browse Item -> Specifications -> Sales and order Management
    • Back to Back Enabled should be “Yes“.
    • Default Sales Order Service Type = “Enabled”.
  • Under Purchasing Tab, ensure Purchasable as “Yes” and List price should have a value.
  • Under Planning Tab, ensure Planning Method is “MRP Planning”.

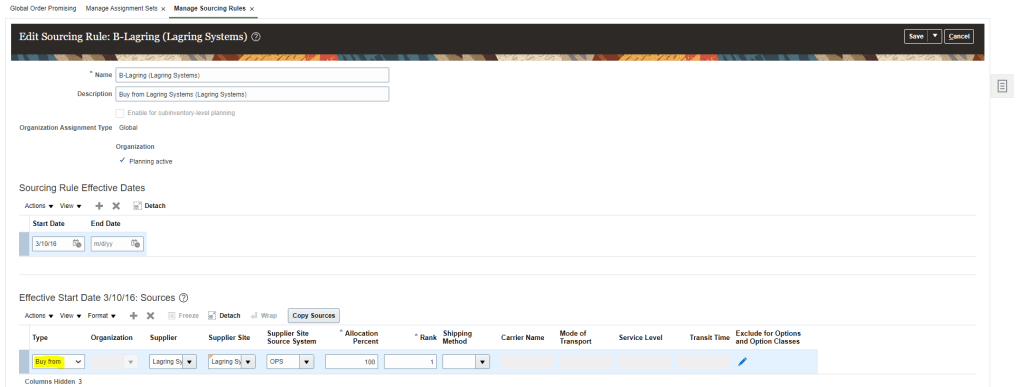
Setup 4: Global Order Promising Setup

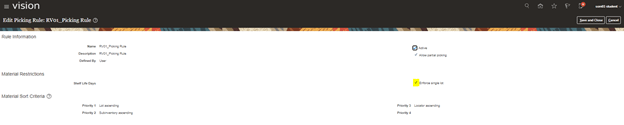
Sourcing Rule Setup.

  • Sourcing Rules should be Setup with “Buy From” the supplier.
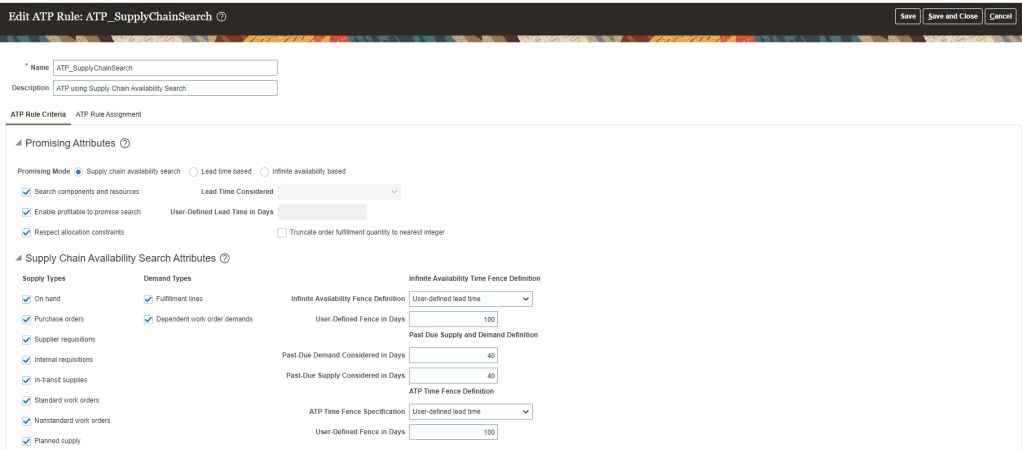
ATP rule

  • Create ATP rule which has all below setup

Assignment set.

  • Management Assignment set should be setup for the Item with Assignment level as “Item” and Sourcing rule which was setup in step 4. Due to assignment level of “Item”, Order Fulfillment becomes DropShip”. If we would had kept Assignment Level as “Item and Org”, it will become Order Fulfillment would become “Back to Back”.

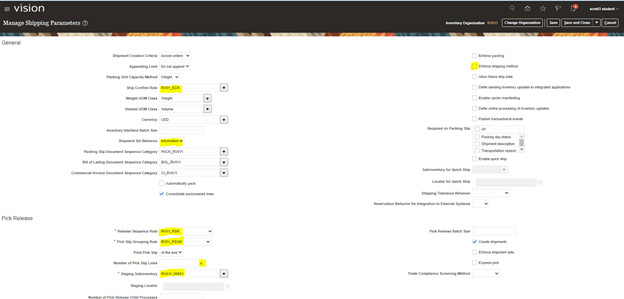
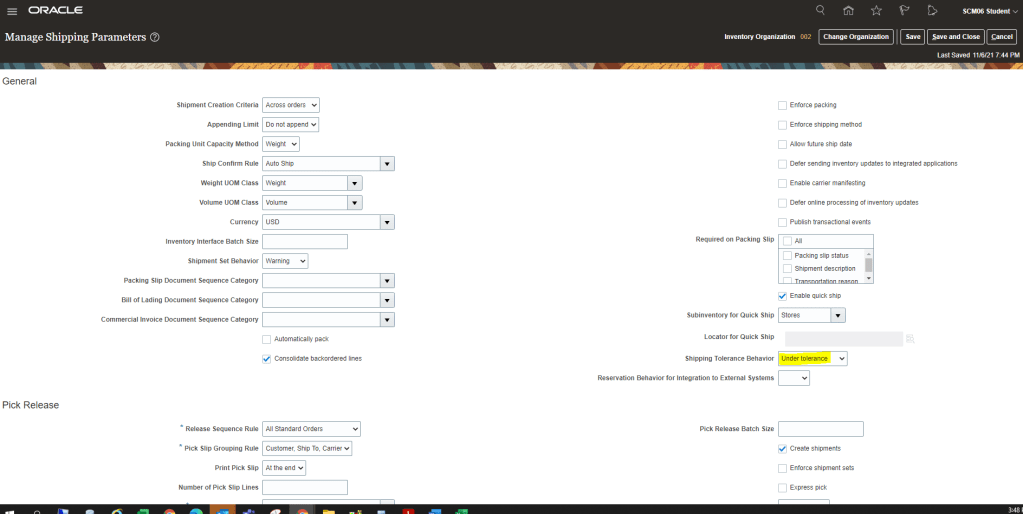
Setup 5: Preparer should be setup in Order Management Parameters

  • Ensure Preparer is setup for the Business unit where transaction is taking place.

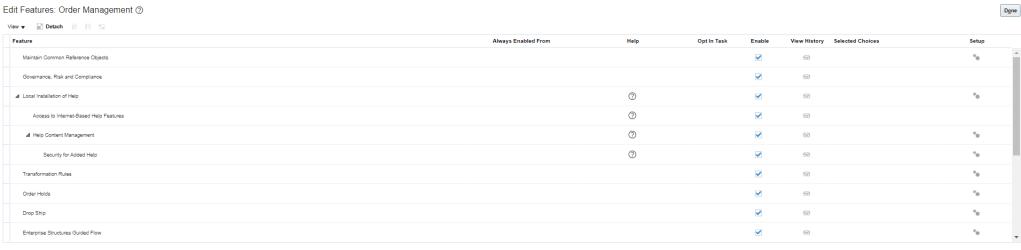
Setup 6: Sales Order Fulfillment is enabled in Procurement offerings

  • Navigation : Go to Setup and Maintenance -> select offering as Procurement -> Actions -> Change Feature Selection
  • Ensure Customer Sales Order Fulfillment is enabled.

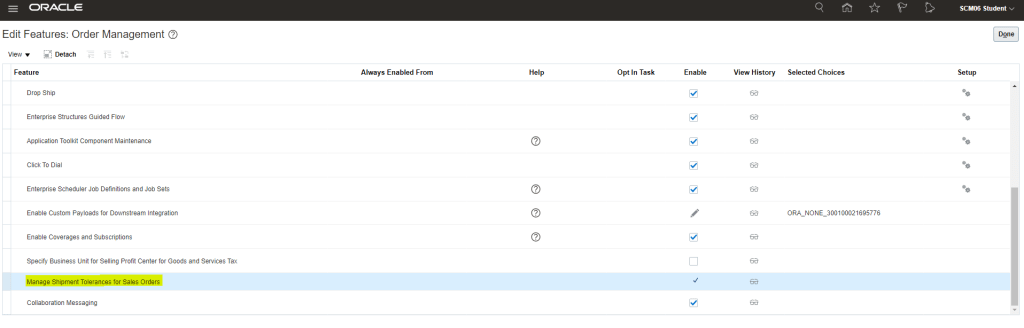
Setup 7: Drop Ship should be enabled under Sales Order offerings

  • Navigation : Go to Setup and Maintenance -> select offering as Sales Order-> Actions -> Change Feature Selection.
  • Ensure Drop Ship is enabled.

Setup 8: Drop Ship Financial setup

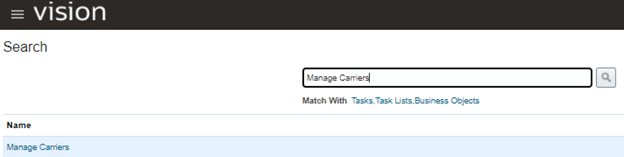
  • Navigation : Go to Setup and Maintenance -> select task : “Manage Drop Ship Financials”.
  • Ensure setup exist.

Drop Ship Creation Process

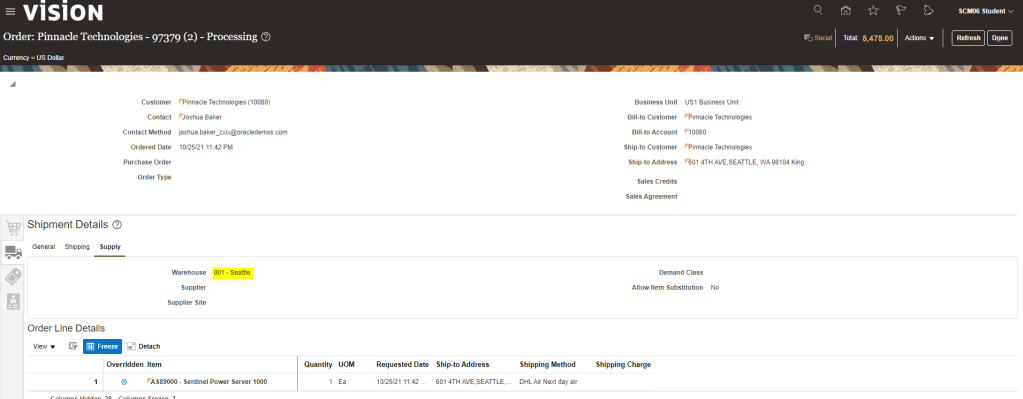
Step 1: Create Sales Order

  • Create sales order for item “CM53036”
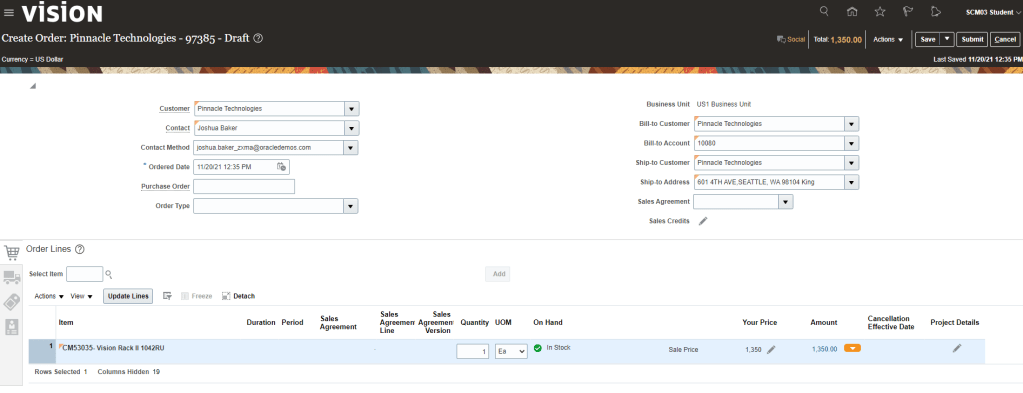
  • Set Receive date is 10 calendar days from today
  • Switch to Fulfillment View
  • Fulfillment Status is first set to “Not Started” thereafter it changes from Not Started -> Scheduled -> Requisition Created and then Awaiting Shipping.
  • Under fulfillment line view -> Drop Shipment -> Supplier Name is set to “Lagring System”
  • Now fulfillment line Status change to “Awaiting Shipping”.
    • Drop Shipment PO number gets created
    • Supplier Remains the Same
    • Buyer Gets assigned
    • Purchase Requisition Number gets created
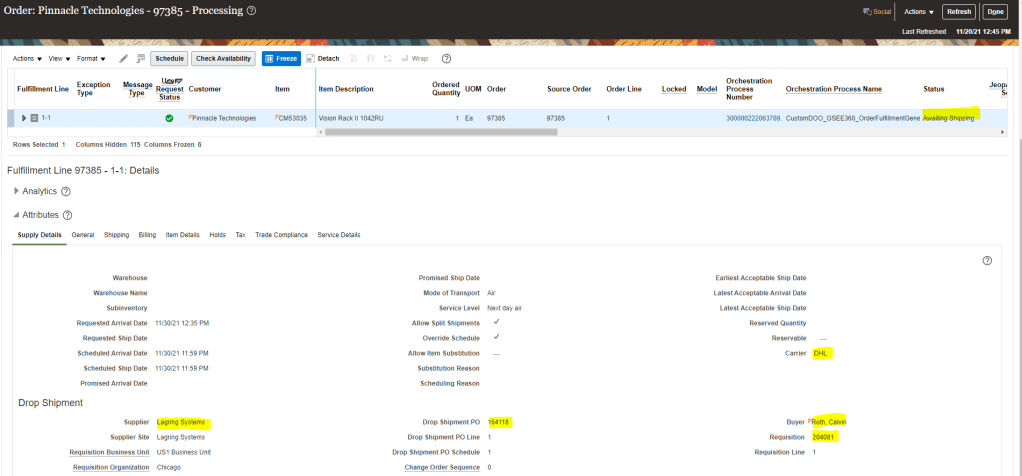
  • Click on Orchestration Process number to see the progress of each line.
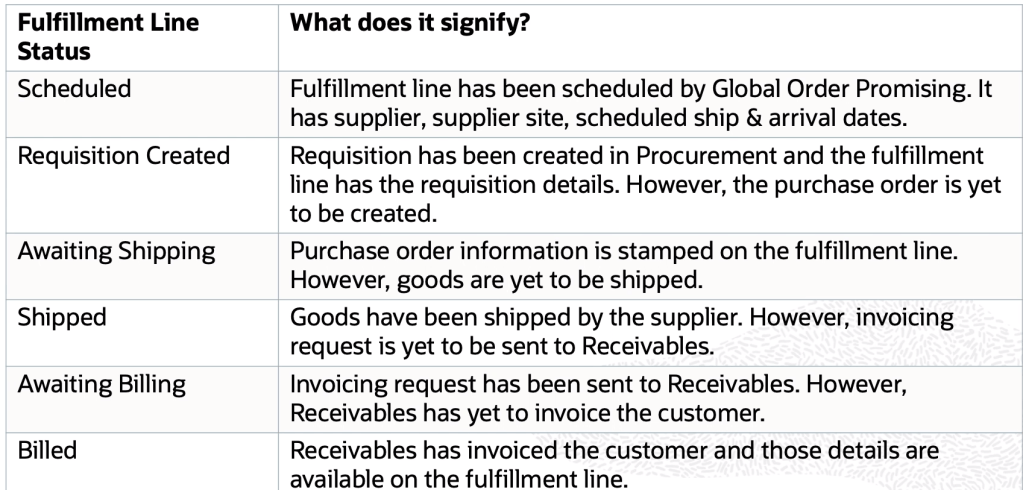
  • Below are different statues of fulfillment lines and what they signifies.

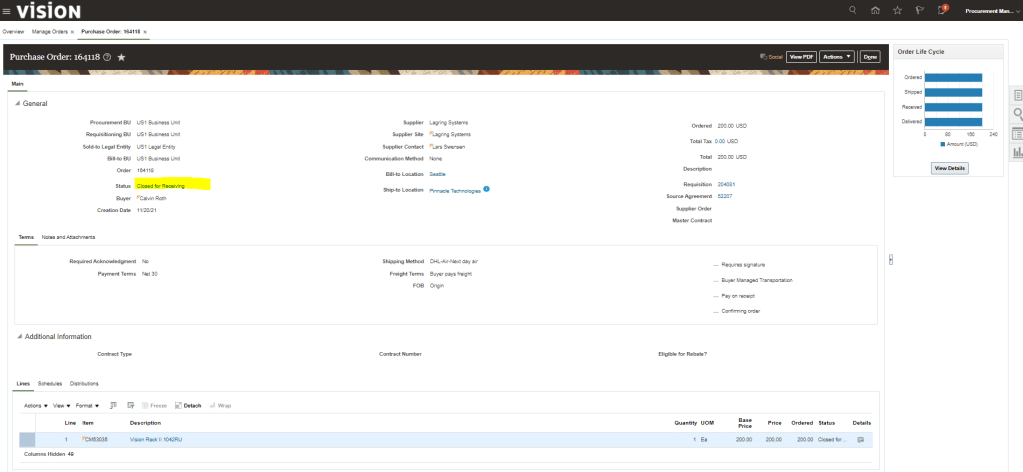
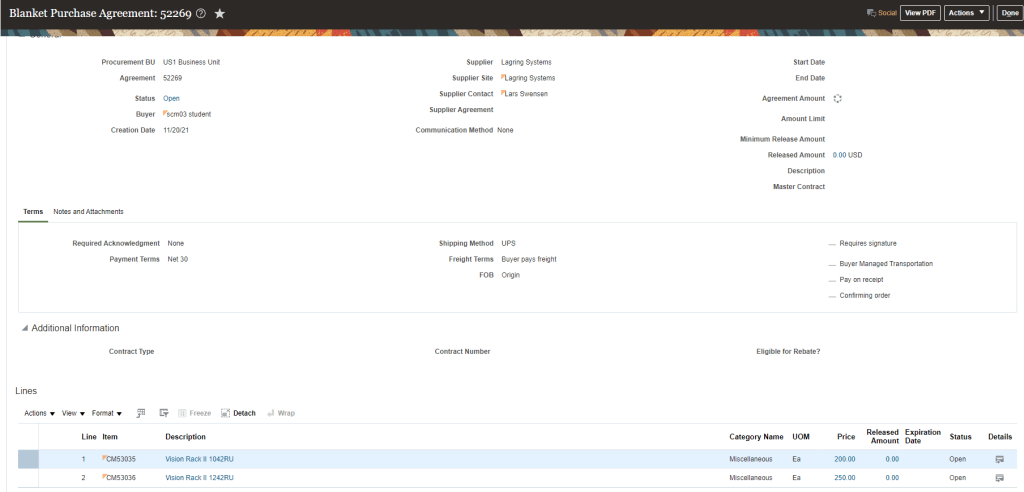
Step 3: Verify status of Purchase order

  • Login as Calvin Roth to see details of Purchase order and Purchase Requisition
  • Screenshot of Purchase Order

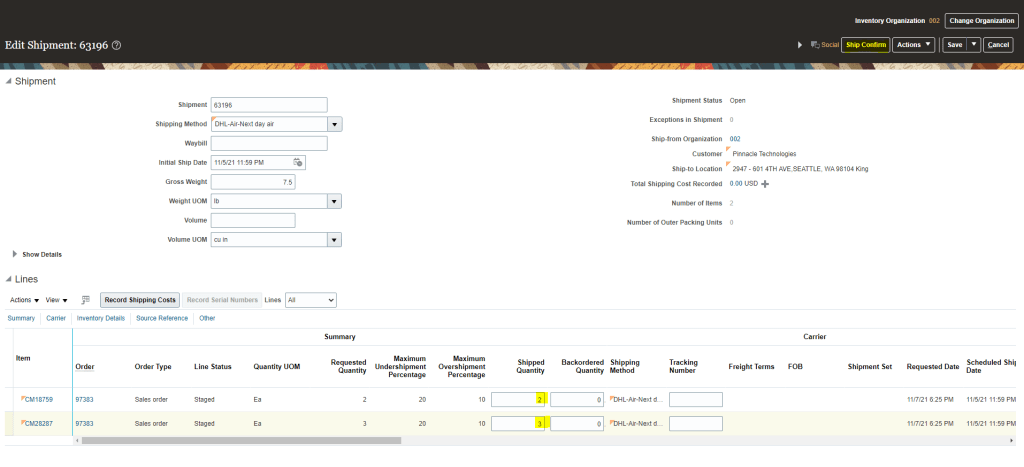
Step 4: Create ASN (Advance Shipping Notice)

  • Logout and Login as supplier “Lars Swensen”.
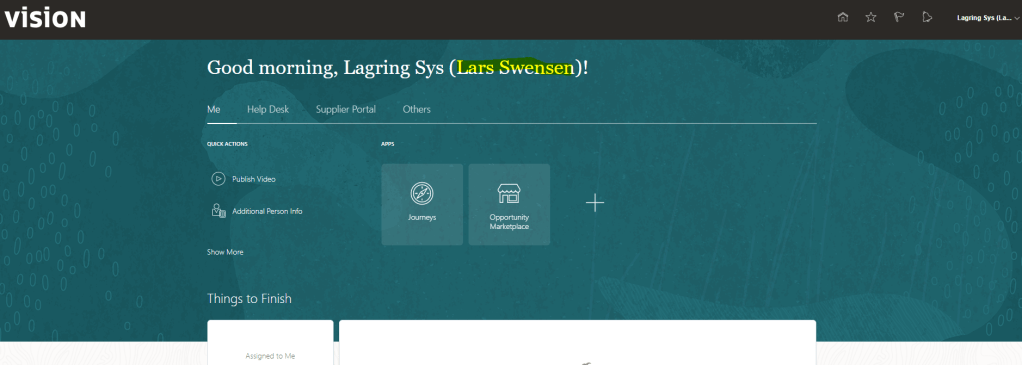
  • Go to Supplier Portal and See Pending Action
  • Click on Create ASN below Shipments Tab.
  • Enter details for shipment and click on Submit.
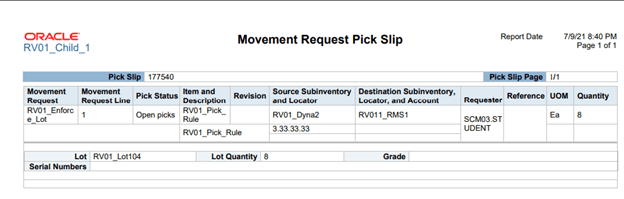
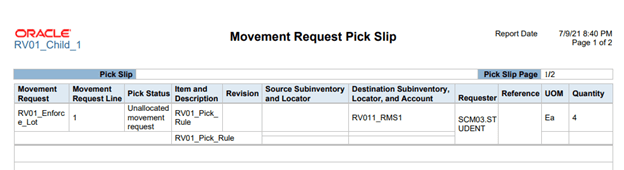
  • This is how a sample Packing Slip looks.

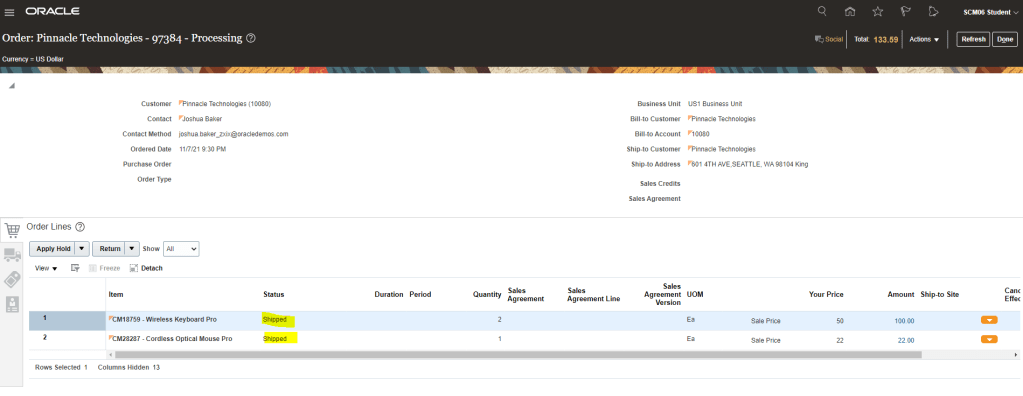
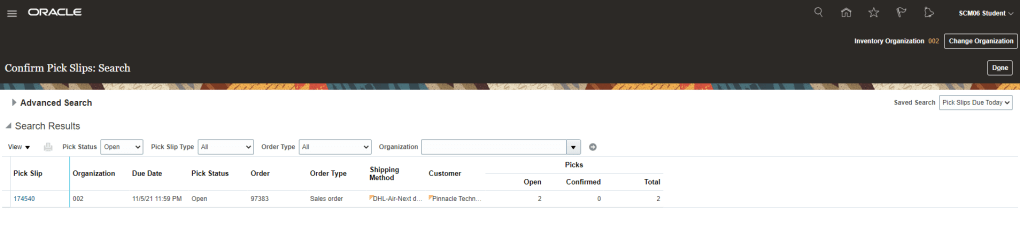
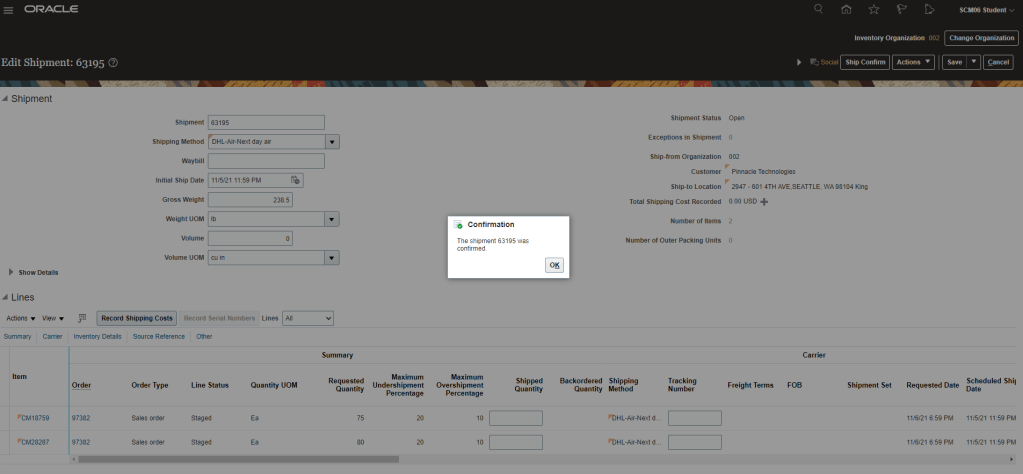
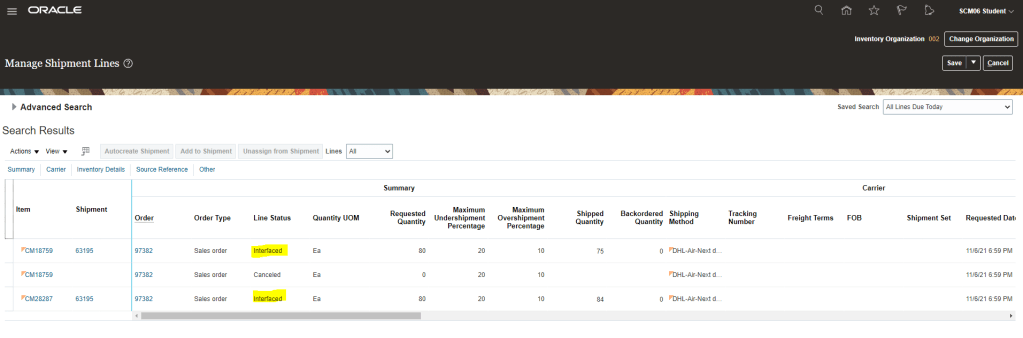
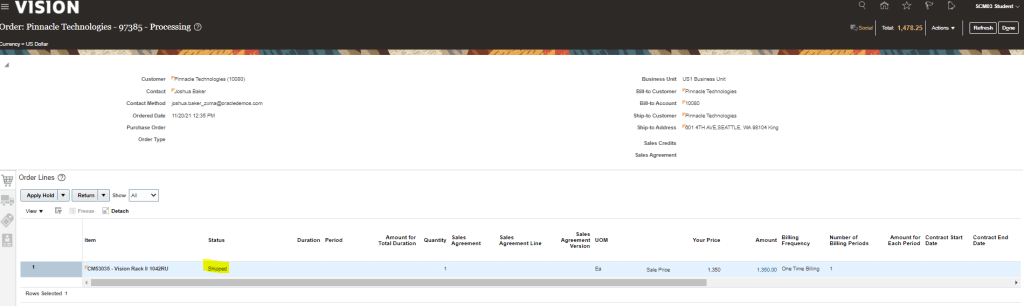
Step 5: Verify status of Sales Order

  • Log out of System, Clear Cache and then Login as SCM03.
  • Status first become “Shipped”.
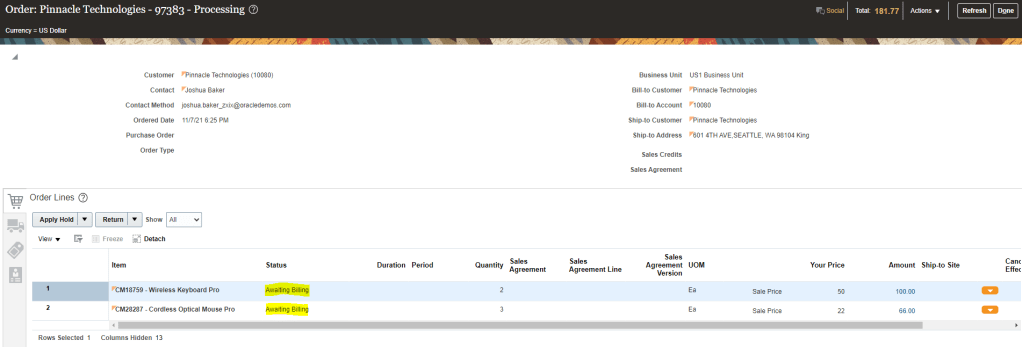
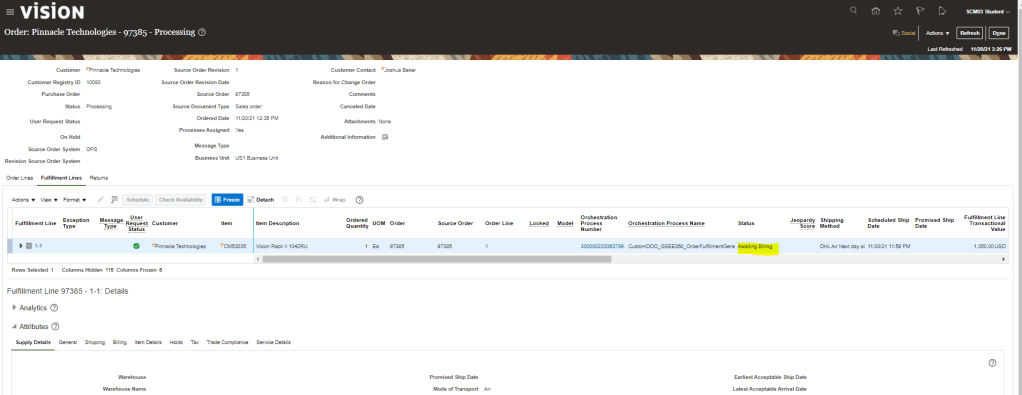
  • Then status changes to “Awaiting Billing”
  • Status of Fulfillment Line also becomes “Awaiting Billing”
  • Orchestration Process status details to become “Shipped“.

Step 6: Verify status of Purchase Order

  • Login as user profile “Calvin Roth” to verify status of Purchase order. It should be in “Closed” status.

Oracle Fusion: Quick Shipment in Order Management

This post is in continuation to Ship Confirm Process but with a change where in Business do not want Picking to take place and as soon as Orders are released from Order Management, Shipping should take place.

This generally happens when shipment process happens in bulk which enhances the performance or so called operational efficiency.

Mandatory Setups for Quick Ship Process

Setup 1 : Ensure Pick Confirmation is unchecked in Organization where we do not want Picking to happen.

  • Navigation: Go to setup and Maintenance -> Enter task “Manage Inventory Organization Parameters”.
  • Go to tab Item Sourcing Details. Under Picking Defaults -> Ensure “Pick confirmation required” is not checked. i.e. we do not want picking to happen in this warehouse.

Setup 2 : Ensure Quick Ship is enabled in Shipping Parameters.

  • Navigation: Go to setup and Maintenance -> Enter task “Manage Shipping Parameters”.
  • Ensure “Enable quick Ship” is checked.
  • Subinventory for Quick Ship should be filled with Subinventory from where shipment happens.
  • Please Note: i.e this Subinventory should have all necessary quantity else it will be difficult for warehouse operator to manually change subinventory at time of Ship Confirm.

Setup 3 : Ensure Quick Ship is enabled in Shipping Parameters.

  • Navigation: Go to setup and Maintenance -> Enter task “Manage Ship Confirm Rules”.
  • For rule “Auto Ship“, Ship with section is defaulted for “Ship quantities”. In case we have Subinventory populated under “Subinventory for Quick Ship” in Setup 2, we should change it to “Requested quantities”.

Setup 4: Verify that Subinventory has enough stock of the Item which needs to be quick shipped.

  • Go to Supply Chain Execution -> Inventory Management -> Manage Item Quantities
  • Enter Item which we are going to order.
  • Verify we have On Hand quantity in necessary Subinventory “Stores”.

Process flow for Quick Ship

Step 1 : Create order

  • Create order and ensure Line status as Awaiting Shipping.

Step 2: Create Shipment

  • There are two ways to create shipment for any order.
    • Use Auto create shipment “OR”
    • Run ESS job
  • Using Autocreate Shipment
    • Go to Supply Chain Execution -> Inventory Management -> Task Panel on Right -> Go to Shipment -> Select Shipment Lines.
    • Enter Order Type, Order Number.
    • Click on Autocreate Shipment.
  • Using ESS job
    • Go to Tools -> Scheduled Process -> Enter Job “Create Shipments”
    • Enter Ship-from Organization “002”.
    • Create Shipment = “Yes”.
    • Shipment Creation Criteria = “Across Orders”.
    • Line Status = “All”
    • Submit the Job
  • Job completes and Shipment gets created.
  • For both lines
    • Shipment Number gets generated “63203”
    • Quick Ship Flag is NOT enabled for both the lines
    • Line status is “Ready to Release Status” so it is ready to be shipped.

Step 3: Stage the Shipment Lines.

  • Enter shipped quantity for both the lines
  • Select both lines, go to Actions and Click on Stage Lines.
  • Line status will be changed to Staged and Quick Ship Status will become enabled

Step 4: Ship Confirm Shipment Lines.

  • Select both lines, go to Actions and Click on Ship Confirm.
  • Line status will be changed to “Shipped“.

Step 4: Verify line Status of each Order Line.

  • Status of each Order lines become “Shipped” and later on “Awaiting Billing”.
  • Note: User can also use “Perform Shipment” FBDI in case you want to do above steps for multiple order in batches.

Oracle Fusion: Shipping Process Flow in Order Management

What is Shipping

Shipping is one of the essential process where in Order is shipped from warehouse. Warehouse receive the total quantity of order in form of Shipment number. Each shipment could

  • Generated for all lies of one single order
  • OR single order could be split into multiple shipments based on either schedule ship dates for each lines, quantity or availability of Stocks for each lines
  • OR many orders clubbed into one shipment based on shipping address, schedule ship dates or item

Below is the description of Ship Confirm process flow which happens in warehouse.

Shipping in Order Management can happen Internally within fusion or Externally with other Fulfillment System

  • Shipment process happening internally within Fusion.
  • Shipment process happening outside fusion.

Different Roles in warehouse for Shipping

Within warehouse each person has designated roles with designated function to perform.

Trade Compliance

Shipping process needs to follow trade compliance which needs to stick to Government and Company rules and regulations.

Necessary Setups for Shipment Process.

Step 1: Create Release Sequence Rule

It is used to determine sequence of pick release of all orders from Order Management. Orders are pick released in batches and needs to be sorted based on certain criteria. Release sequence rules determines those criteria.

  • Navigation -> Go To Setup and Maintenance -> Click on Task Pane Carousel -> Click on Search.
  • Enter Task “Manage Release Sequence Rules”.
  • Click on + Button.
  • Choose Parameter based on which you want Incoming transaction to be Sorted and in which order.
  • In below case its sorted based on “Sales Order” in Ascending Order.

Step 2: Create Pick Slip Grouping Rule

It is used to determine on what basis Order needs to be grouped. Be it at destination location or customer or Order Level.

  • Navigation -> Go To Setup and Maintenance -> Click on Task Pane Carousel -> Click on Search.
  • Enter Task “Manage Pick Slip Grouping Rule”

  • Click on + Button.
  • Pick slip is grouped based on Order Number.

Step 3: Create Ship confirmation Rule.

It is used to determine on what basis Order needs to be grouped. Be it at destination location or customer or Order Level.

  • Navigation -> Go To Setup and Maintenance -> Click on Task Pane Carousel -> Click on Search.
  • Enter Task “Manage Ship Confirm Rules”

  • Click on + Button.
  • Ensure Defer Sending Updates is marked Unchecked.

Step 4: Create Shipping Parameters at Organization level.

It is Organization Level entry setup which uses setup created from Step 1 to Step 3. Using Shipping Parameters

  • Navigation -> Go To Setup and Maintenance -> Click on Task Pane Carousel -> Click on Search.
  • Enter Task “Manage Shipping Parameters”
  • Create Entry with Highlighted fields as Mandatory entry. Ensure to uncheck “Enforce Shipping Method” else Transit times become mandatory.
  • At Source Level RV011

Step 5: Create Carrier

  • Navigation: Go to Others -> Setup and Maintenance -> Manufacturing and Supply Chain Materials Management -> Enter Task “Manage Carriers”.
  • Go To Actions -> Enter Carrier Name “RV01_Carrier”. Ensure Active should be Enabled.
  • Go to Shipping Method -> Actions -> Add row -> Enter Service Level “2Day”, Mode of Transport “Air”, Active “Yes”
  • Add Child organization to the Carrier.

Shipment Process Life Cycle

Step1 : Create Order

Ensure Status of each line is Awaiting Shipping.

Step 2: Create Pick Wave

  • Navigation: Go to Supply Chain Execution -> Inventory Management -> Task Panel on Right -> Go to Shipment -> Create Pick Wave
  • Enter Order Type, Order Number
  • On Selection Criteria -> Click on Show More -> Enter Order type and Number if not added -> click on Options
  • Click on AutoConfirm Picks
  • Click on Release Now
  • Pick wave ID, no of pick slip has generated will get displayed
  • Go To scheduled Process, Pick Release document should be running and finally has to be in Succeeded Status
  • Click on View log to see the logs
  • See logs of Print Pick Slip Report
  • Go to Shipment section, enter order number and see the shipment id. At line level , status should be Staged.

Step 3: Confirm Pick Wave

  • Navigation: Go to setup and Maintenance -> Enter task “Manage Inventory Organization Parameters” -> Item Sourcing Details. Under Picking Defaults -> Pick confirmation required should be True
  • Go to Supply Chain Execution -> Inventory Management -> Task Panel on Right -> Go to Shipment -> Confirm Pick Slips
  • Enter Order Type , Order Number
  • Pick Slip screen will appear
  • After checking on box “Ready to Confirm” we have two options either choose “Confirm Pick slip” or “Confirm and Go to Ship Confirm”.
  • Lets select “Confirm Pick Slip”. Pick slip number “174540” gets confirmed.
  • Go To scheduled Process, Pick Release document should be running and finally has to be in Succeeded Status
  • Click on View log to see the logs
  • See logs of Print Pick Slip Report

Step 4: Ship Confirm the order

  1. Go to Supply Chain Execution -> Inventory Management -> Task Panel on Right -> Go to Shipment -> Select Shipment Lines.
  2. Enter Order Type, Order Number
  3. Once Ship confirm screen appears, enter Shipped Quantity. There is a different flavor of entering Shipped quantity which is different from Order Quantity, its called Shipped Tolerance.
  4. On right hand corner there is option for Ship Confirm
  5. Click on Ship Confirm and press enter.
  • Shipment number 63196 gets created.

Step 4: Verify Status of Order Line

  • After shipment, Order line status will be “Shipped” and later on it will change to “Awaiting Billing“.
  • After certain moment it will change to “Awaiting Billing“.

Oracle Fusion : Shipment Tolerance for Sales Order.

Due to business Reasons we can ship more or less than the order quantity, this is where Shipment Tolerance comes into picture. Shipment Tolerance specify a percentage over or under the order quantity that can be shipped for an item on Order Line.

Shipping uses tolerance to determine the extent of the over/under shipment quantity allowed. Based on Shipping results, Order Management determines whether an order fulfillment is split or considered fulfilled.

Business Benefits of Shipment Tolerance

  • Allow for variability in supply chain.
  • Eliminates the time taken to perform manual workarounds.
  • Contributes to on-time delivery.
  • Enhances customer satisfaction.

Shipment Tolerance can be done through following Channels

  • Order Management Create Order Page
  • File Based Data Import
  • EDI
  • Order Import Web Services(Including REST)

Shipment Tolerance is Supported/Not Supported for following

Basic Setups for Shipment Tolerance

Step 1: Enable Shipment Tolerance if not already Enabled.

  • Navigation: Go to Others -> Setup and Maintenance -> Actions -> Select Offering -> Select Order Management -> Opt-In Features. Select Features for Order Management. Verify if Enable check box is selected for “Manage Shipment Tolerance for Sales orders“.

Step 2: Enable Shipment Tolerance if not already Enabled.

  • Navigation Go to Others -> Setup and Maintenance -> Order Management -> Enter Task “Manage Order Management Parameter”.
  • Select Source for Shipment Tolerance Values. Ensure Business Unit is “All Business Unit”
  • Select “Default Value for Undershipment Tolerance” and set it to “20” and for “Default for Overshipment Tolerance” set it to “10”,
  • Note : Tolerance Values cannot be modified in an Order Revision.
  • Any update done for the two values will only effect orders created after it. Shipment Tolerance for Existing orders cannot be updated.
  • Users will be able to Override Partial Picking Restrictions for Under-Tolerance behavior.
  • It also supports Shipping over the Requested Quantity using Quick-Ship.

Step 3: Billing

  • Navigation Go to Others -> Setup and Maintenance -> Order Management -> Enter Task “Manage Order Management Parameter”.
  • Select Quantity to Invoice for Overshipment Values. Ensure Business Unit is “All Business Unit”
  • Select whether Quantity to Invoice for Overshipment should be Shipped Quantity or Ordered Quantity.

Step 4: Shipping Parameter Shipping Tolerance Behavior is “Under Shipment”

  • Navigation Go to Others -> Setup and Maintenance -> Supply Chain Execution -> Enter Task “Manage Shipping Parameters”
  • There are two options for Shipping Tolerance Behavior , Under Tolerance and Requested Quantity
  • Verify that Shipping Tolerance Behavior is set to “Under Tolerance“.


Perform Full Cycle of Order Management to test Shipping Tolerance.

Step 1 : Create Order and ensure it goes to Awaiting Shipping.

Step 2 : Create Pick Wave for Order 97382.

  • Navigation : Go to Supply Chain Execution -> Inventory Management -> Right Hand Corner Go to Shipments -> Select Create Pick Wave.
  • Enter Order Number “97382” and click on Release Now.
  • Pick wave “232899” gets created.

Step 3 : Verify Shipment Lines for Order 97382.

  • Navigation : Go to Supply Chain Execution -> Inventory Management -> Right Hand Corner Go to Shipments -> Select Manage Shipment Lines.
  • Enter Order Number to see shipment created and also verify Maximum Undershipment and Overshipment Percentage.

Step 4 : Pick Confirm Shipment Lines for Order 97382.

  • Navigation : Go to Supply Chain Execution -> Inventory Management -> Right Hand Corner, Go to Shipments -> Select “Pick Confirm”.
  • Enter Order Number to see Pick Slips.
  • By default Picked Quantity value will be what was Ordered Quantity.
  • Change Picked Quantity for both the lines, for one its under shipped( 75 instead of 80) and other line is Over shipped(84 instead of 80).
  • Select “Ready to confirm” line for both lines and Click on Confirm and Go to Ship Confirm

Step 5 : Ship Confirm Shipment Lines for Order 97382.

  • Although we will reach directly to Ship confirm screen from above steps but in case we want to come to this screen then follow below steps
  • Navigation : Go to Supply Chain Execution -> Inventory Management -> Right Hand Corner, Go to Shipments -> Select “Manage Shipment Lines”.
  • Enter Order Number to see Shipment Lines.
  • Click on Ship Confirm.
  • Ship confirm happens
  • Verify that shipment lines are in “Interfaced Status” and Shipped quantity is what we selected above.

Step 6 : Verify Order lines Status is Awaiting Billing and Fulfillment lines remains intact.

  • Verify that Status of Order line is ” Awaiting Billing”.
  • Also verify that there is no split of Fulfillment lines due to change in Picked/Shipped Quantity

Step 7 : Generate Invoice for the Order line.

  • Go to Tools -> Scheduled Process -> Select Process “Import AutoInvoice”
  • Enter Values
    • Business Unit : “US1 Business unit”.
    • Transaction Source : “Distributed Order Orchestration”
    • From Sales Order number : “97382”
    • To Sales Order number : “97382”
  • Click on Submit
  • Order gets Invoiced.

Step 8 : Verify Order lines Status is Closed and check Invoice number of Order.

  • Verify Status of Line is “Closed” and do see Amount of each Order line.
  • Now verify Invoice amount, Fulfilled quantity for each line.
  • Navigation: Switch to Fulfillment View -> Fulfillment Tab -> select each fulfillment line -> Actions -> View fulfillment details
  • For Fulfillment Line 1 verify below details
    • Order Quantity = 80
    • Fulfilled Quantity = 75
    • Invoice amount = 4106.25
  • For Fulfillment Line 2 verify below details
    • Order quantity = 80
    • Fulfilled Qty = 84
    • Invoice Amount = 2023.56

Step 9 : Verify total Invoice amount to see its billed for Shipped quantity and not actual order quantity.

  • Navigation : Go to Receivables -> Enter Invoice number and see the invoice amount for the order

Apologies : My instance does not have access to Receivables module so I cannot show total invoice amount but as you could have seen in step 8, Total invoice amount will be different from Total order amount based on sum total of Line 1 and Line 2.

Oracle Fusion: External Integrations in Order Management

Order management can be integrated with both upstream and downstream systems like fulfillment and billing. Order Management comes predefined with integrations to other Oracle Cloud services. To integrate with non Oracle systems integrations need to be built.

External Integration Flow and Setup.

Platform that enables integrations between Oracle Cloud applications and External applications uses SOAP services and Business Events exposed by Oracle Cloud Applications

  • Services
    • OrderInformationService
    • OrderFulfillmentResponseService
  • Events
    • OrderStatusUpdated event
    • SalesOrderNotification event

Step 0 : Different Roles for Integration process

  • For Upstream Integration :
    • Manage Order Specialist.
  • For Downstream Integration :
    • Manage Orchestration Generic Web Service.
    • Manage Orchestration Order Activity Interface Web Service.
    • Manage Orchestration Order Fulfillment Interface Web Service.
    • Manage Orchestration Order Modification.
    • Manage Orchestration Purchasing Interface Web Service.
    • Manage Orchestration Order Receiving Interface Web Service.
    • Manage Orchestration Order Shipping Interface Web Service.
    • Manage Orchestration Order Template interface Web Service.
    • Manage Web Service Interface to Transportation Data for Sales Order.

Step 1: Manage Task Types

  • Navigation Go to Others -> Setup and Maintenance -> Order Management -> Enter Task “Manage Task Types”
  • Go to Actions -> Click on Add Custom-> Enter Task Type and Description
  • Under Detail Section -> Services gets added by default.
  • Please note : Task type and Name of Services will be used in Orchestration Steps.

  • Under Detail Section -> go to Task tab and add Necessary Task.
  • Click on Save and Close

Step 2: Orchestration Process Steps

For external fulfillment integration custom task steps need to be added to the orchestration process to invoke the integration. Task type and services created in previous step will be used in Orchestration step

  • Navigation : Go to Others -> Setup and Maintenance -> Order Management -> Enter Task “Manage Orchestration Process Definitions”
  • Go to Edit and then under Process Details -> Step Definition > Enter Step Name ” Pick to be done from Ravi”
  • Under Task Type , Select Task, created in Manage Task Type , “Pick_From_Ravi”.
  • Select Task ,created in Manage Task Type, “Pick Carton”.
  • Select Service, created in Manage Task Type, “Pick_From_Ravi_Create”.
  • Click on Save and close.
  • Go to Actions and follow general steps of Orchestration Process Definition Deployment. For more detail click on link.

Step 3: Connector Setups

Connectors need to be defined to allow capturing of external systems details.

  • Navigation : Go to Others -> Setup and Maintenance -> Order Management -> Enter task “Manage Trading Community Source Systems“.
  • Go to Actions under Search Results -> Click on Create -> Create Source System
  • Enter value Code = “CSS01”
  • Type = “Spoke”. Valid type values are
    • Spoke” for Legacy System
    • Purchased” for Data from Third Party provider
  • Enable for Order Orchestration and Planning. Other Valid values are
    • Enable for Items -> It is used for Import Data for Items
    • Enable for Trading Community Members -> It is used to import data for the trading Community. It Establishes the Original System Unique Reference(OSR) for customer Entities.
    • Enable for Order Orchestration and Planning -> it is used to import data for Order Orchestration
    • Enable for Assets -> It is optional and used to import data for assets
  • Click on Save and Close and then Done.

Step 4: Manage Planning Source Systems

  • Go to Others -> Setup and Maintenance -> Supply Chain Planning -> Enter task “Manage Planning Source Systems“.
  • Under Source Systems Tab -> click on Actions -> click on Create
  • Code = “CSS01”. Code created in Step 3.
  • Time Zone = “US Eastern Time”
  • Order Orchestration Type = select Fulfillment from dropdown
    • If we choose Order Capture, it specify the source system as an order capture system that sends source orders to Order Management. It is typically chosen with Import Web Service
    • If we choose Fulfillment, Order management of Source System will send fulfillment requests and receives fulfillment replies.
  • Check Enable data cross-reference if Source system expects Order Management to perform cross-reference.
    • In case if Source system and Oracle fusion uses same values then do not Check, “Enable data cross-reference” . These values should be setup in fusion.
  • Check Collections Allowed.

Step 4.1 : Manage Upstream and Fulfillment Source System

  • Navigation : Go to Others -> Setup and Maintenance -> Order Management -> Enter Task “Manage Upstream and Fulfillment Source Systems
  • Under Destination System -> Go to Actions -> Create Code
  • Under Source System -> Go to Actions -> Create Code
    • Enter Code = “CSS02”
    • Time Zone = “US Eastern Time”
    • Version = “Others”
    • Order Orchestration type = “Order Capture”.
      • If we choose Order Capture, it specify the source system as an order capture system that sends source orders to Order Management. It is typically chosen with Import Web Service
      • If we choose Fulfillment, Order management of Source System will send fulfillment requests and receives fulfillment replies.
    • Check Enable data cross-reference if Source system expects Order Management to perform cross-reference.
      • In case if Source system and Oracle fusion uses same values then do not Check, “Enable data cross-reference” . These values should be setup in fusion.
    • Check Collections Allowed.

Step 5: Manage External Interface Web Service Details

This is used to establish connection between Oracle fusion and Middleware/SOA server using Connectors.

  • Navigation: Go to Others -> Setup and Maintenance -> Order Management -> Enter task “Manage External Interface Web Service Details
  • Enter following details
    • Target System created in Step 3 = “CSS01”.
    • Connector Name =
      • “Event Connector” for Business Event
      • “Connector01” Connector for Target System CSS01.
    • Connector URL = URL of SOA server which will be used to connect with Oracle Fusion
  • Username and Password are not directly added in the setup. Instead below steps are performed
    • Use Oracle Wallet Manager to add user credential key to a credential map. To do this one should have Administrator Privilege and Administrator role.
    • In Oracle Wallet Manager, in list Selected map, select Oracle.WSM.Security.
    • Enter User Credential key, Username and Password from the service that we will be integrating with Order Management
    • Sign into Order Management with administrative privileges and then enter the username and Password
  • Response Processing Option : from the three values select anyone of them
    • Reject all Lines on First Error(Default option)
    • Reject all Lines on when error on at least one line occur.
    • Reject group with lines that contains error
  • Ensure Send Attachments should be “Yes” if Order Management sends attachments to fulfillment Systems.
  • Invocation Mode
    • For OIC integration select “Business Event“.
    • For Web service Integration select “Asynchronous“(Default) or “Synchronous Service“.
  • Repeat step to enter details for Business Event.

Step 6 : Identifying Hosts and Ports

  • Navigation: Go to Others -> Setup and Maintenance -> Enter Tasks “Review Topology”.

Step 7 : Manage External Interface Routing Rules

  • It create rules to route fulfillment requests to appropriate connectors to external fulfillment systems.
  • We can use order, fulfillment line and process definition attributes to select the fulfillment system connectors.
  • The routing rules gets executed in Oracle Business Rules Engine.
  • Navigation: Go to Others -> Setup and Maintenance -> Order Management -> Enter task “Manage External Integration Routing Rules for Sales Orders“.
  • Click on Create New Rule.
    • Rule Description : Route Invoice Request 01.
    • For IF condition.
      • Enter text for IF condition “Item is CM5008 and Task Type is Invoice”.
      • In condition section, Enter condition “Item” and choose Order Fulfill Line.
      • Operator should be “=”.
      • Click on Search Icon box and search for Item “CM5008” and then select it.
      • Click on AND Icon.
      • In condition section, enter condition Task Type and choose the one for Order Header.
      • Operator should be “is equal to”.
      • Click on Search Icon box and search for task “Invoice” and then select it.
  • For Then Section
    • Select “DO”.
    • Enter text for Then Section “Route to Oracle Fusion Invoicing System”.
    • In create action dialog box select “Perform an Action”.
    • For Action select “Set Connector Name”.
    • Under Connector Name select search icon and search for value “Connector01” which was created in Step 5.
    • Click on Save and Close
  • Click on your new rule and select Activation Rule to activate your newly created rule.
  • In case we want it to run under specific date give the Start and End Date.
  • Click on Save and Close.
  • And then click on Publish button to publish this new Routing Rules.

Step 8: Setting up Jeopardy Business Event for a channel system

  • This is primarily use when source system is sending bulk Order messages to be processed by Oracle Fusion.
  • So in event where it exceeds the limit and orders might get delayed, Order Management in such case will raise an event when Jeopardy Party value is high and send event notification to receiving Event connector which will notify the source system of the delay.
  • Navigation Go to Others -> Setup and Maintenance -> Order Management -> Enter task “Manage Business Event Trigger Points“.
  • Select Format “Jeopardy”
  • Under Jeopardy Detail section, for Jeopardy Priority High, check the box for Raise Event.
  • Click on Associated Connectors Tab and click on Actions and Add Row
  • Enter Connector Name “EventConnector” created in Step 3.
  • Click on Associated Connectors Tab and click on Actions and Add Row
  • Enter Connector Name “EventConnector” created in Step 5.

  • We can similarly create Business Event Trigger points based on our Business scenarios.
  • In below case we want to notify our source system in case of Fulfillment Line Shipment Update.

Step 9 : Setting up Jeopardy Business Event for a channel system

  • Navigation Go to Others -> Setup and Maintenance -> Order Management -> Enter task “Manage Business Event Trigger Points“.
  • Select Format “Order Header Status Update
  • It has Send E-Mail Notification under various status Value which can be checked. In below example for Status Value , Submitted, Raise Event is “Checked” as well as Send E-mail Notification is “Checked”
  • Email will be triggered once Order Header Status Changes to Submitted
  • Same goes true for “Hold” for sending Email Notification.

Oracle Fusion: Holds in Order Management

Order Management uses a sales order hold to temporarily stop an orchestration process from processing an order line or fulfillment line. You can use a hold to manage order fulfillment.

  • Hold can be applied Manually
    • Holds can be applied at Order Level, Order Line Level and Fulfillment line.
    • In case Hold is applied to a Model or Shipment set, the Hold get applied to all levels.
    • Only certain set of users who have necessary roles can Apply and Release Holds.

  • Hold can be applied Automatically
    • In case of Credit check of customer.
    • OM automatically applies a hold if a change in the OM work area requires it to compensate the orchestration process. OM sends a message to the fulfillment system to apply a hold so fulfillment stops while OM compensates the orchestration process.
      • Order Management automatically releases the hold after it finishes compensation.
      • An orchestration process can automatically apply a hold only when a hold request already exists in Order Management, in the source system, or in the fulfillment system.
        • For example, assume an orchestration process is at the scheduling step when a source system sends a request to hold the shipping task. Order Management stores the request until the orchestration process reaches the shipping step. It then searches for existing requests, and then applies them.
    • When fulfillment lines having a hold is split, OM automatically applies hold to each of the lines that result from the split. eg if Fulfillment lines of 100 is split on 25 each, holds will be applied on each fulfillment lines.
  • Propagate hold
    • Order Management transforms a hold that it receives from a source system or a fulfillment system. The hold becomes part of the sales order.
      • If a Source order includes a Hold, then Order Management includes it on the fulfillment lines that it maps to the sales order.
      • If a fulfillment line includes a hold, and if Order Management splits the fulfillment line, then it includes the hold on each new fulfillment line that it creates to do the split.
      • If Order Management applies a hold to one or more lines in a shipment set, then it applies the hold on the entire shipment set.
  • Display and Process Active Hold
    • An active hold is a current hold on an orchestration process.
    • The Hold Source System attribute displays the location of where the hold was applied.
    • If a fulfillment line includes a hold, and if the orchestration process that the fulfillment line references hasn’t reached the step that includes the hold, then Order Management might continue to run the process until it reaches the step that includes the hold.
    • If a fulfillment line includes a hold that Order Management hasn’t released, then Order Management displays it as an active hold even if the line doesn’t include an active hold.

How Holds behave

Below flowchart depicts how holds behave. Applying of Holds from Fulfillment system via webservices to Order Management.

Types of Holds

There are three types of holds which are applicable for all types of items like: Standard Item, PTO Model, Kit and Hybrid etc.

  • Generic Hold -> Holds not linked to any specific Task. These holds can be applied and released at any step.
  • Task Specific Holds -> Holds which are linked to specific task and service. It can be used to pause the processing of specific task on the sales order
  • System Holds: System holds are automatically applied and released at the end of the processing of the sales order. E.g. Hold for change request / Credit check Hold.

How to Apply and Release Holds on Order, Lines and Fulfillment Lines

  • Holds Applied to the Header are cascaded to lines automatically.
  • Users can apply holds from User Interface, Webservice and Fulfillment views.
  • Hold codes are set enabled so that Business Unit level segregation can be controlled.
  • Holds can be applied at any time, like Invoicing Hold can be applied after Order Submission. Order goes on holds once Invoicing task is reached.
  • Holds applied on Pause task will not have any effect.
  • Multiple holds can be applied on Sales Orders.
  • User can apply and release holds across multiple Sales Orders.
  • Hold Request Task(HRT) is a flag which is used to forcefully pause proceeding of an order/line at a particular task, by sending the hold request to the fulfillment system currently processing the task.
  • Currently if an order needs to be created with a Hold applied, it has to be done on a Draft Order.

Setup for Hold Codes.

  • Navigation: Go to Others -> Setup and Maintenance -> Order Management -> Enter Task “Manage Hold Codes”
  • In Hold Codes -> Select any Code
    • If “Hold ALL Services” is Checked than Task Types at bottom section will be empty.
    • If “Hold ALL Services” is Not Checked than we need to add Task Type and Service Name for which hold will be applicable. i.e. in below snapshot, Hold Definition “Hold_For_Scheduling” does have Task Type and Service Name to which Hold will be applicable.
    • Set will be “Common” for all Business Unit.
    • Go to Applicable Roles tab and either select All Roles or select any specific Roles for which Apply Hold and Release Holds will be applicable.

Setup for Hold Code Reason.

  • Navigation : Go to Others -> Setup and Maintenance -> Order Management -> Enter task “Manage Order Lookups”
  • Enter Lookup code “DOO_HLD_RELEASE_REASON”.
  • Verify Lookup code, its Start date and End Date.
  • Holds can be migrated from One Instance to Other.

Hold Release Process

Manual Release of Hold

  • You can release a hold that you applied in the Order Management only in the Order Management work area.
  • Only the user of a source system can release a hold that another user of the source system applies.
  • If you don’t cancel an orchestration process, then you must manually release each hold and provide a release reason
  • You can release hold in any channel irrespective of the channel that applied it in the first place, as long as you have sufficient roles and privileges.

Automatic Release of Hold happens

  • Once Order Management finishes compensating for a change to the order.
  • After we cancel an Orchestration process, Order Management Automatically releases any holds that reference this process.
  • After credit check case folder is approved in Oracle Fusion Credit Management.

Oracle Fusion: Revision of Orders in Order Management

Due to any business needs or change in demand, there is always a need to create revision of Order. Revision could be due to change in quantity(Increase or Decrease of item), change in item(Instead of Apple Phone look for Samsung phone) or change in attribute of item (Color of Mobile phone could be change i.e. from Blank to Rose Gold).

Oracle gives the flexibility of revision of order with a rider.

Business Flow of Revision of Order

Once order is submitted after making changes to it, Delta change is identified and same is now assessed with respect to its impact on order related to Change in qty, pricing and change of Item. Once change is accepted it is assessed again to see if there is going to be any impact downstream with respect to Pick Release, Ship Confirm and Invoice.

Change Processing Concepts

Whenever a change comes, Order Management should be able to assess if change can be done and if answer is yes then it should accommodate the change seamlessly. OM determine whether its possible to make the change and what all steps needs to be done or redone.

  • Processing Constraints : It determines who can make changes , what kind of changes can be made and when in the process the change can be made.
  • Navigation : Go to Setup and Maintenance -> Order Management -> Enter Task “Manage Processing Constraints”.
    • Select any Constraints “Fulfillment Line Item Update” and it will show the list of rules attached to Fulfillment Line Update.
    • Read more about Processing Constraints at link.
  • Compare Change Order to Fulfillment Values : Parameter that allows a web service or file-based data import to change fulfillment line values even after Order entry Specialist revise the sales order in Order Management(OM) work area.
    • If it is used then OM
      • Compares attribute values in the revision to attribute values in the import data to determine whether user has revised the order
      • It replaces a user’s revisions with values from the imported data.
    • Navigation : go to Setup and Maintenance -> Order Management -> search for task “Manage Order management Parameters“.
  • If this parameter is set to “Yes”
    • we need to make sure Import data should also include values for attributes the user didn’t revise. We must get these values from the orchestration process that’s currently processing the order.
    • Use the getOrderDetail operations of web service Order Information Service or use OTBI to get attribute values from the sales order that OM is currently processing. Create a new payload for the order revision, change attribute values in the payload to reflect the revision, then send the payload to Order management.
  • Compensation Pattern : It is rule which governs how a single step of the orchestration process is compensated.
    • Navigation : Go to Setup and Maintenance -> Order Management -> Enter Task “Manage Orchestration Process Definition”.
    • Enter Process Name of Orchestration. Go to Action -> Click on Revise Process(Version number should Change)
    • Then Select any Particular Orchestration Step Definition in this case “Create Shipment Request” and click on Change Management Tab. It will take to Compensation Pattern where we need to select “Click for Rule”.
  • It will display the Compensation Pattern attached to the Process Step Definition.
    • Add a rule (Inventory Item is Changed_01) -> click on Active, Advanced and Tree Mode
    • Select Root as DooSeededOrchestrationRules.DooHeader
    • In IF clause Left Side -> enter text Header, Right Side select from drop down rule(DooSeededOrchestrationRules.DooHeader)
    • Delete Test associated with above line, instead click on green + sign for Add Pattern
    • In add section Left Side -> enter text “fline”, Right Side select from drop down rule(Header/childFLines)
    • Add a simple test -> click on lens and then click on calculator sign(on right)
    • Click on function to select on Fline -> getAttribute(String) and click on Insert into Expression
    • Click on constants and select InventoryItem Id and click on Insert into Expression.
      it should look line below
      fline.attributeChanged(DooSeededOrchestrationRules.IFLine.INVENTORYITEMID)
    • Click on constants and select InventoryItem Id and click on Insert into Expression.
    • on right side enter value true
    • In Then, click on Assign
    • On left side select from Drop Down Header.mRuleDecision.compensationPattern on right side enter = “CANCEL/CREATE”
    • Click on Validate
  • Order Attributes that Identify the Change : If mailing address is changed which is in vicinity then for sure order do not need rescheduling but if its far off then rescheduling would be required based on distance. Also if qty is changed then rescheduling would be required. Those attributes are called Change Attributes.
    • Navigation : Go to Setup and Maintenance -> Order Management -> Enter Task “Manage Order Attributes That Identify Change”.
  • Select any Task Type, in this case Schedule and click on Edit. It will list all attributes which qualify as “Change Attribute” for corresponding Fulfillment Lines, Order Line and Order Header.
  • Compensation : These are actions that must be done or redone because of change. Each steps are assessed and if it needs to be compensated, then steps are compensated by updating with new information from the change order. This change is done by Compensation Pattern.

How Compensation Works

Step1 : Check for Delta

  • Order Management runs the Orchestration process to determine the difference in Original order and Change order.
  • Processing Constraints are evaluated at
    • Header, to determine of order is closed. If order is closed than for sure Lines cannot be modified.
    • Line level, Qty or item is changed which are Change attribute hence compensation is triggered. Also if color of item is changed it also falls under Change attribute so compensation gets triggered.

Step 2 : Compensate

  • After Delta is checked in Step1, it verifies if the Task is done.
  • If “No” then it uses Business Rule to determine how to compensate particular step.
  • If task is completed then it checks if all task is completed or not. If “No” it goes to Next tab to check of Delta and repeats the process. If “Yes” then it determines whether update needs to be send to Fulfillment System based on Delta value
  • Below steps of Orchestration process has different compensation pattern.
    • Create Scheduling Step is compensated with default behavior of Update takes place. That is Create Scheduling step is cancelled and created again. Global Order Promising checks for availability post which Planning process is run and Scheduling steps are assigned new dates.
    • Create Reservation Step is compensated with specific rule. Lets take example of Color of mobile is changed to Gold, then compensation pattern will have Rule “If DemandClassCode” isn’t Gold, then excluding all High Priority Customer, Supply is released and Reservation is created again with new dates. Also reserved quantity is updated.
    • Create Shipping Step is compensated with by updating with new dates and new item.
  • After performing compensation patter, Orchestration process reaches where it was when change order was submitted.

Step 3 : Order Management Decides on sending updates

  • If changed attribute does not affect task then Orchestration process applies the attribute change to the Sales order without sending any update to Fulfillment System. Like if address from home to Work location is done, in that case it has no impact on fulfillment system so change is applied at Order level without impacting Fulfillment system.
  • But if there is change of item, quantity which falls under Change Attribute then Fulfillment system is notified.

Oracle Fusion: Item Import using FBDI process

Step1 : Check version of your Oracle Fusion.

  • Go to Fusion-> Settings and Actions -> Click on About this Applications
  • Below is the version of Cloud Application and its 20D.

Step 2: Download FDBI template from Oracle Site.

  • Select Inventory Management
  • Select version related to your application. It has 20B and 21A, so I am going with 21A.
  • Based on version, choose either All Books or Books. We need to look for File-Based Data Import for Oracle Supply Management Cloud. Based on Version you can get it under different section.
  • Click on HTML Link.
  • Based on version, Nomenclature and location of FBDI template will vary.
  • Click on XLSM template. An excel sheet will get downloaded.
  • Below is Sample Template.

Step 3: Make entry of items into Inventory Template.

  • Enter details of Product to be uploaded as shown below. Details can be seen in attached excel sheet.
  • Do copy Batch ID from first line, which will be used in next step.
  • Input files Look after modification
  • Click on Generate CSV file and it will create 1 zip with 13 files.
  • Save the Generated Zip file in a document folder.

Step 4: Bring in Excel Data from to Universal Content Manager (UCM)

  • Select File Import and Export from Tools Option.
  • Below screen appears
  • Choose the Excel file and enter Account from drop down list. It has to be scm/item/import
  • Excel file gets loaded into UCM.

Step 5: Bring in Data from Universal Content Manager (UCM) to Interface Area of Item

  • Run job “Load Interface File for Import”. Select Import Process as “Item Import”.
  • Select Data file which was uploaded in previous step and click on Submit.
  • Ensure Job completes Successfully.

Step 6: Bring in Data from Interface Table to Item Table

  • Run Job “Item Import”.
  • Below Job should run and complete successfully.

Step 7: Browse Loaded Item into PIM

Step 8: Mass Item Changes, Add Organization to the Item

  • Select Item -> Go to Actions -> Manage Item Mass Changes -> Assign Items to Organizations
  • Click on + Button to add Organization
  • Click on OK and Submit.

Browse Item after Organizations get added

Step 9: Add Price to each item

  • Select Item -> Go to Actions -> Manage Item Mass Changes -> Assign Items to Organizations
  • Enter List Price against each item and Click on Submit.
  • On clicking Submit, Job gets Submitted.

Browse Item after List price gets added

Oracle Fusion: Pick Wave in Order Management

When is Pick Wave used

It is used most Often for

  • Fulfilling a particular customer demand
  • Optimizing transportation
  • Fulfilling backorders to reduce delay in shipment

Steps of Pick Wave

Step1: Create Order

  • Create Order with Supply Warehouse as Seattle. Ensure Line status of this Order is “Awaiting Shipping”.

Step 2: Ensure Inventory Organization has Pick Confirmation Required as Unchecked

  • Inventory Organization should have Pick Confirmation Required Unchecked else even if we try for Auto Pick Confirm, it will not proceed further.

Step 3: Create Pick Wave

  • Navigation: Go to Supply chain Execution -> Inventory Management -> Go to Task Panel tab -> Select Picks -> Choose Option “Create Pick Waves”
  • Enter Following Details
    • Inventory Organization at Top Right Corner should be “001”.
    • Release Rule : 001-Auto Pick Conf. This rule is a task which can be viewed at “Manage Pick Wave Release Rule“.
    • Order Type : Sales Order

  • After entering Above Details, Click on “Show More“. Click on Options Tab
  • Ensure AutoConfirm Picks is Checked.
  • Click on Release Now.

  • On clicking Release Now, Pick Wave Number will be generated along with Number of Pick Slips as “1” and Number of Picks as “1”.
  • A Job “Print Pick Slip Report” gets scheduled, which can be viewed by going to Tools-> Scheduled Job.

Once Job completes, see attachment to view the Pick Slip Report.

Step 4: View Shipment

  • Navigation: Go to Supply chain Execution -> Inventory Management -> Go to Task Panel tab -> Select Shipments -> Choose Option “Manage Shipments”.
  • Enter Order Number “97379”,
  • We will Shipment Lines along with following details
    • We can see Shipping Method attached to Shipment
    • Line Status will be Staged

Oracle Fusion: Pick Release in Order Management

Pick Release Steps

We can have Pick Release in max three steps and Minimum 2 steps as depicted in below diagram.

Pick Release Process

What happens

Picking Rules

Picking Rule enables you to define the criteria that determines how material is consumed. For example, LIFO, FIFO, Lot Ascending, Locator Ascending. After you create a picking rule, it can be enabled for usage in various organizations. Below is the Industry standard few of the movement rules. Of which Picking rule is movement between FGS and Staging Area.

Step 1: Create Pick Rule and Pick Assign the rule

Create Picking Rules

  • Navigation -> To go Setup and Maintenance -> Click on Task Pane Carousel -> Click on Search.
  • Enter Task “Manage Picking Rules”
  • Click on + button to create Picking Rule

Sorting is done based on 4 Criteria.

In below scenario I am giving 3 criteria. So, precedence will be Priority 1 then Priority2 and finally Priority 3.

  • Priority 1: Lot Ascending
  • Priority 2: Subinventory Ascending
  • Priority 3: Locator Ascending

Step 2: Create Picking Rule Assignments

  • Navigation -> To go Setup and Maintenance -> Click on Task Pane Carousel -> Click on Search.
  • Enter Task “Manage Picking Rule Assignments”
  • Click on Picking Rule Assignment. Then Click on + to assign Picking Rule.
  • Enter Values as shown below. Criteria can be given accordingly for Picking Rule.

Picking rule has Sorting Rules

  • Navigation -> To go Setup and Maintenance -> Click on Task Pane Carousel -> Click on Search.
  • Enter Task “Manage Subinventories and Locators”
  • Select Organization :”RV01″(organization created for my example)
  • Select Subinventory and click on Edit

Sorting at Subinventory level

  • It is Determined by Picking Order. RV01_Dyna has Picking Order 1
  • While RV01_Dyna2 has Picking Order 2.

Sorting at Locator Level

  • Picking order determines Sorting at Locator Level. D1.1.1.1 has Highest Precedence over D2.2.2.2 due to Picking Order.
  • 3.33.33.33 has Highest Precedence over 4.44.44.44 within Subinventory RV01_Dyna2 due to Picking Order.

Step 3: Create Item at with Full Lot control.

Step 4: Create Miscellaneous Receipt at Subinventory and Locator Level providing Lot Number.

Transaction 1: Subinventory RV01_Dyna. Locator: D1.1.1.1, Lot: RV01_Lot103

Transaction 2: Subinventory RV01_Dyna. Locator: D2.2.2.2, Lot: RV01_Lot103

Transaction 3: Subinventory RV01_Dyna2. Locator: 3.33.33.33, Lot: RV01_Lot104

Transaction 4: Subinventory RV01_Dyna2. Locator: 4.44.44.44, Lot: RV01_Lot103

Step 5: Miscellaneous Transactions got created

Step 6: View Item Quantities received using Manage Item Quantities option.

Step 7: Create Movement Request

  • Navigation: Go to Supply Chain Execution -> Inventory management -> From Task Carousel select “Manage Movement Request”.
  • Click on + button to create Movement Request

Things to consider

  1. By default, Movement Request will get populated. Erase it and provide user defined name.
  2. Source Subinventory should always be kept blank
  3. Select Item for which movement needs to be created.
  4. Give quantity to be moved.
  • Submit Job for Print Movement Request Pick Slip Report to allocate movement.
  • Ensure Release Approved Lines to “Y”.
  • Click on Republish button
  • Click on Wheel Button -> Export and PDF
  • Below Pick Slip will be printed which will decide Picking based on Sorting criteria defined above.

Step 8 :Provide User access to see Pick Confirm. Warehouse and Shipping Manager Role is required.

Step 9 :Pick Confirm Screen appears

  • Enter Picked qty against Requested qty and click on confirm.
  • Using Enforce Single Lot in Picking Rule setup
  • The enforcement of a single lot for the specific picking rule. If not, multiple lots may be picked.
  • Note: Enter qty as 12 while performing Movement request. Since we only have 8 qty left in Subinventory we will check report generated from scheduled process.
  • So, we have open pick for 8 QTY which is good.
  • We do not have account of remaining 4 QTY due to which, Unallocated Movement request can be seen.
  • In Pick confirm screen, one movement request of 8 qty can be seen.