Parameterized BI Report in Oracle Fusion

Pre-requisite : Refer link to create/understand BI Fusion Report from Scratch

https://wordpress.com/post/ravidubey.work/372

Below steps explain how to create parameterized BI report

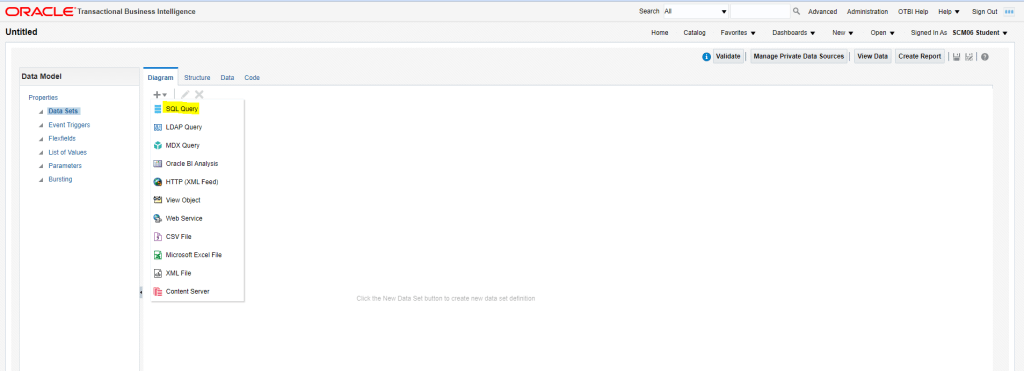
Step 1: Create New DATA MODEL

  1. Go to Menu Option New
  2. Select Data Model
  3. Click on + Icon
  4. Select SQL Query
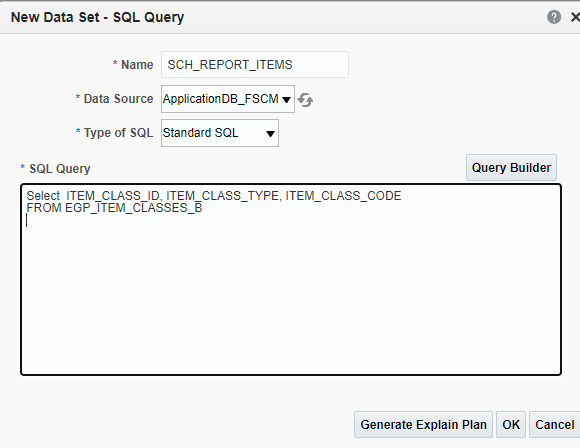
  5. Create a Data model with below SQL query

SELECT * FROM EGP_ITEM_CLASSES_B WHERE ITEM_CLASS_ID = :P_ ITEM_CLASS_ID

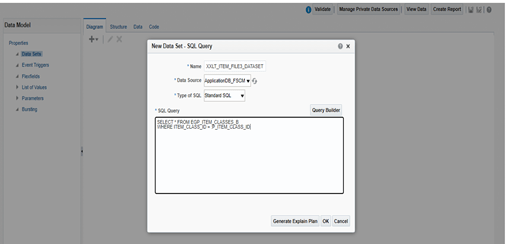
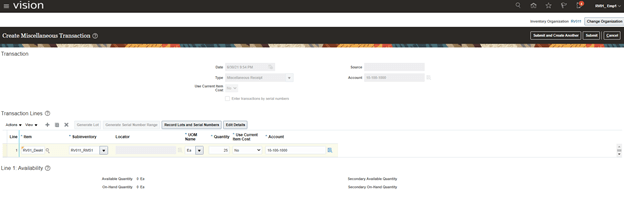
  • Once you click OK, below screen will appear
  • It will ask to create Parameter Value for which we will need List of Values.
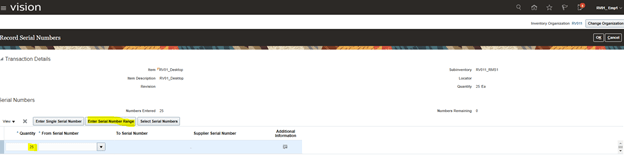
  • On left hand side there is List of Values, create a variable ITEM_CLASS_ID_LOV1 with SQL query
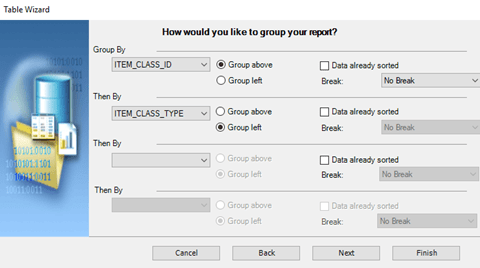
  • Go to Parameter Values section on left hand side and select the List of Values. Do remember to select Menu as Parameter Type.
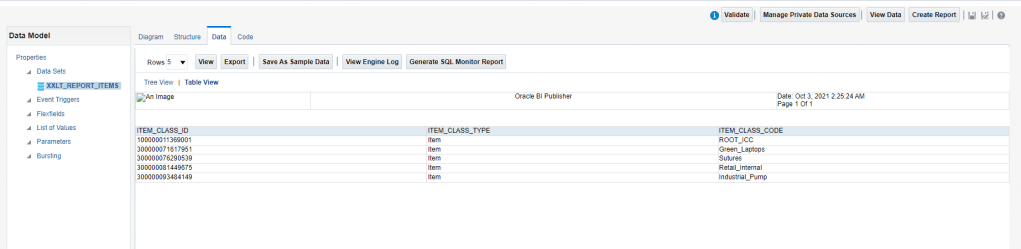
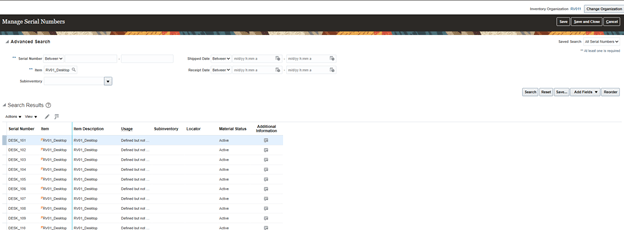
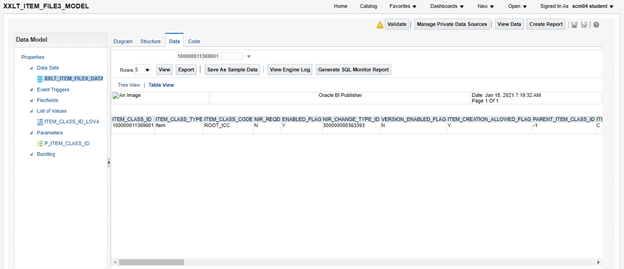
  • Once data set is created and saved successfully. Go to Data View
  • Choose Item Id from above list and select View.
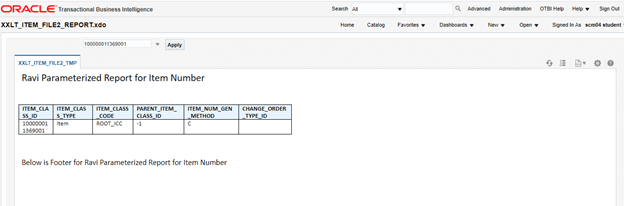
  • It will show data for selected Item id.
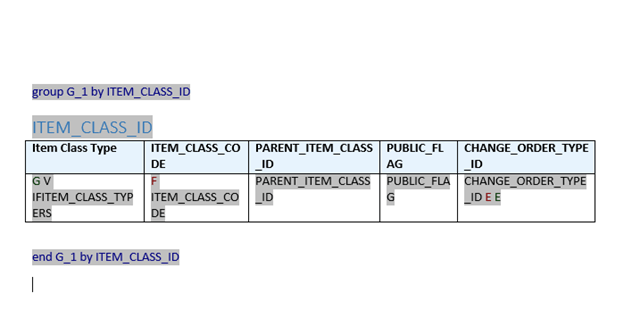
  • Export the data and perform steps 2 and 3 of Report Generation from below link

https://wordpress.com/post/ravidubey.work/372

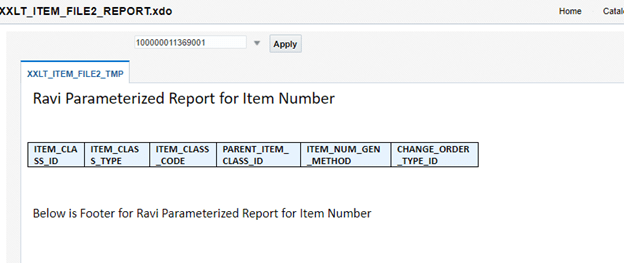
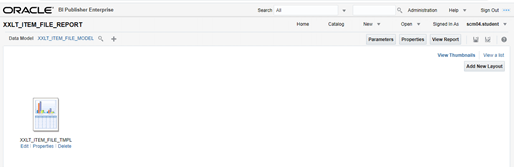
  • While running Report enter Parameter value in Left hand side of Apply button and Click on Apply Button. Below report will be displayed in PDF format

BI Report Generation in Oracle Fusion

Pre-requisite: Install BI Publisher Desktop version as a plugin in your Microsoft Word else you wont be able to create BI reports. Use below link to download the plugin.

https://www.oracle.com/middleware/technologies/analytics-publisher/downloads.html

Step1: Creation of New DATA MODEL

  • Navigation -> Select Tools -> Click on Report and Analytics
  • Click on Browse Catalog
  • Go to Menu Option New -> Data Model
  • Click on + Icon and Select SQL Query
  • Write SQL query and Click on OK.
  • Save Data model with Name XXLT_ITEM_FILE_MODEL
  • Go to Data Tab to view data extracted from SQL query in Table View Mode.
  • Click on Export Tab to save Data model. Save Data Model into a folder in your computer, where you wish to store all repositories.

Step 2: Create Report Layout

  • In your computer, Go to your folder/repository and create a word document. Save the Word Document in RTF format with name “XXLT_ITEM_FILE_TMPL”
  • In Word document, go to BI Publisher Menu. Click on Sample XML option.
  • Select Data model name “XXLT_ITEM_FILE_MODEL” and click on OK
  • Data Loaded Successfully message should appear.
  • Select Table Wizard option
  • It will choose data set by default
  • Choose fields which you want in report
  • Choose Group By option
  • Choose Sort By option and click Finish
  • Finally Layout will be created as shown below
  • Enter Header and Footer for Suitable Heading
  • Change Alignment accordingly and you can preview in PDF format to be sure report comes.

Step 3: Upload Report Layout

  • Click on Create Report from Menu Option.
  • Default Selection of Data Model wizard appears. Click on Cancel
  • On Left hand side, next to Data model there is Search icon. Click on it to choose Data model “XXLT_ITEM_FILE_MODEL”
  • Data Model should get selected
  • Click on Upload or Generate Layout
  • Go to your repository and select RTF document with name “XXLT_ITEM_FILE_TMPL”
  • Template will appear as below
  • Click on Save to save Report. Save report as “XXLT_ITEM_FILE_REPORT”
  • On RIGHT Corner there is View a List option, Click on it to view which report you want to see first in case we have multiple templates.
  • Click on View report to see data. We have option to see Data in PDF as well as in other format.

Step 4: To migrate BI Report from one instance to another

  • Select complete folder in case you want to transfer Template, Data model and report together in one go.
  • Click on Download. File will be downloaded in XDRZ format
  • Save file in repository, then click on Upload to upload RAVI TEST file in new instance. File will be uploaded.

Serial Controlled Inventory Transactions in Oracle Fusion

Serial Number Assignment

  • You must assign serial numbers whenever you receive items under serial number control into inventory.
  • If an item is under Predefined control-> We can choose from the list of predefined serial numbers for that item.
  • If an item is under Dynamic entry At inventory receipt -> We can choose from a predefined list of serial numbers or enter any serial number, depending on the uniqueness control for your organization. You can create and assign serial numbers individually or as a range to speed up data entry.
  • If your Item is under Dynamic entry At sales order issue -> We can only assign serial numbers when we perform a shipment transaction in Oracle Order Entry/Shipping.
  • Once Serial number is assigned to an item, the combination of the serial number and the Item is an entity known as a Serialized unit. From that point on, Oracle Inventory tracks all movements and maintains the following information for each serialized unit:
    • Receipt or Ship Date: The date on which you last performed a material transaction for your serialized unit. Material transactions update this information when you move your serialized unit.
    • Serial Status Oracle Inventory assigns one of the following statuses to your serialized unit: Defined but not used, Resides in inventory, Issued out of inventory, or Resides in in transit.
    • Location: The organization, Subinventory, and locator in which the serialized unit currently resides. Material transactions update this information when you transfer the serialized unit.
    • Revision level: The revision of the item when you assign the serial number to the unit.
    • Lot number: During material transactions, you first specify the lot number and then the serial number. Oracle Inventory tracks the lot from which a specific serialized unit originates.

Case 1: Create Serial Controlled Item with Serial Generation at “Dynamic entry at Inventory Receipt”.

  • Create Item with below features
  • Navigation On Item screen -> Go To Specifications Tab -> Inventory -> Under Serial Section, ensure we select Generation =Dynamic Entry at Inventory Receipt.
  • Enter values in
    • Starting Prefix = “LAP_”
    • Starting Number = “101”
  • Go To Associations -> Search Child Organization and add RV01_Child_1.

Case 2: Change setup at Child Inventory Organization for Serial Number Generation.

  • Navigation -> To go Setup and Maintenance -> Click on Task Pane Carousel -> Click on Search. Enter Task “Manage Inventory Organization”
  • Search with organization RV01 to fetch Child Org RV011. Select Child Org RV011 and Click on Pencil button to Edit.
  • Click on Next button.
  • Click on tab “Lot, Serial Number and Packing Unit” and Change Values under section Serial Number Generation
    • Set Generation = “At Item Level”
    • Prefix= “HP_”
    • Starting Serial Number= “101”.

Case 3 : Generate Serial Number

  • Schedule process to Generate Serial Number.
  • Go to Supply Chain Execution -> Inventory management -> From Task Carousel select Manage Serial Numbers.
  • Search for Item RV01_Laptop. 2, Serial Numbers would be generated.
  • Note: Serial Number starts with Prefix LAP_.
  • Reason:  Since in Step 1(b), “Inventory Organization setup”, Serial number generation is set at Item level, so despite giving HP_ in Inventory organization setup, Prefix LAP_, given at Item level got selected.

If we would have given, at Organization Level, in Step 1(b), Serial number would had got generated with prefix LAP_.

Case 4. Generate Serial Number during Miscellaneous Receipt Transaction

  • Create Miscellaneous receipts. Click on Record Lots and Serial Numbers
  • Click on Enter Serial Number Range.  
  • Default Screen appears with Quantity as 300, qty entered above.
  • If we enter value in “From Serial Number” as 1, it will default “To Serial number” to 9 as well.
  • It will also populate values in Change Numbers Entered and Numbers remaining.
  • Enter values in “From Serial Number” as shown below. It will generate “To Serial Number” and do calculation accordingly.
  • Click on OK and Submit.
  • Verify Generated Serial Number using Step C.
  • Do note the usage of existing serial number and newly created serial Number.
  • In below screenshot, Lap_101 and LAP_102 was created at step 1.C and its usage is Defined but not used.
  • LAP_299 to LAP_ 555, is created during Miscellaneous transaction and its usage is “Resides in stores”.

Case 5. Add Supplier Details in Serial Number.

  • In case supplier is providing item and want their Name and Serial Number in the list, we can do following.
  • Navigation -> To go Setup and Maintenance -> Click on Task Pane Carousel -> Click on Search.
  • Enter Task “Manage Serial Number”.
  • Search with Serial Number and then Click on Pencil button to Edit.
  • Enter Supplier Details and Supplier Provided Serial Number. Note: I didn’t enter correct supplier Number, so it is coming as error.

Case 6. Create Miscellaneous Issue transaction

  • Navigation
  • Go to Supply Chain Execution -> Inventory management -> From Task Carousel select Create Miscellaneous Transaction. Verify Organization is RV011 at top right corner.
  • Enter following Details:
  • Type= Miscellaneous Issue,
  • Use Current Item Cost = Yes
  • Account = 10-100-1000
  • Click on Actions -> Add.
  • Enter Item and QTY and Click on “Edit Details”
  • Note: We cannot generate Serial Number during Miscellaneous Issue. As can be seen in above and below screen, Generate Serial Number Range is not Editable. Click on Record Lots and Serial Numbers.
  • Click on Enter Serial Number Range.
  • Click on Drop Down option and then Click on Search button of From Serial Number.
  • Select Lap_300, which was created during Miscellaneous Receipt Transaction.
  • By Default, to Serial Number gets defaulted with End Sequence value. Click on Ok.
  • Click on Submit.
  • Verify Serial Numbers. Above entered Serial Number Starting from LAP_300 to LAP_304, status is Issued out Stores.  

Case 7. Create Items with Predefined Serial Number Generation.

  • Note: For Predefined Serial Number, Serial numbers cannot be generated at run time. Serial Numbers needs to be created first before getting used/Issue.
  • Create Item with below exception being In Serial Number Generation Setup, change it to “Predefined Serial Number”.
  • Generate Serial Number following Step C.
  • Below Serial Numbers got generated.
  • Create miscellaneous Receipt.
  • Try entering Quantity as 25 instead of 10.  You will not be able to generate Serial numbers during Receipt.
  • Click on Edit Details -> Record Lots and Serial Number. Qty Field has value 25.
  • Click on From Serial Number and Choose DESK_101. Keep a note on Qty which is still 25.
  • Now Qty Changes to 10 and “From” and “To” serial number becomes DESK_101 and Desk_110, respectively. Since we had 10 serial numbers printed for this item only 10 Qty would be issued.
  • In case you wish to Enter Serial Number Range for Qty 15, you cannot find Serial Number.
  • If we try to do transaction only for 10 Serial Number without Changing entered QTY 25, at initial level, we will get error. Change Receipt Qty to 10 and then proceed further.

My Cloud Journey

I will be Presenting My Journey from Legacy System, AS400 to Oracle Cloud. In between have learned few other Technologies which i will be Sharing.

I am Ravi Dubey having 15 years of Experience in AS400 Technology. Domain expertise if Primarily into Supply Chain Management. Other Domain being Banking and Insurance.