OC Connects applications and automate end-to-end Business process.
There are Three type of Oracle Integration Cloud Services
Integrations : Create and Manage Integrations using below steps
Create the connections to the applications with which we want to share data.
Setup the Integration using the connection you created.
Define the flow of data to be shared between connections.
Process Builder : Automate the business using below Process Applications
Develop
Test
Publish
Activate
Visual Builder : Develop Web and Mobile Applications by following below steps.
Quickly create and publish custom web and mobile applications using Visual Development tool.
Build the pages in our application using the components that is placed on a canvas and then integrate with other services.
There is no need for any setup or coding.
OIC : Integrations
OIC : Oracle Integration Cloud is a complete, secure and lightweight integration solution that enables us to connect our application in the cloud.
It simplifies connectivity between our applications and connects both our applications that live in the cloud and on premises.
It provides secure, enterprise-grade connectivity regardless of the applications we are connecting and where they reside.
SaaS-to-SaaS Integration
Business Case : All cases created in Salesforce are synchronized with Oracle Service Cloud
It automate real-time Integration
Streamline Business process by integrating across multiple business systems.
SaaS-to-PaaS Integration
Business Case : Update of opportunities in Salesforce propagated to on-premises Order Management.
It shows an opportunity-to-order system that is distributed across E-Business Suite and Salesforce.com.
It is scenario using hybrid integration, which leverages OIC and SOA Suite on-premises.
OIC Integration Components
OIC uses adapters to connect to source and target systems and then extract data from the source system, Mediate the semantics and technical differences and publish the data to the target.
Leverage Oracle Public Cloud Services for storage and Messaging Services.
Workflow for Integration Development and management
Step 1: First step in Integration design is to identify the applications that we want to integrate and then configure the connection details for these applications.
Connections are created that are based on prebuilt adapters.
Step 2: Create Integrations by dragging these connections to the Designer.
Step 3: Create mapping of Data between applications using Graphic mapper.
Step 4: Activate the Integration.
Step 5: Monitor the Integration using monitoring dashboard. We can pinpoint bottlenecks, monitor errors and see details for each running integration.
OIC Connection
It is a resource that represent either a new OIC interface or an existing external application or system. Connection can be used in either of the roles
Trigger(Inbound)
Defines a SOAP or REST interface allowing clients to invoke an integration flow.
Allows for defining an event subscription or SOAP interface for a SaaS application.
Defines a polling trigger to consume a file or message from an upstream system.
Invoke(outbound)
Used to define an external service or system that can be called from an integration.
Steps for Creating Connection
Select an Adapter.
Provide Basic Information.
Name.
Identifier which is uppercase value of Name entered.
Role based on Adapter.
Trigger
Invoke
Trigger and Invoke
Configure Connection Properties based on Adapter chosen.
Configure Security based on Adapter chosen.
Test the Connection.
Point to Note
Generally we only create one connection for each external system or application, which get reused by Integrations. Exception are there based on scenario where we create more connections for each system.
Multiple runtime connections are managed by OIC for each integration flow as needed.
Connection for Oracle ERP Cloud.
Message Exchange Patterns
We create a business object-based or event-based orchestrated integrations which allows four interaction patterns
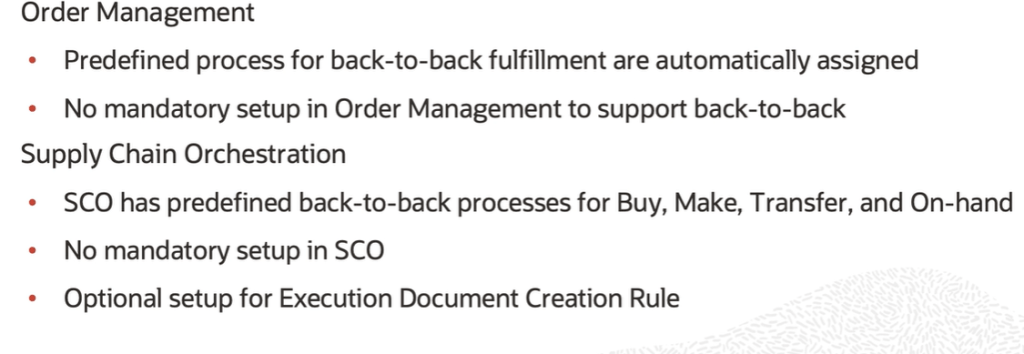
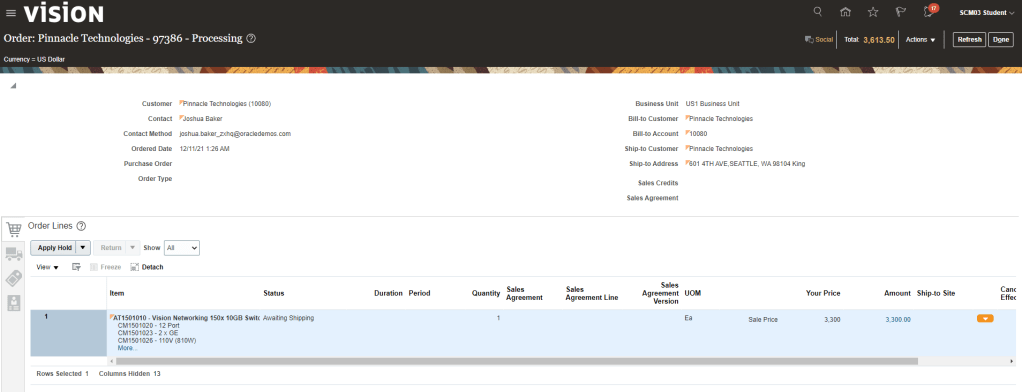
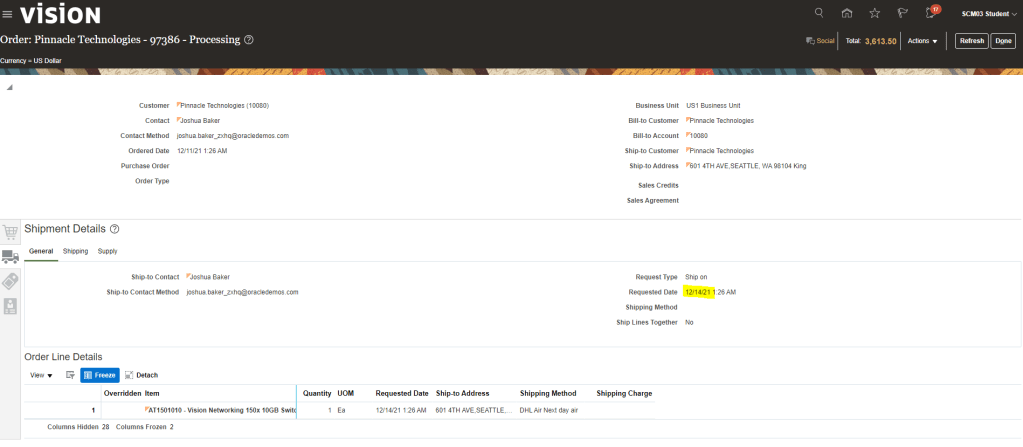
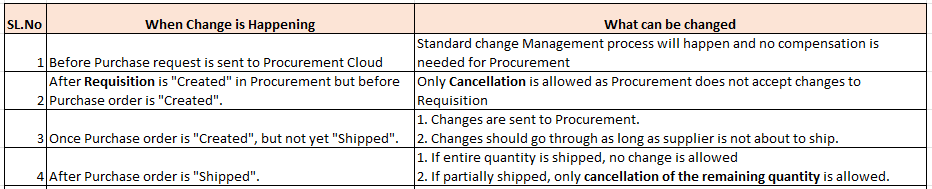
Fulfillment process is selected when Order line is scheduled. Scheduling results are based on results setup in GOP. Back-to-Back setup is done in Product Management.
Back-to-Back Fulfillment is where supply is procured and then received at a warehouse only after an order is placed.
Supply is reserved against a sales order until shipping. This process provides support to create and link supply after a sales order is entered and scheduled, allowing you to reduce your inventory while maintaining the ability to respond to customer demands.
Supply for back-to-back order is created using following flows.
Buy : Procurement from an external supplier.
Make: Production in an internal manufacturing facility(includes in-house manufacturing and contract manufacturing).
Transfer : Transfer from another warehouse
On hand: Reservation of on-hand supply in the fulfillment organization.
Back to Back Fulfillment BUY Flow
Back to Back Fulfillment MAKE Flow
Back to Back Fulfillment Transfer Flow
Back to Back Fulfillment Oh Hand Supply Flow
Setups required for Back to Back Flow
Step 1: Product Management
Order Management and Supply chain orchestration uses this setup to assign Back to Back Orchestration.
Navigation : Product Management -> Product Information Management -> Browse Item ->Sales and Order Management .
Ensure Item is assigned to warehouse from which it will be shipped. In this case “003” Chicago
Go to Specification -> Sales and Order Management and ensure Back-to-Back Enabled is “Yes” for Item under Organization “003”.
Default Sales Order Type should be “Yes”.
In Planning section, Make or Buy , it should be “Make” Or “Buy“.
Under Purchasing section -> Select Purchasable as “Yes” and Purchase Price should have a value.
Create Structures under Item.
We have sufficient stocks in Organization “003”.
Setup 2: Preparer should be setup in Order Management Parameters
Ensure Preparer is setup for the Business unit where transaction is taking place.
Setup 3: Sales Order Fulfillment is enabled in Procurement offerings
Navigation : Go to Setup and Maintenance -> select offering as Procurement -> Actions -> Change Feature Selection
Ensure Customer Sales Order Fulfillment is enabled.
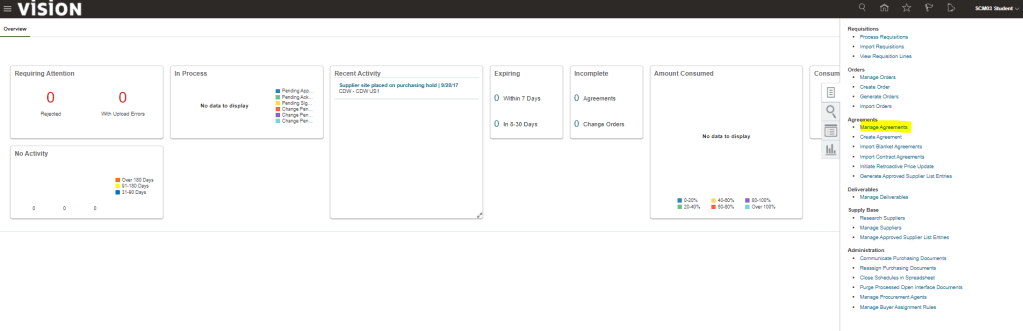
Create Agreement “52270” with Supplier “Lee Supplies”.
Add Item “CM6755001” with price and click on Submit.
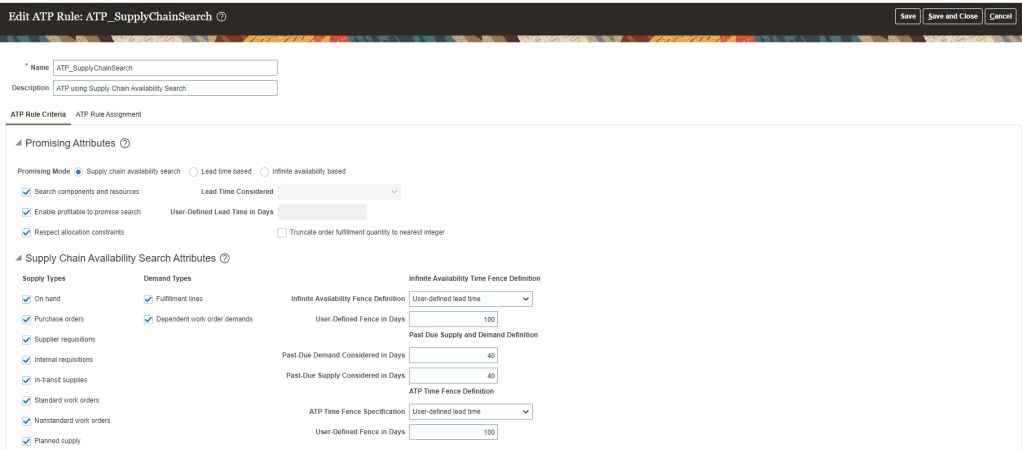
Setup 5: Global Order Promising setup
1: ATP Rules
Navigation : Order Management -> Global Order Promising -> Manage ATP Rules -> Search for your Item “CM6755001”.
Ensure setup has following
Promising Mode is “Supply Chain Availability Search”.
If Make recommendations are required, Ensure “Search Components and Resources” is checked.
All Supply Types are selected
User-Defined lead time should be selected and Fence in Days should have value which should be longer in case longer lead time support is required.
Under ATP Rule Assignment , Assignment Basis should be “Item” and Assigned to Item should be “CM6755001“.
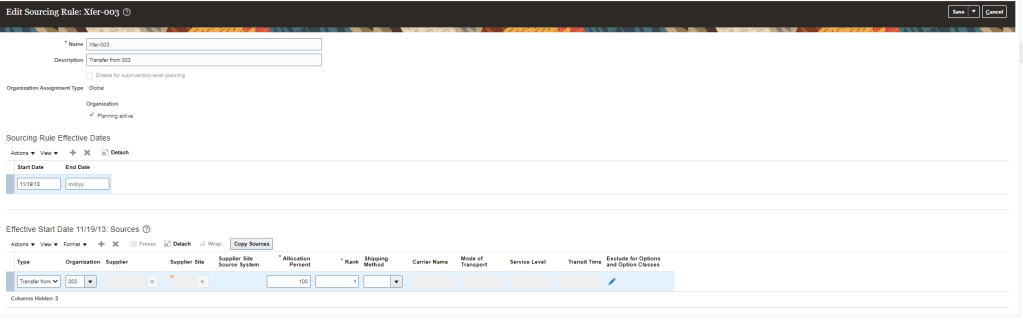
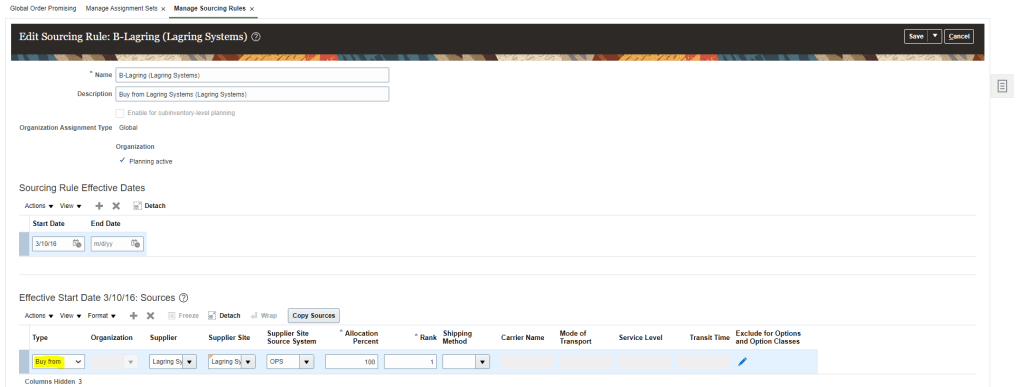
2: Create Sourcing Rules
Navigation : Order Management -> Global Order Promising -> Manage Sourcing Rules.
Create Local Sourcing Rule with Assignment Type Local and Organization is “003”
Create a Global Sourcing Rule with Assignment Type Global.
Ensure it has rows for “Buy from” the supplier.
Supplier should be the one with which BPA was created “Lee Suppliers”.
Another Sourcing Rules for Transfer from “003” Organization.
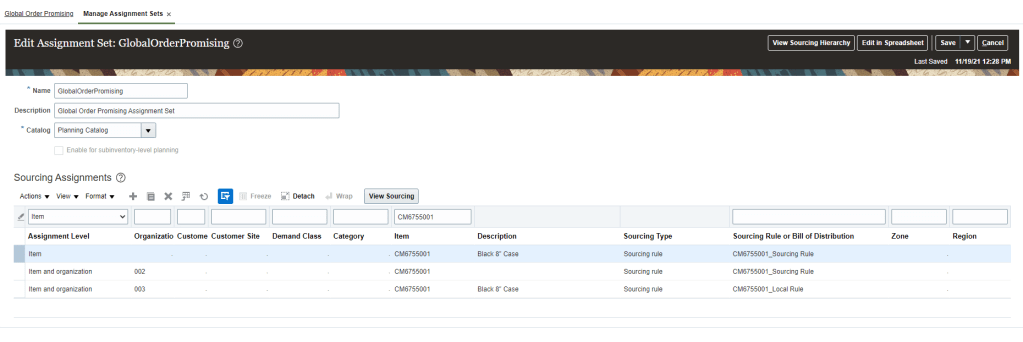
3: Create Assignment Sets
Below sourcing rule will setup which will tell GOP that item is transferred from Organization “003”.
Sourcing Rule should be setup in Sourcing Assignments Set with
Assignment Level = “Item and Customer”.
Customer = “Pinnacle Technologies”.
Item = “CM6755001”.
Sourcing rule = “Xfer-003”. It is transfer from Organization “003”.
Sourcing Rule should be setup in Sourcing Assignments Set with
Assignment Level = “Item and Organization”
Organization = “003”.
Item = “CM6755001”.
Sourcing rule = One defined in previous steps.
Based on Supply availability, Sourcing rules has following recommendation
Following default settings we have in Order Management and Supply Chain Orchestration
Steps for Back to Back Fulfillment Flow
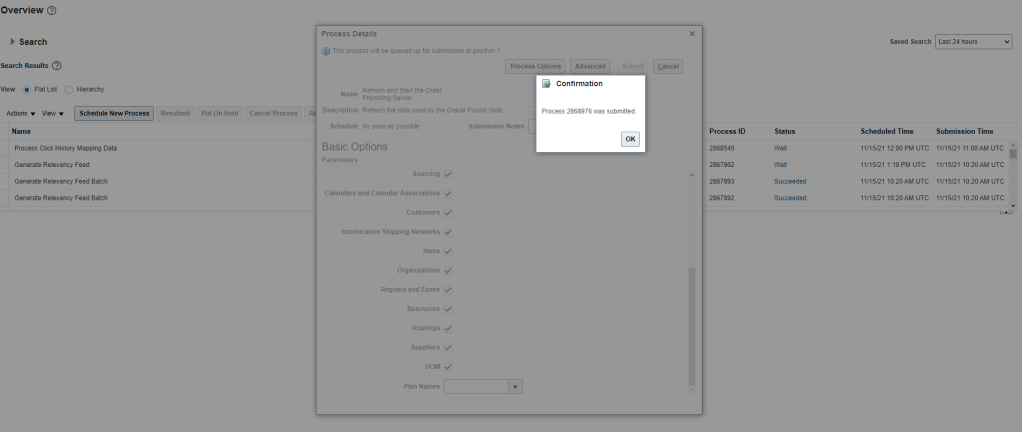
Step 1: Run Job “Extract Global Order Promising Data Store and Store Request Journal”.
Select all parameters except keeping Plan Names field as Blank.
Step 2: Verify Job “Refresh and Start the Order Promising Server” .
If it is not running then Schedule the job,
Select all parameters except keeping Plan Names field as Blank.
Step 3: Create Sales order
Create Sales Order using Item “CM6755001” in Organization “002” and assign Shipping from “003”.
Requested Supply Details , Ensure it has Requested Supply date , 4 calendar days from current date.
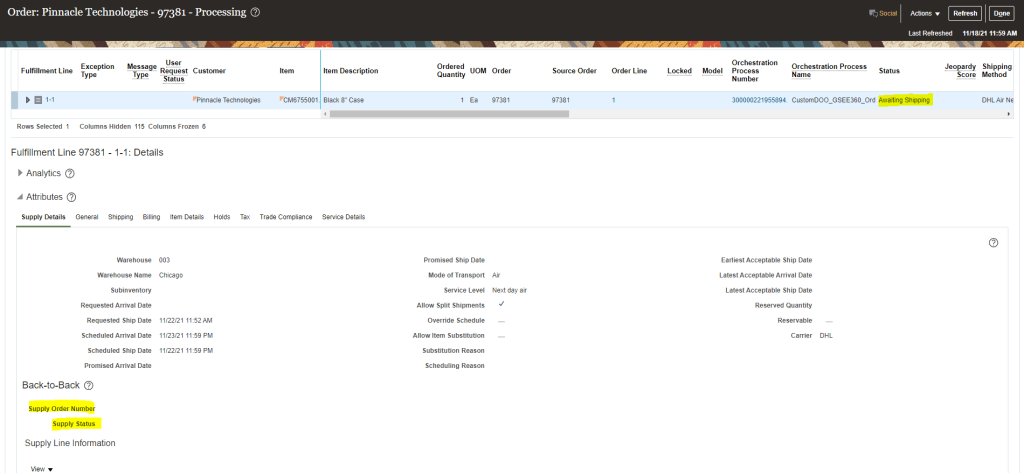
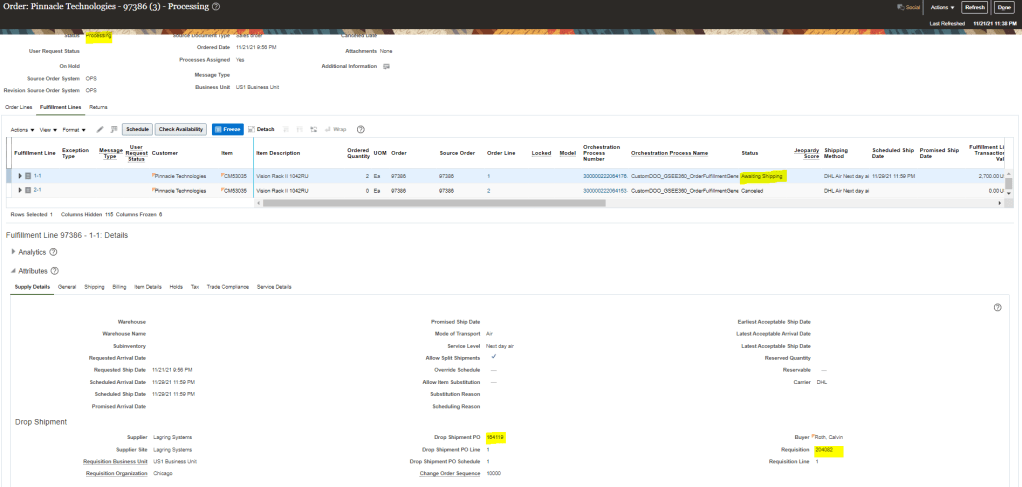
Note down the Sales order. Ensure line status is “Awaiting Shipping”.
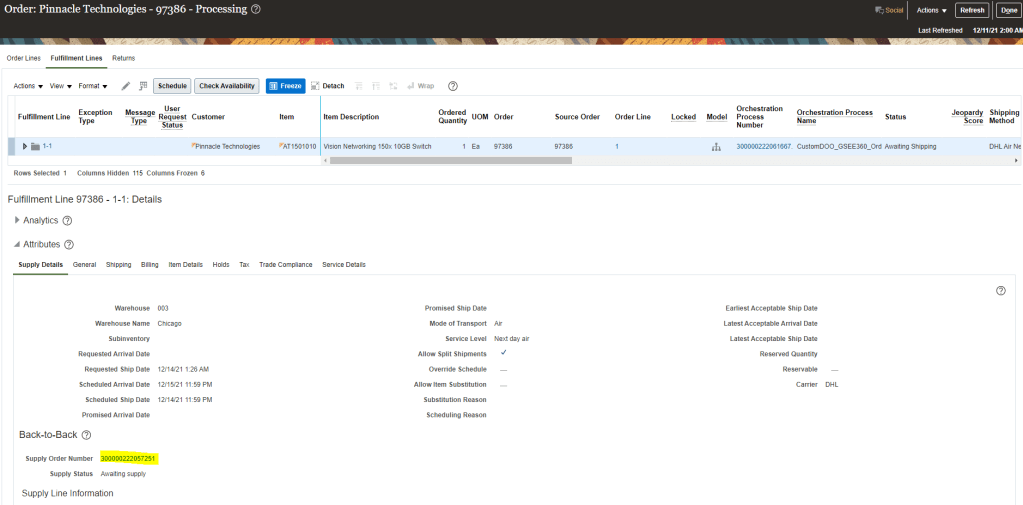
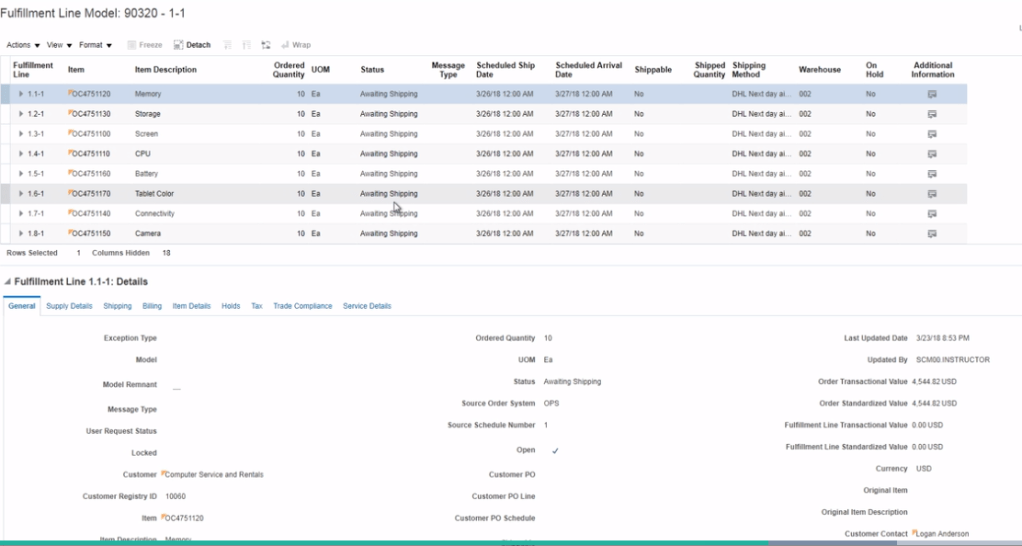
Go to Fulfillment lines to see the Orchestration Details. See the status should be “.Awaiting Shipping”.
Under Supply Details Back-to-Back tab, Supply Order Number is Blank.
Step 4 : Schedule the job “Release Planning Recommendations” and click submit.
Note : It is optional step as this job keeps on running in live environment. So do verify if this job is not running then we can scheduled it for faster processing.
This will enable faster movement of Sales order and lines gets dropped to Supply Chain orchestration.
Step 5: Verify Sales Order
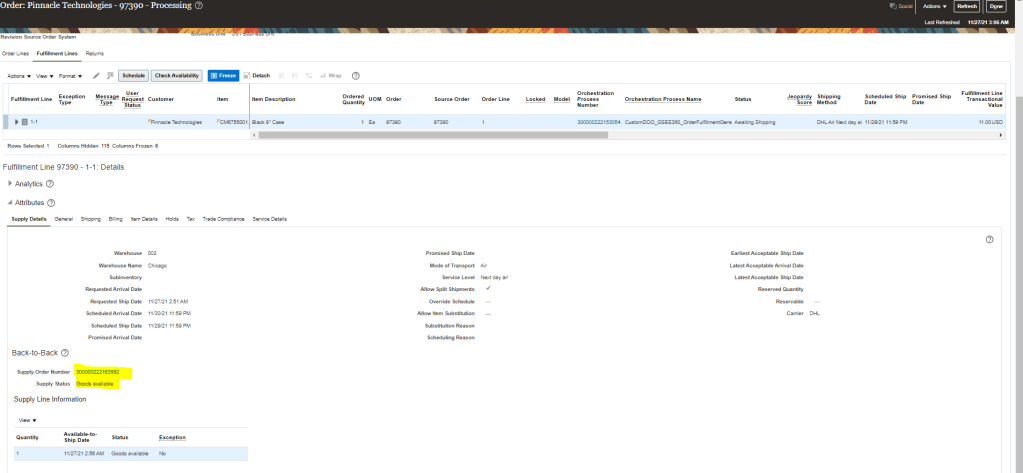
In Sales Order go to fulfillment lines.
Under Supply details Back to Back tab, see the Supply order number created and its current status.
Note : I have used a different order number as i was having issue with previous order number.
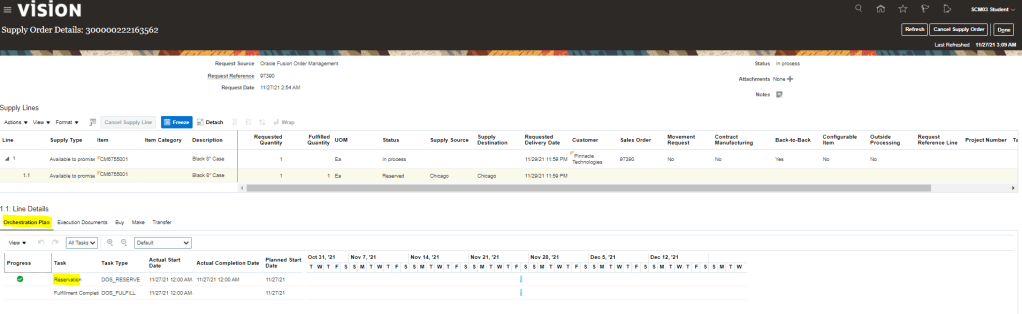
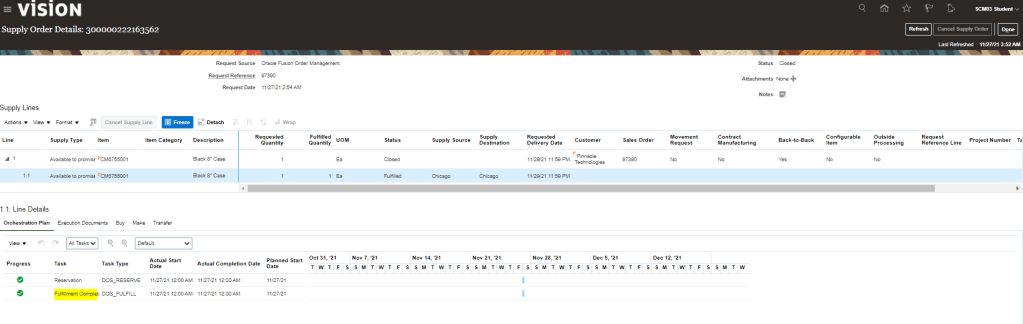
Click Supply Order Number to see supply Orchestration Details. It will take us to Supply Order Details Screen
Click on Detail Supply lines -> Orchestration Plan tab. Purchase Order and Purchase requisition steps have already been completed along with Reservation. Put Away and Fulfillment completion steps are pending.
Step 6: Manager Reservation and Picks
Navigation -> Go to Supply Chain Execution-> Click on Inventory Management -> Task “Manage Reservations and Pick”.
Change Organization to “003” in Inventory Organization.
Select task Manage Reservation and Picks -> Search with Sales order number “97390“.
When Purchase order gets created , we will see Purchase order number instead of On-Hand.
Step 7: Receive Purchase order
Navigation -> Go to Supply Chain Execution-> Click on Inventory Management -> Task “Manage Receipts” .
Enter Purchase order number created for Supply order.
Click on Receive once line appears.
Enter Quantity = 1.
Subinventory = Stores
Click on Submit Button
Step : Verify Sales Order
Sales order should have progressed
Status should be Goods available Status.
Step : Verify Supplier Order
Supply Order status should be “Put Away”.
Put away should have got complete and fulfillment completion is pending.
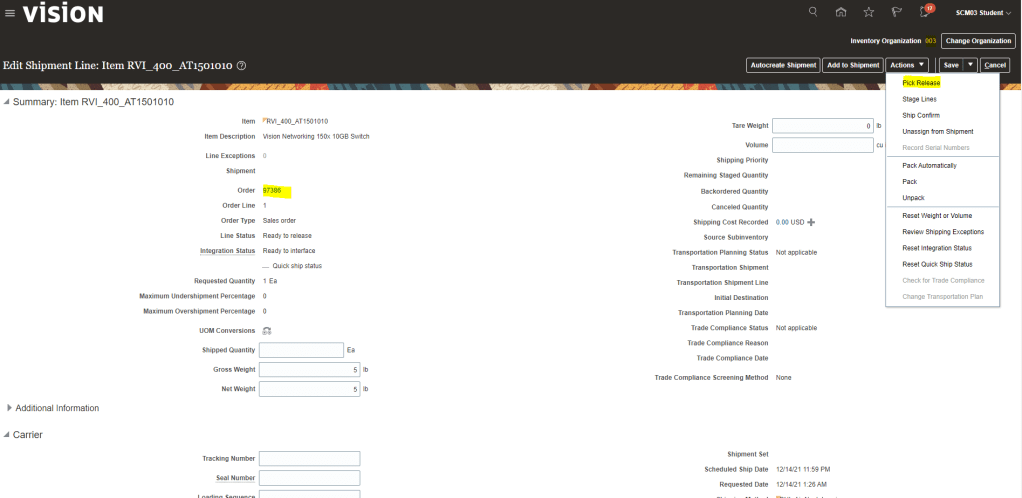
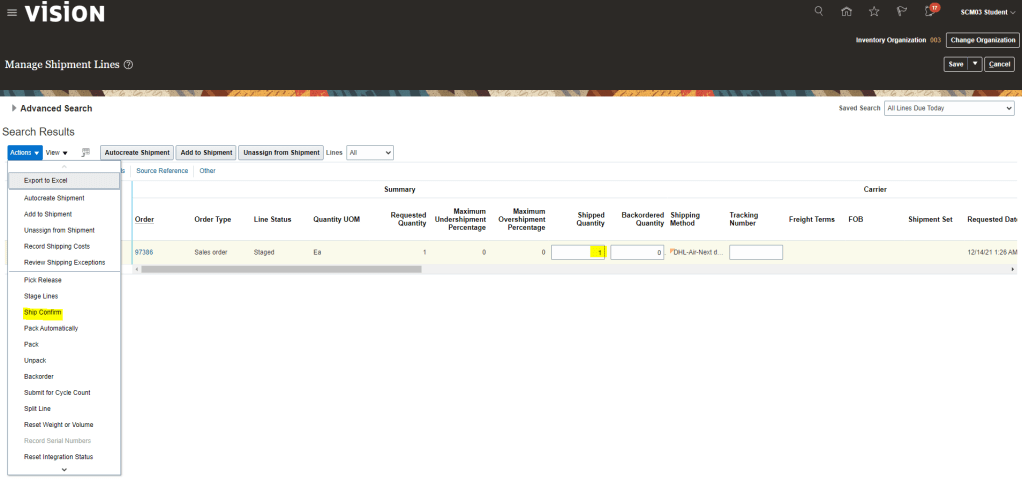
Step 7: Receive Expected Shipments
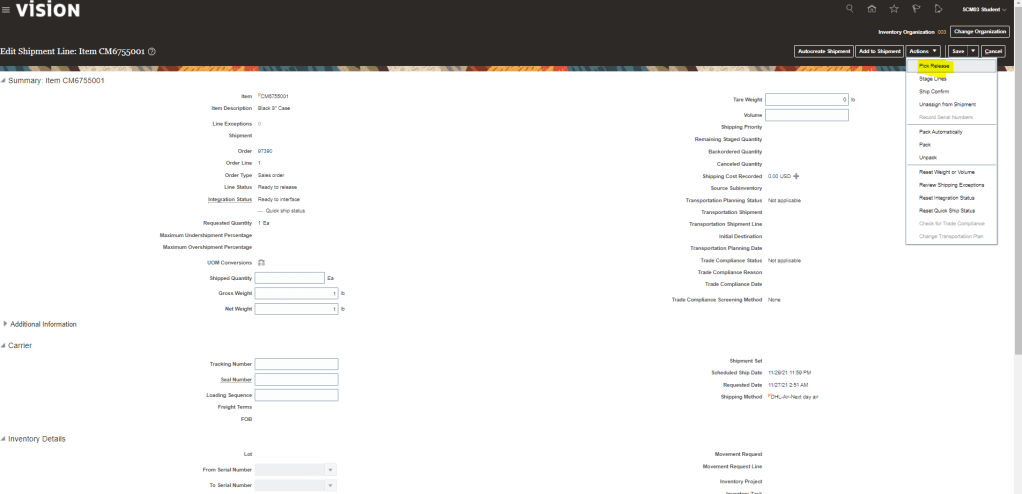
Navigation -> Go to Supply Chain Execution-> Click on Inventory Management -> Task “Manage Shipment Lines”
Enter Sales Order number
Pick Release the Shipments
Once Pick release is clicked, Shipment ID will get generated.
On Clicking Ship Confirm, Shipment ID will get generated.
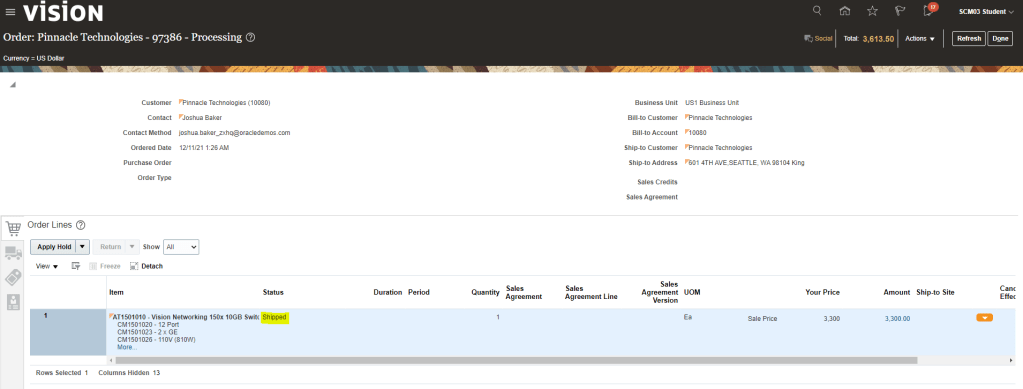
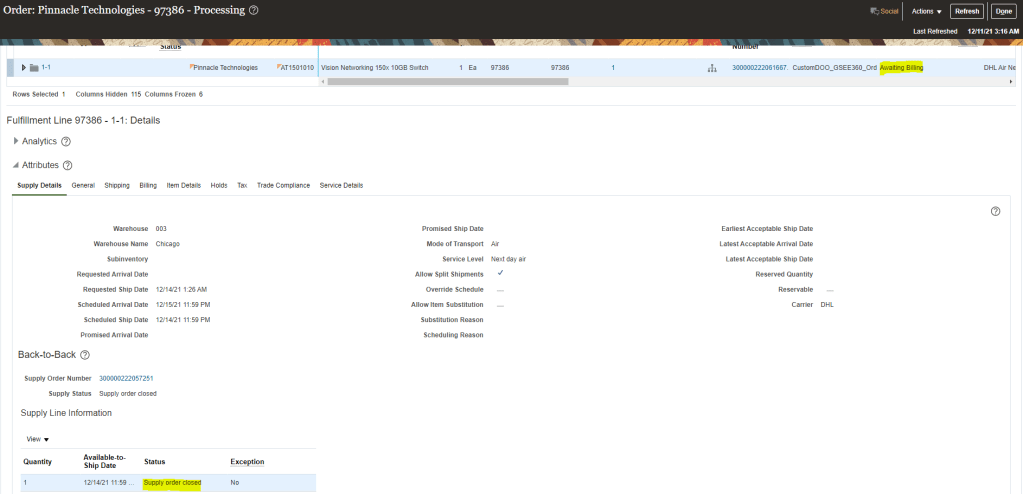
Step 8 : Verify Sales Order
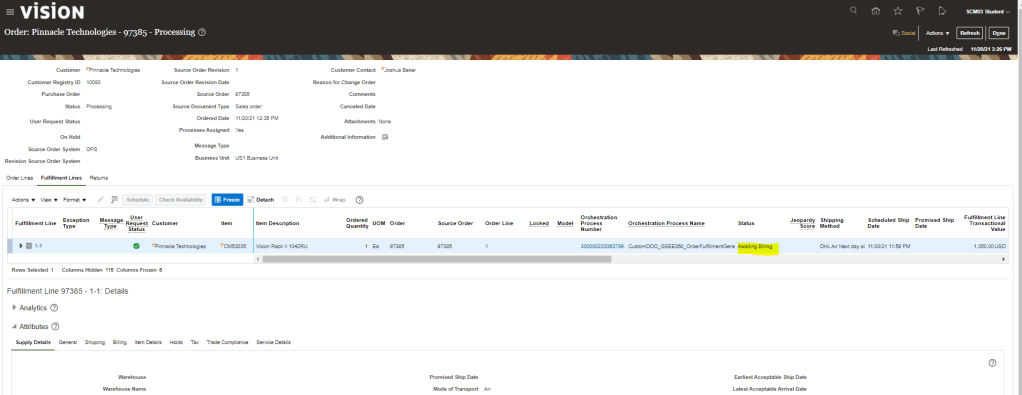
Sales order should have progressed with status of “Awaiting Billing”.
Fulfillment Line Status should be “Supply Order Closed“.
Step 9 : Verify Supplier Order
Put away should have got complete and fulfillment completion is pending.
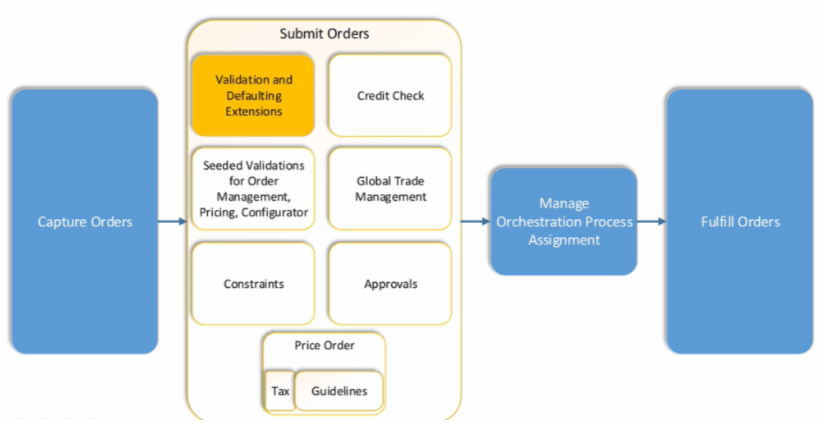
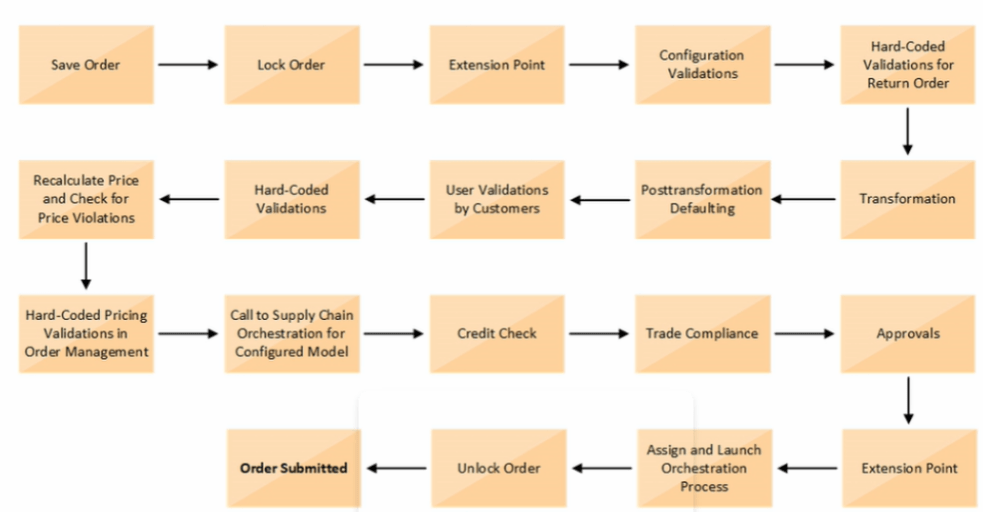
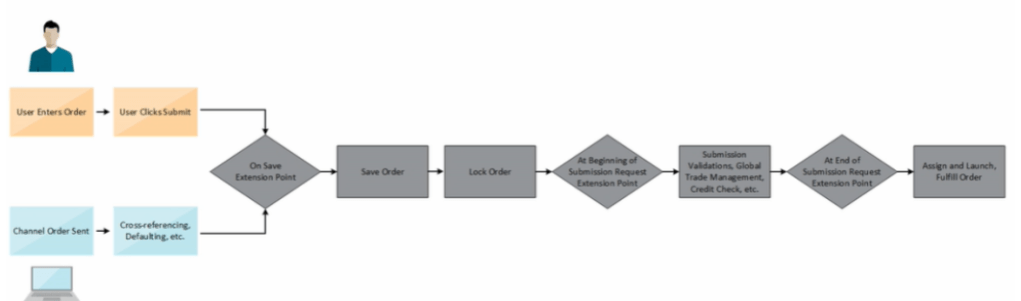
Order Management Extension Point, During and After Submission of Order, gets executed
Assign and Launch Orchestration Process. See Details.
Unlock the Order
Finally Order gets submitted.
Order Management Extension
A Groovy script written by programmers which programmatically changes the Logic or changes the Order Management Deployment. It also call web services
For Order Submission, extensions can be written to
Validate the Order
Validate the Business Rule i.e. Verify that a PO number entered on the sales order matches a PO number in Procurement System.
Set Default values on the Order for following
Default attributes on an Order Line
Fetch Order preferences from Customer Masters to the Order
Fetch values from Original Order to Return Lines
Convert Shipment cost to freight charge in Order Management and then send it to Invoicing
Below is the flow of Order Management Extension. Extension comes into play
At Beginning of Submission Request
During Submit Request
At end of Submission Request
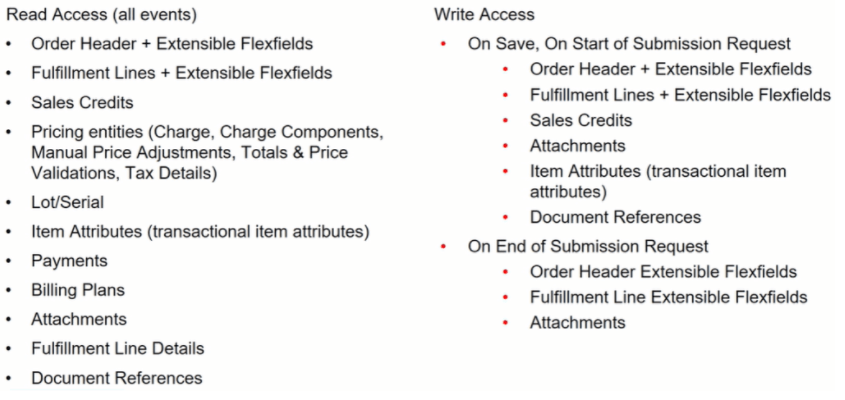
Order Management Extensions : Data Available for Read/Write
Order Management Extension: Read and Write Access
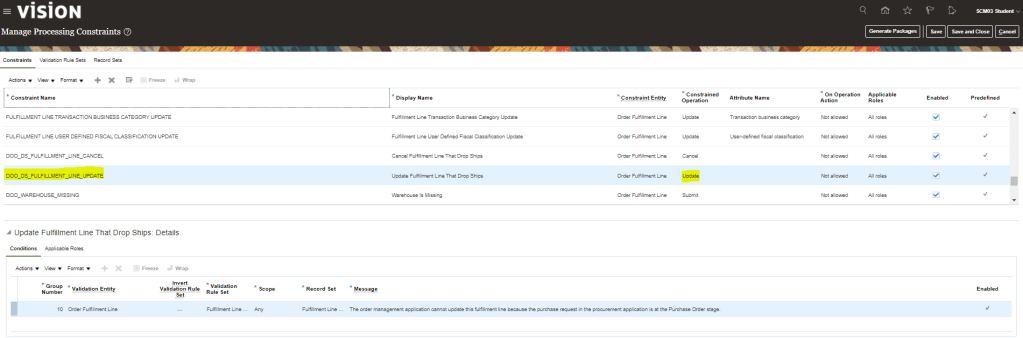
Order Management Extension : Filtering lines in Extensions, Rules and Constraints
Make sure we filter out lines that we don’t want to process when we create an Order Management Extension, Business Rule or Processing Constraint.
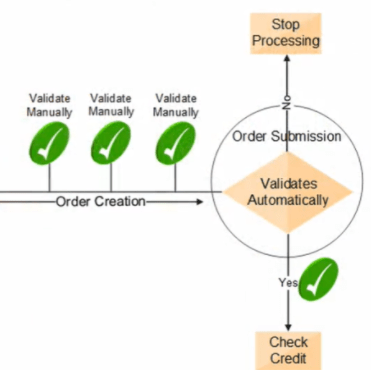
Validations of Order
Before Submission, we can validate Order Manually
At Submission, Order Management Validate Sales Orders Automatically
Verifies required attributes
Check errors related to constraints, pricing, configuration and Taxes
If the Sales Order Validation
Passes, then the process checks the credit, (if this step is part of the Orchestration process)
Fails, then processing stops and the order is in Draft Status
Global Trade Management
If GTM is integrated with Order Management, then GTM may perform below actions upon Order Submission
Verify that Sales order passes any Trade Compliance rules that is setup in Organization
Screen for Export Compliance
Determine License
Service Mappings
Gives us the ability to pass data from an attribute or Extensible Flexfield in Order management to a descriptive flexfield or Interface column in following Oracle Fusion Fulfillment Systems
Shipping
Receiving
Receivables
Purchasing
Service Mappings : Flow
Service Mappings : High-Level Setup Steps
Below are the High Level Setup Steps
Get values that identify the attribute.
Use the Manage Service Mappings Page to map the attributes or Extensible Flexfields to Descriptive Flexfields or Interface Columns
Use the Manage Algorithms page to include additional Logic or Mapping Information from a different level, for example
From Order Header to Invoice Interface Line
From Extensible Flexfields to Interface Line
Order Management Parameters
These Parameters affect most or all of the Order management Cloud
In this topic we are going to discuss about Configurator Modelling, Snapshots, Steps to perform configurator Modelling (workspaces, supplemental structure, rules and UI), Versioning and release of workspace.
Need of Oracle Fusion Configurator
Oracle Fusion Configurator is used for following
Product Configured to Unique Customer Needs
Centralized Management of Configurator Models
Simplified Configuration of Complex Solutions
Cloud Enabled which is Integrated with Order Management.
Configurator Runtime UI
The UI is dynamically assembled at run time by using templates.
Template provide look-and-feel which is Interaction based.
Seeded templates are available for all major navigation and controls.
Visual UI editing of pages is possible in the configurator Models Work Area.
Oracle Application Development Framework(ADF) and Java Server Faces(JSF)
Template Driven User Interfaces (UI)
It quickly Generate Run time UIs. It has following items
Configurator Models and Components Items
UI Template which controls the behavior of navigation through responses to fulfill the configuration components.
Different Templates
Shell Templates -> As name suggest, its the outermost layer
Layout Templates -> It determines the layout i.e. if its form, stack time of presentation
Control Templates -> It represent the selectable representation within the items.
Message Templates
Utility Templates
Integration with Order Management
The Configurator UI is embedded within the Order management UI when a product is being configured.
Reconfiguration is supported during the revision of an order.
Configuration and Validation Services are provided for models.
Configuration details are not saved until the order is saved.
Pricing Segment and Strategy information to price the configuration are obtained from the order.
For Pick to Order (PTO) models, Included Items are added to the order when configuration details are returned to the order.
End users see real time pricing at run time
Defined configured item pricing in Oracle Fusion Pricing application
Display accurate pricing at run time
Display prices for items
Display prices and totals on the Review Page.
Item Structures
we Define Item Structures which comprises of Items and Item Structures i.e Structure Component Attributes
Create Items using the structure
Define Item Classes, User Define attributes and Transactional Attributes.
Define Attribute Groups and Value Sets.
For Car Model if we need to define Item Structure in PIM work area then it should contain following
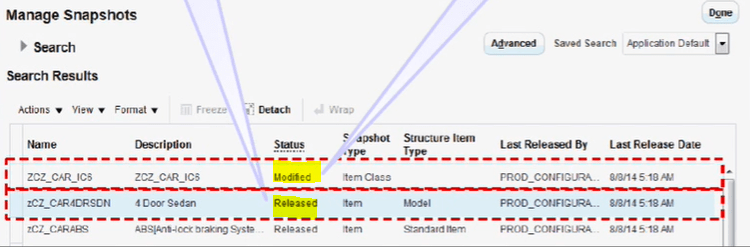
Snapshots
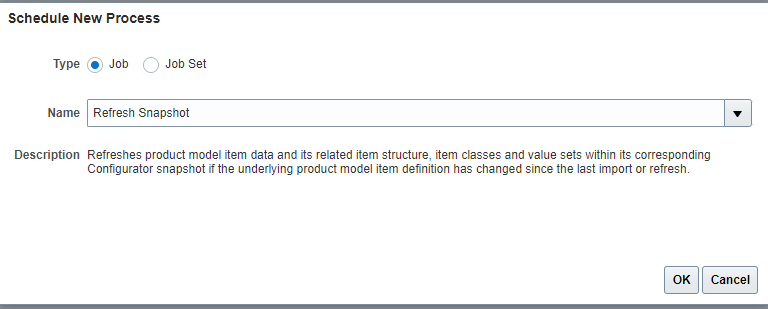
These are the Read-Only copy of approved Product Model entities/data which are imported from PIM work area into the configurator model work area. There is a scheduled job which runs to import the copy into work area . Job name is “Import Model Action”. Model Item Snapshot contains following
Item Structure
Structure Component attributes
Operational attributes
User-defined attributes
Below is the good example of Baseline version and Snapshot taken into Configurator model work area.
Import creates the initial baseline version of a model and then creates corresponding snapshots for all standard items and option classes beneath it.
Any reference models that exists in the item structure are imported along with the model item.
Snapshots are shared across models and all models use the same snapshot of that item. E.g. below 4 different Car Models uses same snapshot of Item “Seat Trim”.
Purpose of Refreshing Snapshots
Its brings updates from Product Model into Configurator Snapshot. The Manage Snapshots task provides snapshot refresh actions
The refresh runs as a scheduled process similar to import
The snapshots that can be refreshed include:
Items(Models, option classes, and standard items)
Value Sets for Item attributes like color
In below example, Option Class Seat Trim had three options Leather, Cloth and Sport. Import option causes it to flow to Product Configurator Manager. Later on Limited Edition got address to Seat trim option class in Product Manager. Refresh Option will copy the added item to Product Configurator Manager.
The Snapshot Statuses include
Released -> When snapshot of new configured Item is brought first time into Configurator Workspace, its status is Released and it is automatically moved to production as there will be almost no changes to be done in Product.
Modified -> After update on Items and/or their components are done in PIM are, refresh snapshot will bring changed item in configurator workspace. Status of Snapshot will be Modified. Once updates to items and their components are tested successfully and on release of Workspace, status of Snapshot changes from Modified to Released.
Changes to an item class can be refreshed without refreshing any item
When the updated item class snapshot is added to a workspace, the corresponding changes are seen in the items in that workspace that belong to the item class.
Snapshot Refresh Models
The Snapshot refresh models are of 3 types
Refresh(Single Item Snapshot)
Refresh, including descendant structure
Refresh, including descendant and reference structure.
Refresh Single Item Snapshot
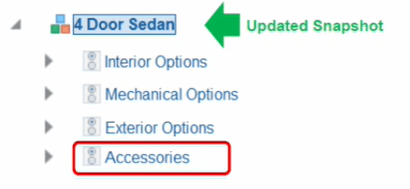
If modification happens at accessories level, and user select Refresh Single Item Snapshot then snapshot of 4 door Sedan gets updated
Refresh including Descendant structure
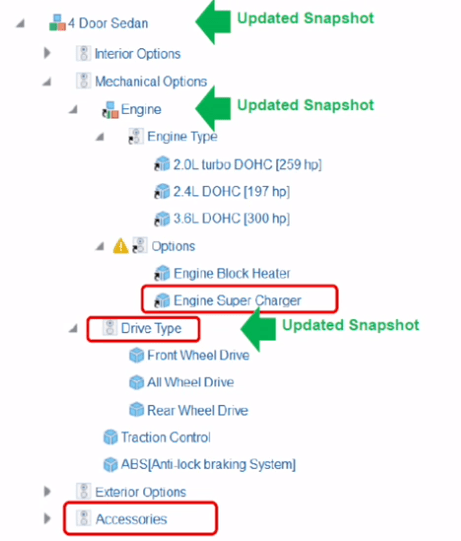
If modification happens at accessories level and Limited Edition gets added in option class Seat trim, and user select Refresh Single Item Snapshot including Descendant structure then snapshot of 4 door Sedan and Seat trim gets updated
Refresh including Descendant and reference Structure.
If modification happens at accessories level and Engine Super Charger and user select Refresh Single Item Snapshot including Descendant and reference structure then snapshot of 4 door Sedan, Engine, and reference type Drive Type gets updated
Purpose of Workspaces
Workspaces enable us to modify and test one or more draft models before they are released into production.
Modified snapshots can also be added to workspaces along with models.
Multiple workspaces allow concurrent draft development
After testing, workspaces can be released into production. All changes made to the models are effective as of the effective start date of the workspace
Participants in Workspaces
Models
Snapshots
Items
Item Classes
Value Sets
Configurator Life Cycle
It starts with Defining Item structure in PIM to Release of workspace. Below snapshot gives a holistic view of different steps between Initial Product Definition to Ongoing Draft Model Management.
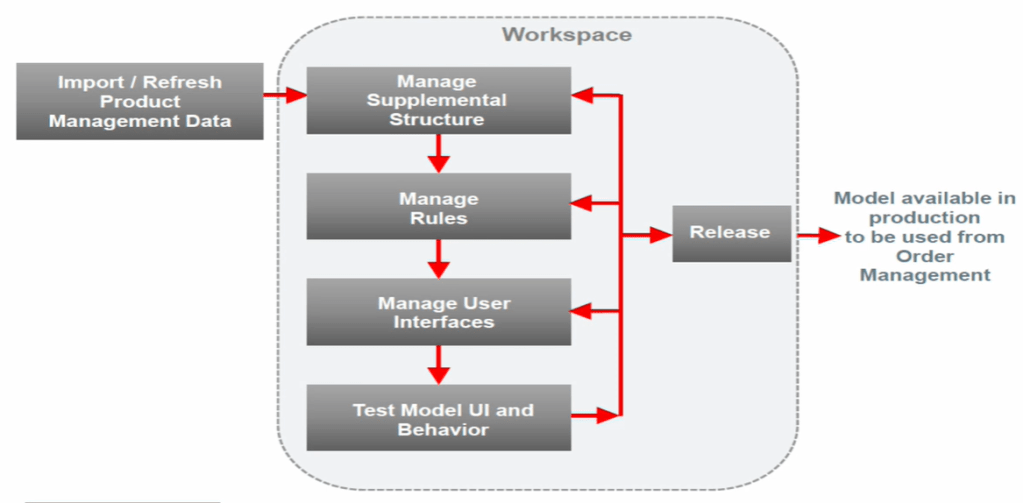
Configurator Modelling
Below is the snapshot of steps which takes place during Configurator Modelling. Right from Import/Refresh PIM data to Workspace, to creation of supplemental structures, creating/updating rules, Manage User Interfaces, Test Model UI and Behavior and finally release it to production environment.
Configurator Modelling Steps
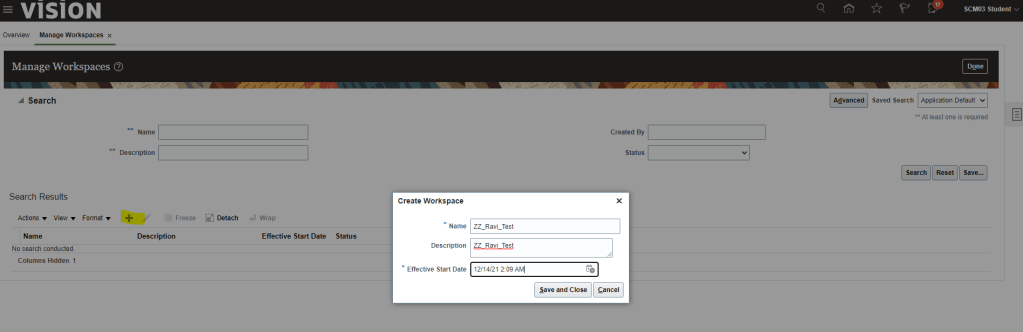
Step1 : Create Work Space
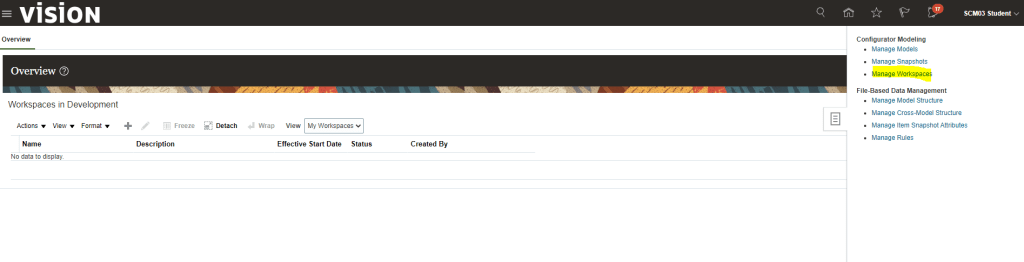
Navigation : Product Management -> Configurator Model -> Manage WorkSpace
Click on ‘+” Button to Create Work Space. Enter following details for workspace
Name
Description
Effective Start Date
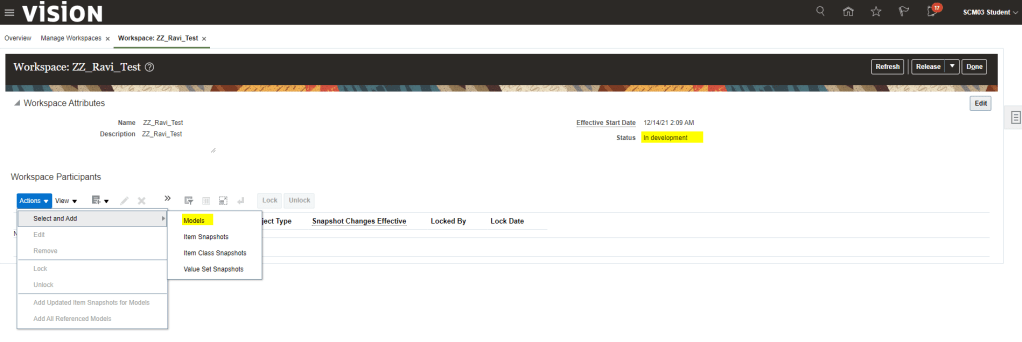
Once WorkSpace gets created, Status becomes “In Development”.
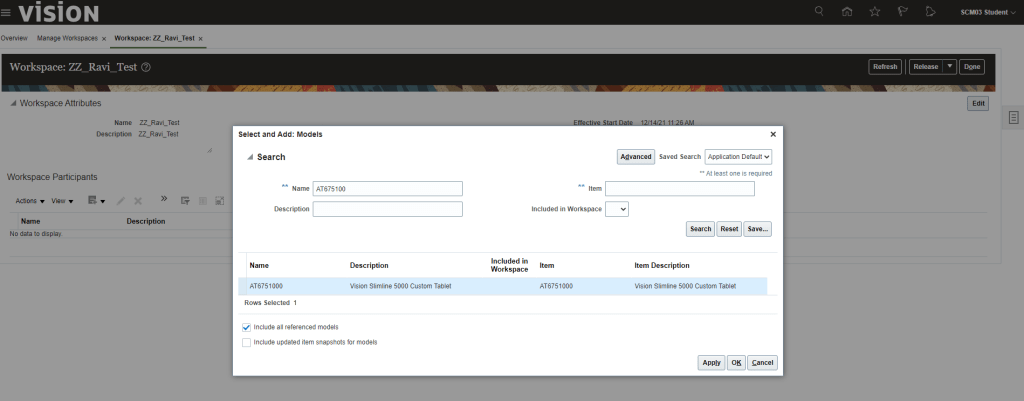
Click on Actions -> Select and Add -> Models
On Selecting Models above, Add models page appear. Enter Item Model which you want to add and click Ok.
In below case search for “AT6751000” and click on Search button. Once it appears, select the line, select the Include all Referenced Models and click on Apply and OK.
Once Ok button is clicked Model and its reference item both gets added to workspace. Do notice they are in Locked state by my user profile.
Note: When any Models/Item class gets added into workspace, by default it is in Locked State. Locking and Unlocking helps in preventing conflicting changes done by other users.
If we do not lock the Model and try to save the changes, we will get below error.
Select Model and click on Pencil/Edit Button to reach the edit screen where we can Edit Structures, Rules and User Interfaces
Step 2: Creating Supplemental Structure
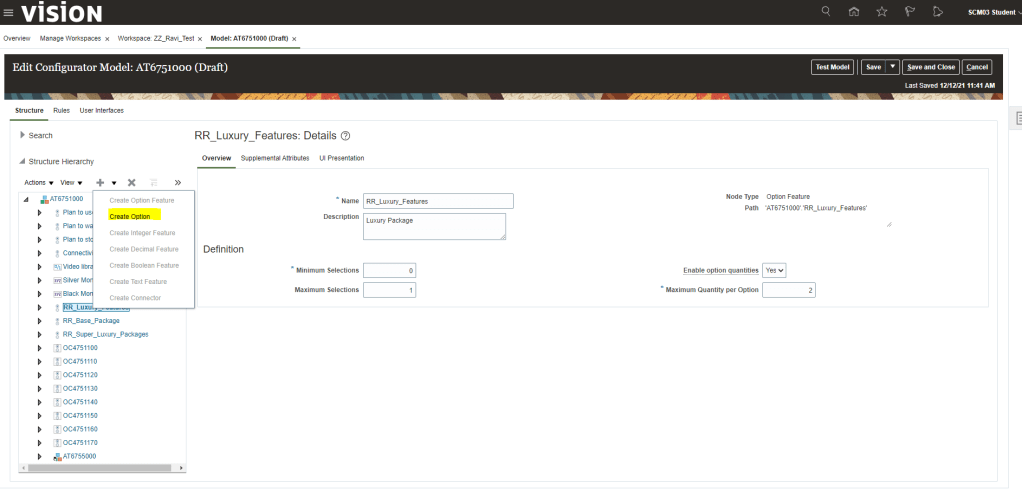
Select “+” button and from the dropdown select Create Option Feature.
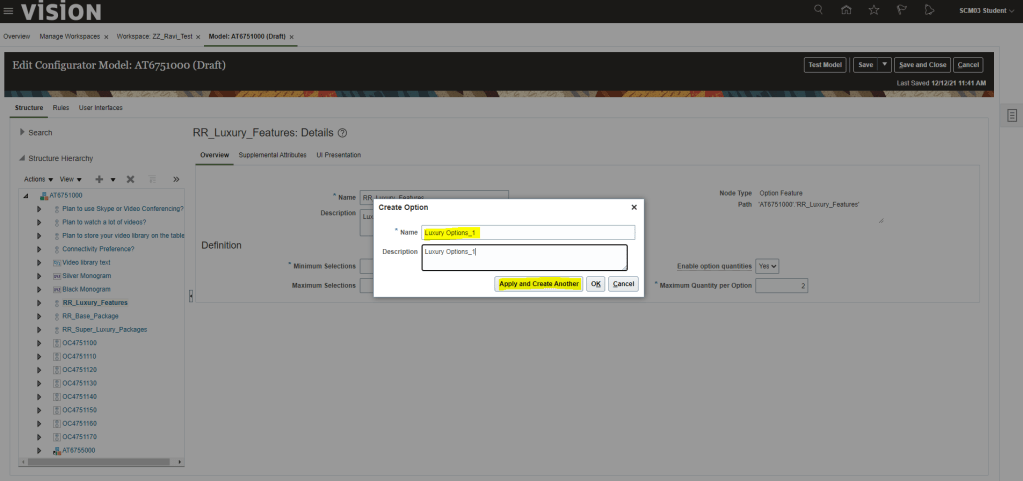
Enter Details as shown below and click on Apply and Create another in case we want to add more options features or we can simply click Ok.
Minimum Selection =
If “0”, we will have option of None in our UI.
If “1”, then we will need to have options in the Option feature else it will give error while testing Model.
Maximum Selection = It implies how many options can be chosen. If we select 2 then we can choose 2 options in our User interface
Enable Option Quantities = If enabled it will allow the quantity of the option to be selected
Maximum Quantity Per Option = for the selected option, what is the maximum value you can choose.
see the Test Model below to get more clarity on above concept.
After adding Option Features, select the option Features and click on “+” button and choose Create Option.
Enter Details for Options and click on adding few more by choosing Apply and Create Another.
After adding Option Features and Option, click on Save.
Testing of Supplemental Structure :
Click on Test Model. It gives following option of Date, UI and Root quantity. Make necessary changes or leave the default value and click on Ok.
Notice the difference between the 3 Option Features packages while doing testing. Difference is explained in below excel chart
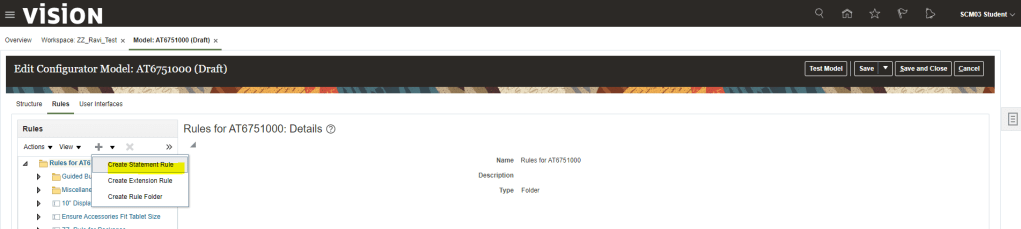
Step 3 : Creating Rules
Select Rule from the Tab and then click on “+” button to add new rule. Enter description as entered below.
Click on Structures -> Select the newly added Option Features and click on “+” button. It gets added to the rule.
From Logic Operator select “implies” from dropdown list and then select option “Luxury_Options_3” and click on “+” button to insert into rule.
Click on Validate to verify syntactically our rule is good.
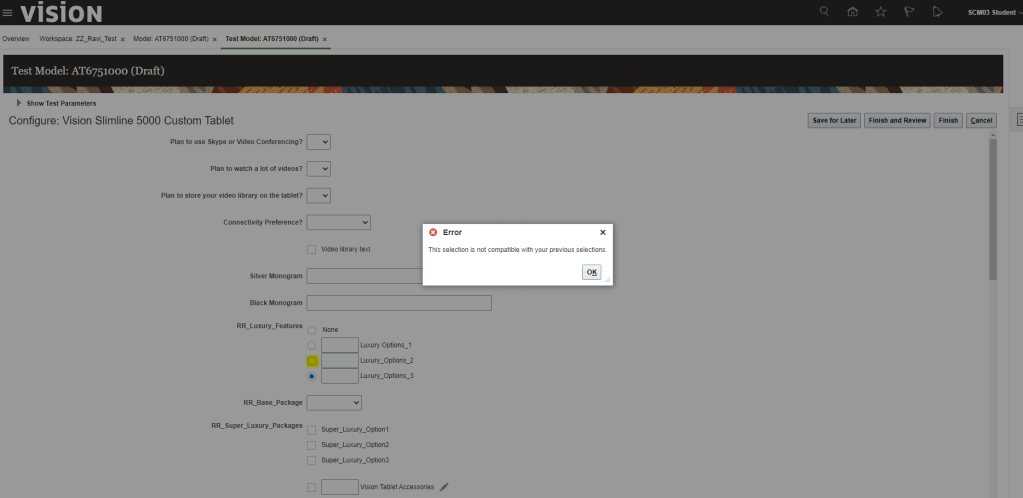
Testing of Rules :
Once rule is set we need to test our model. Since I had selected Rule Class as “Constraint“, so either we can select “None” or “Luxury_Options_3′ from the option feature which we had entered in rule. Any other option will lead to error.
Step 4 : Build User Interface
If Option class has mutually exclusive item, it will be in Radio Button control root template. If it has more than 1 item can be selected from children then it will be Check Box.
User Interface has different styles
Single Page Navigation Styles -> When configured Model Work area is used to create UI.
Dynamic Tree Navigation Styles -> User can navigate using tree Link. Drill down to reference model UI’s.
Step by Step Navigation Styles -> as name suggest navigation is done using steps like a train
Below are the steps for creation of User Interface.
Click on User Interface tab, “+” button to create New User Interface
Give Name of User Interface , UI Template Map can be of different type. Choose Template Map according to your need.
Under Applicability section -> Under Applications -> select “Selected”, Click on Select to choose which application you want this UI to appear.
Under Design Tab -> Under Page section -> click on Actions -> click Page
Under Design section -> Resources -> Under UI Elements -> select the Text
Enter Text Description and give Inline Style. Display can be controlled by selecting Conditionally.
Give Condition under which this page needs to be displayed.
Under Design section -> Resources -> Under Structures -> select the “RR_Super_Luxury_Pages” -> add it as Page Item.
Give Run time Condition = “Always”
Under Design section -> Resources -> Under UI Elements -> select the Image.
Under Image Section -> select Image which you want to add for your test.
Display option can be conditional.
Step 5: Test Model UI and Behavior
In previous steps, we have already tested model while creation of and rules. Below is the steps for testing User Interface.
Testing of User Interface. Click on Test Model. Select User Interface = “zz_Ravi_User_Interface” and click OK
Your User Interface will appear with the new page created by you
Versioning and Release
Below picture depicts how versioning and Release are handled during concurrent development. Versioning is Dynamic(Baseline gets changed as and when version gets released) and Cumulative( Latest version is cumulative of all prior version).
What gets Versioned in Configurator
Below components of Models gets versioned
Supplemental Structure
Rules
User Interface
What all gets Released in configurator
A workspace with all its contents gets released, i.e. Models and Snapshots
Models
Supplemental Structure
Rules
User Interface
Snapshots with changes
Value Set
Item Class
Item
When Model version gets stored in Models Work Area
No Data Duplication Happens
Only deltas gets stored for each version
Version Start Date = WorkSpace Effective Start Date
What are called Model Drafts
Created when added to WorkSpace
Changes scoped under the workspace
Change not in Production
Below is the versioning of Card Model.
Time T1 – Initial Version V1, Packages has Base Trim and Luxury
Time T2 – It has new Version V2, Packages has now Super Luxury added to existing Packages
Time T3 – It has new Version V3, Packages has now Base Trim removed and Sports Super Luxury added to existing Packages
Steps for Version and Release of Model
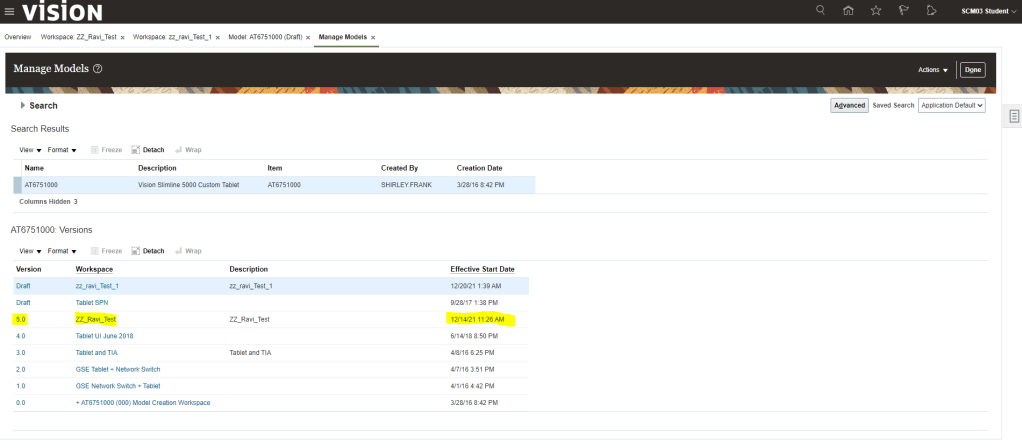
Navigation : Product Management -> Configurator Model -> Manage Models -> Enter Model = “AT6751000”. It will show under what all workspace changes are going on for the model. Current status is 4.0 while 3 of them are in Draft Status.
I have created one concurrent Workspace zz_ravi_test_1 along with workspace zz_ravi_test created earlier to see the impact of change done in Model. Both workspace versions are in Draft Status as none of them got released.
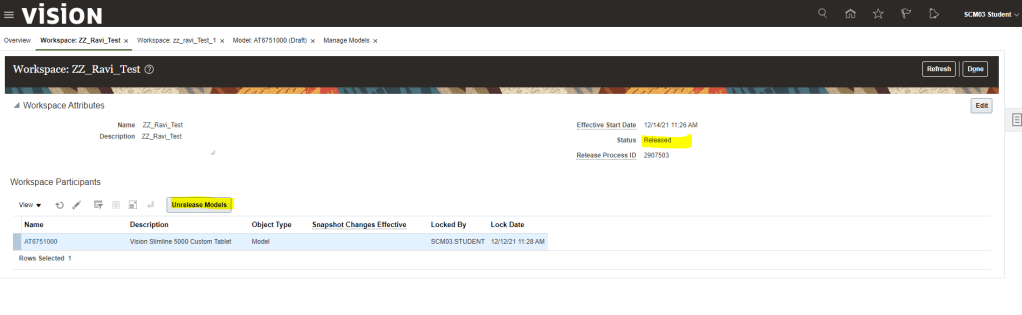
Go to workspace zz_ravi_test, select Model AT6751000 and Click on Release
Warning message comes which we can click “Yes”.
On clicking Submit, confirmation message appears. Status changes to “Release in Progress”
After clicking refresh, Status changes to Released and we get option to “Unreleased Models”.
Now verify the version of Model “AT6751000”, It will change from 4.0 to 5.0 of the workspace zz_ravi_test
Scenario where Model with Release date of future is changed again in Work Space
Verify the Model version “AT6751000”. Just for Note, model gets added zz_Ravi_test_5 after workspace was created
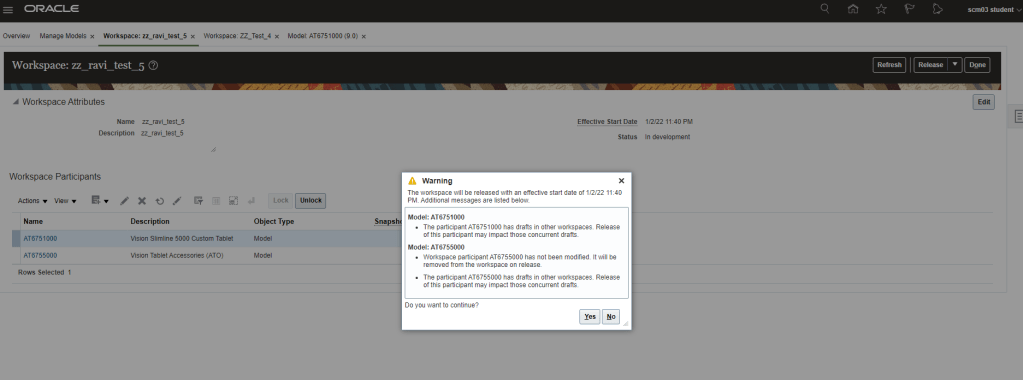
Create workspace zz_Ravi_test_5 and add model “AT6751000”. It gives a warning that there is a release model with effective start date of future date.
Make changes to UI with below changes
Text “ZZ_Ravi_test_5” is added under current workspace Text ZZ_Ravi_test_5.
Text “ZZ__Ravi_test_4” which was added under workspace ZZ__test_4 is not visible on above page as it is still not released into production .
Save and Compile the changes.
Test the model.
On releasing the workspace, It gives error of future date
Change the Effective date of Workspace zz_ravi_test_5 to future release date, release date greater than release date of workspace zz_test_4.
Workspace gets released with Warning.
Save and compile the changes.
Release the Workspace.
Workspace gets released
Workspace zz_ravi_Test_5 gets released
Version 10 gets created for Workspace zz_ravi_Test_5.
Scenario where Configurator has rule and we try to release it
We can make modification to Model, add structures and rule.
If rule has error
It will allow to save and compile as well as also let Test the model with a warning.
But if we release it, it will execute the process of release and fail with error.
Error log depicts that there is Rule Compilation Errors.
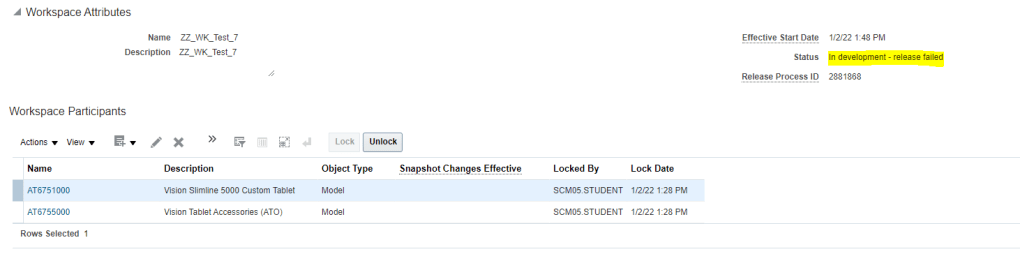
If we check the workspace status, its in Development-release Failed state
How to Unrelease a Model which was already released .
In scenario if we have made changes in a model and would like to undo the change, Fusion gives a capability of unreleasing the model but it comes with a caveat.
Models with release date of future can only be unreleased else it will return in error
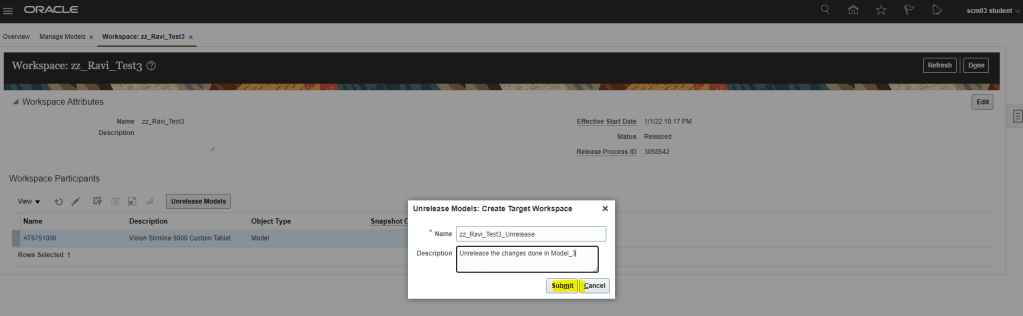
Click on Unrelease model.
Enter Name and Description and click on Submit.
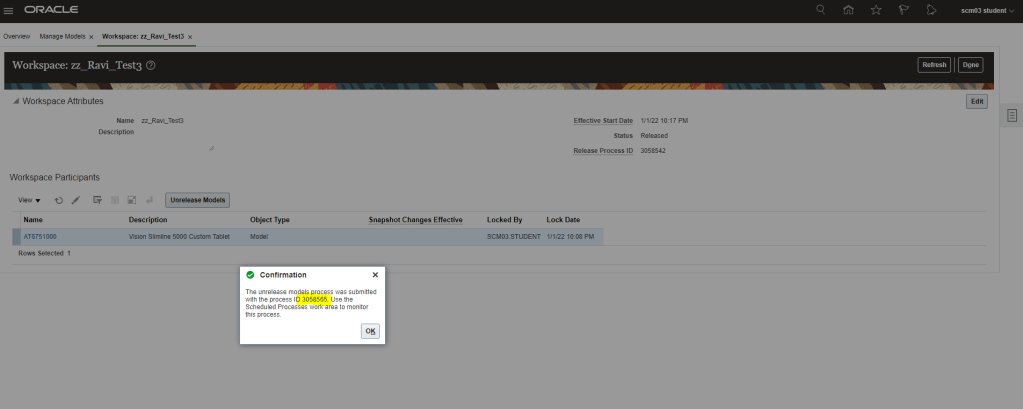
Unrelease Job gets submitted
Job resulted in Error.
Log clearly says, Models in a workspace with future Effective date can be unreleased.
Style = “Configure to Order Blanket Purchase Agreement”
Procurement BU =”US1 Business Unit”
Supplier = “Lagring Systems”
Supplier Site = “Lagring Systems”
Supplier Contact = “Swensen,Lars”
Currency = “USD”
Buyer = “Roth,Calvin”
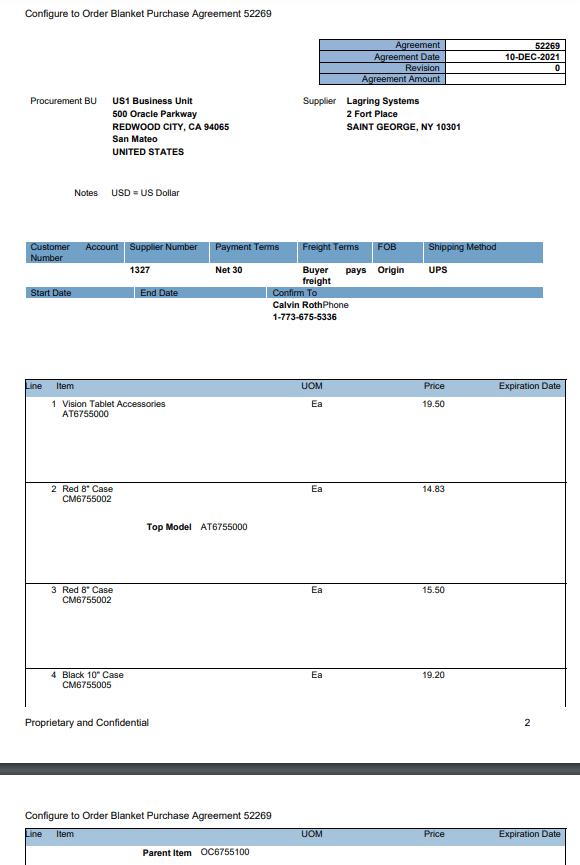
Using “+” button add below Items for the Purchase agreement with below condition
Item “AT6755000” to be added with a price
Item “CM6755002” to be added standalone with a price
Item “CM6755002” to be added with Top Model = “AT6755000” and with a different price.
Reason for doing it is if CM6755002 is purchased as part of configuration which has Top Model as “AT6755000” it will have price of $14.83 but when CM6755002 is purchased as part of some other configuration it will have price of $15.50
Item “CM6755005” to be added with Parent Item = “OC6755100” and with a price.
Once details entered, click on submit button.
We can view PDF to see the details of BPA
Steps for CTO Buy Flow
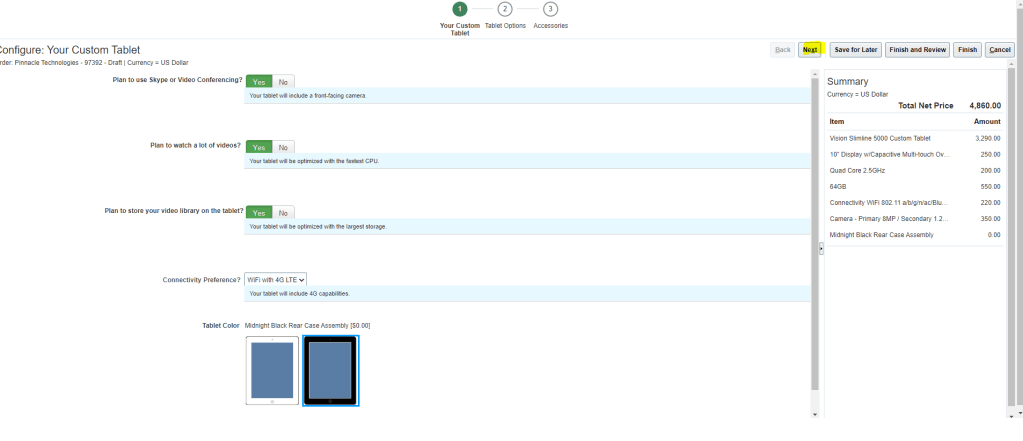
Step 1: Create Sales Order with configured Item.
Please note : There is some issue with CTO item with which BPA was done in setup so taking different CTO item,
Create order with CTO item “AT1501010”
Once item is added it will ask to configure and Add so Navigate the steps to of Configure and ADD
Select the Requested Date , 3 days from current Date and click on Submit Button
Switch to Fulfillment View to verify the status of Order Line
Status = “Awaiting Shipping”
There will be Supply order created for it.
Click on Supply order to navigate to the Supply Order screens. Purchase Requisition and Purchase order will be created.
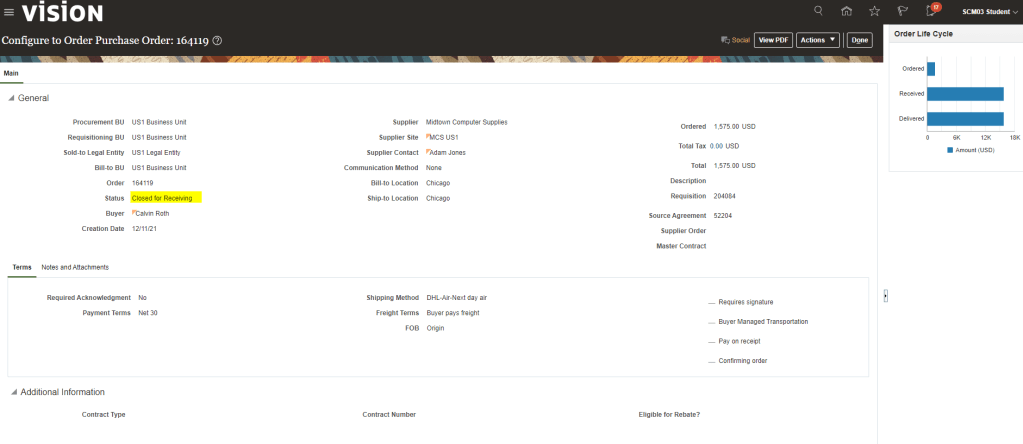
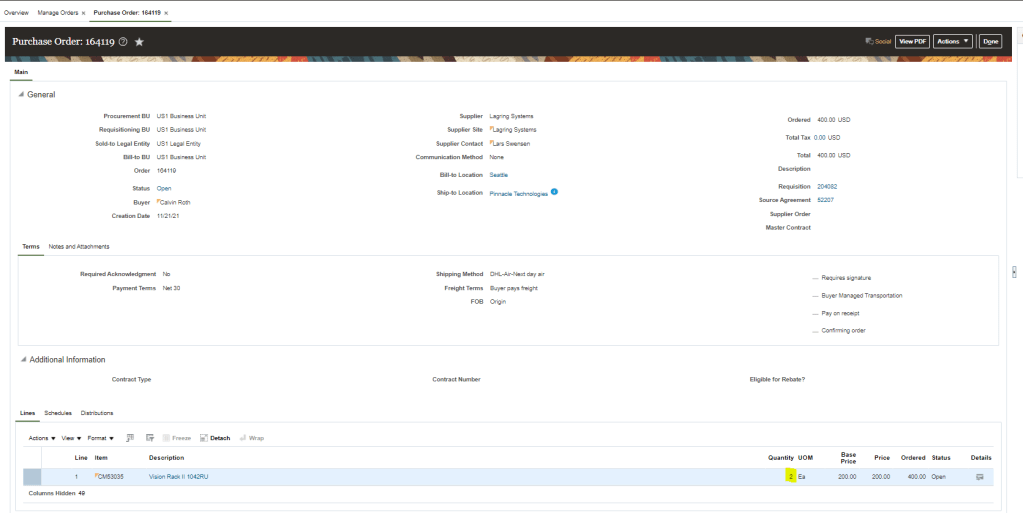
Purchase order = “164119”
Purchase Requisition = ” 204084″.
Click on Purchase Order number = 164119″ to navigate to Purchase order screen.
Click on “View PDF” to see the Document of Purchase Order.
In this topic we are going to Cover Work Definition of ATO item and how to View and Complete a Work Order.
Pre-requisite : Do go through the Configure To Order details to get basic understanding.
Configured Item uses either Make or Buy Flow. ATO always uses Make flow for the Fulfillment process hence Work Order comes into picture. In case of Buy Flow, Purchase order comes into picture
Assemble to Order Work Definition
ATO Model Work Definition Operations Items
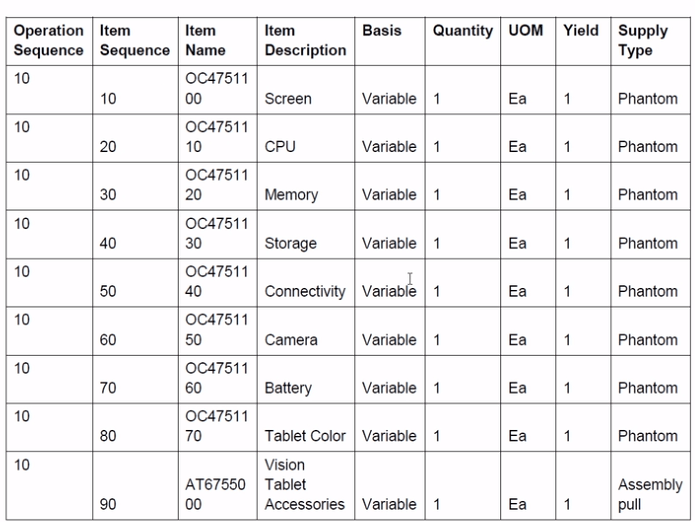
Define Materials requirements for Operations
Must use primary item structure
Assign a component from any level
Must assign entire quantity.
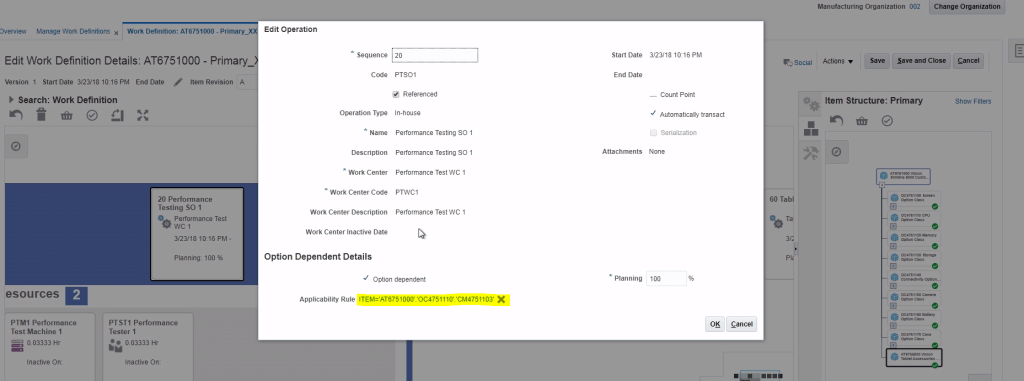
Option Dependent Details region contains operation attributes specific to the
Mandatory or Option Dependent
Applicability rule -> It comes into picture when Option is selected.
Planning % -> It determines % of sales order having Optional Dependent items
Work Definition
All attributes mentioned below comes from Product Model hence it cannot be edited in Work definition page.
Any changes made in Product model will flow to work definition by “Work Order Definition” Schedule Process.
Configured Item Work Order
Configured Item Work Definition is :
Created Dynamically based on
Primary ATO Model Work Definition
Selected options and transactional item attributes
Not Stored
Configured Item Work Order is:
Created based on the configured item work definition
Reserved against the sales order
Configured Item Work Definition
Below is the flow of CTO Work Definition
Creation of Work Definition for ATO Items
Step 1: Create Work Definition Names.
Navigation : Manufacturing -> Work Definition -> on right side click on “Manage Work Definition Names”.
Below screen appears where we can create new work Definition.
Enter Display names, Type = Standard and check “Used in Planning” and click Save and Close.
Step 2: Create Work Definition.
Navigation : Manufacturing -> Work Definition -> on right side click on “Manage Work Definitions”.
Click on “+” button to create new Work Definition.
We can create work Definition from Existing or create new one.
Enter Work Definition Name created in Step1.
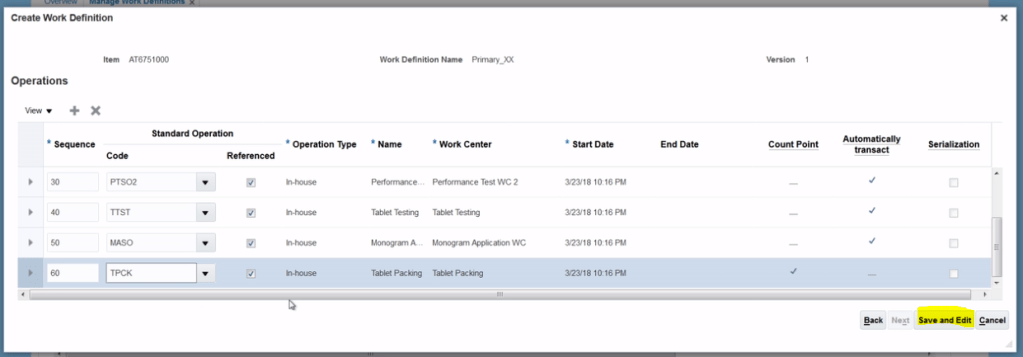
On clicking Next, below screen appears. Enter all the details/components item and click on Save and edit.
After adding Items, work definition appears as shown below
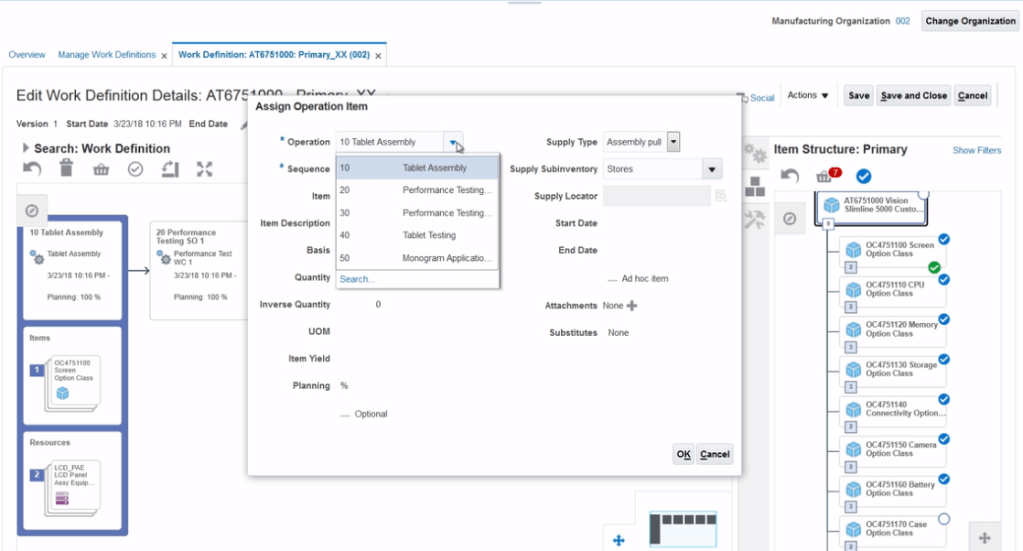
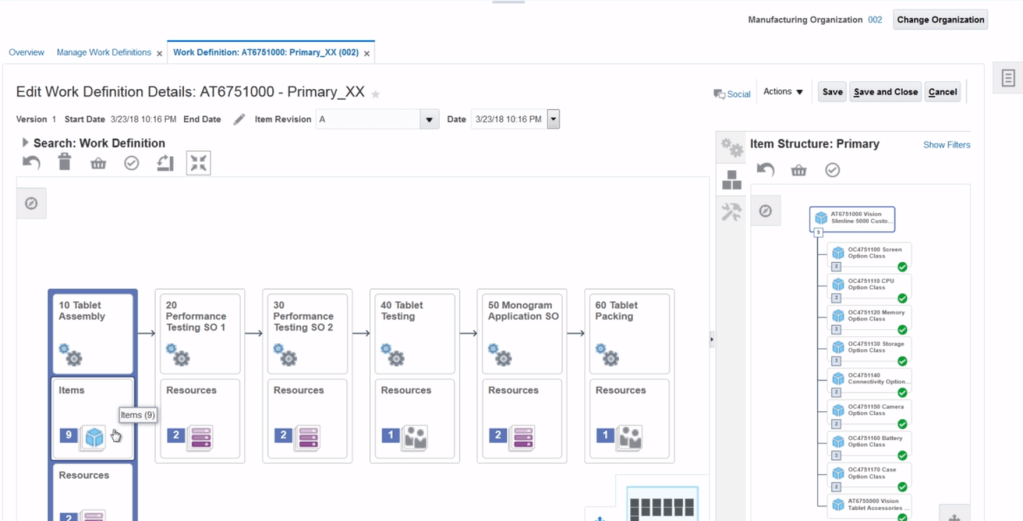
Step 3: Assign Items to the Operations of the work definition Items.
Task is to drag and drop Items from Item structure on the right side to the Operations.
Drag item OC4751100 to Operations 10 Tablet Assembly.
After drag and drop, below is how it assignment of Items to Operations looks.
Select Collections of Item on Item structure side and click on assign. Once assigned select corresponding operations and click on ok.
Click on Actions -> Assign
Click on Expand Icon to see expand to other Items to remaining Operations.
Below screen appears
Right click on Item -> Actions -> Edit
Verify the Operations Item details
Click on edit on each item to compare with below table.
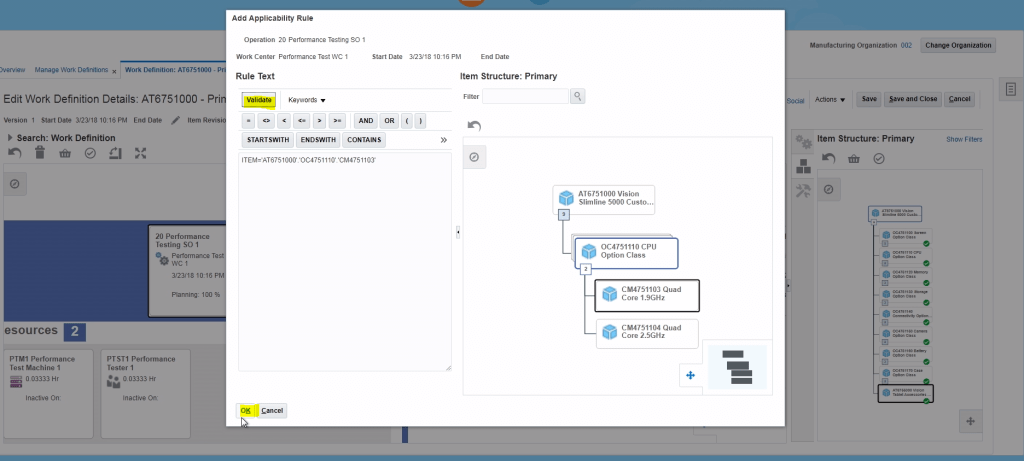
Step 4: Add Applicability Rules
Select steps 20 -> Right click -> Click on Actions -> Edit
Select Options Dependent and then click on “+” button to add Applicability rule.
Below window opens, drag and drop from item structure to rule text. Rule gets added automatically.
Click on Validate and then Ok.
Applicability rule gets added to Operations 20.
If we have added all applicability rules, click on Save and Close.
Completing a Work Order for ATO Items
Navigation: Manufacturing -> Work Execution -> Select “Manage Work Orders”.
Select with Status = “Ready” or enter Work order “WO-002-1025-166751000*200*
Enter Work Order “WO-002-1025” created at time of Sales order
Status of work order is “Released”
If Production Priority = “1” it means work order uses the primary work definition of the ATO model.
Click on Operations Tab which shows different processes which are necessary to complete the configuration.
Below screen gives complete view of Work Order.
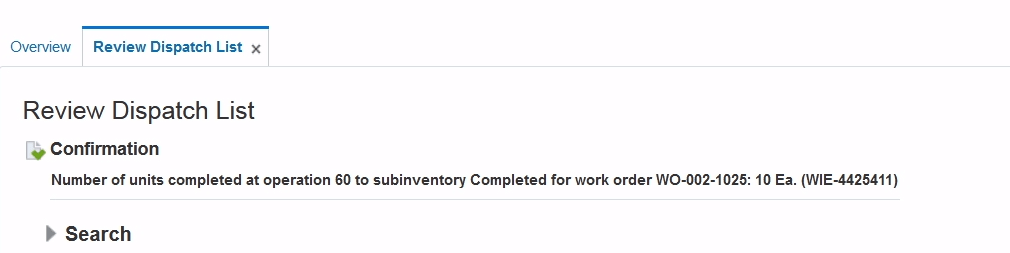
Enter quantity = “10” and click on Quick Complete to complete the Work Order.
It is a business production strategy where products that are ordered by customers are produced quickly and are customizable to a certain extent.
It typically requires that the basic parts of the product are already manufactured but not yet assembled.
Once an order is received, the parts are assembled quickly and the final product is sent to the customer.
E.g: Company has all components of Laptop, based on customer selection of configuration, it assemble the components and then ship to customer.
Pick to Order (PTO) Models ->
It is a configure-to-order environment where the options and included items in a PTO model (finished good) appear on pick slips after we receive the sales order from customer.
Pickers gather the options (based on selection rules), the predefined shippable products parts/components or service from their predefined locations using pick slip and then ship the order.
It is assumed that options and components quantity are readily available. It is an alternative to manufacturing the parent item on a work order and then shipping it. There is no additional value added after getting the customer order.
E.g: Computer System (CPU, Monitor and Printer) A pick to order model can have PTO option class, PTO items, ATO model, ATO Option class and ATO option items. There can not be any PTO model, PTO option class or PTO item under an ATO model. You want to manufacture a promotional laptop computer, you need laptop computer, diskettes, accessories and battery pack. Here, you define PL computer as PTO model, laptop computer as ATO model, battery pack, diskette and accessories as purchase items.
Standard, model and option class Bills of material, can include bills for pick-to-order bills, Pick-to-order is also an item attribute that you can apply to standard, model, and option class items. Oracle Master Scheduling/MRP and Supply Chain Planning does not support planning for pick-to-order models and option classes. Pick to Order (PTO) items have the Pick Component attribute set to Yes. Pick-to-order bills cannot have fractional component quantities if Oracle Order Management is installed. You cannot create routings for planning or pick-to-order items.
Hybrid -> Combination of ATO and PTO models
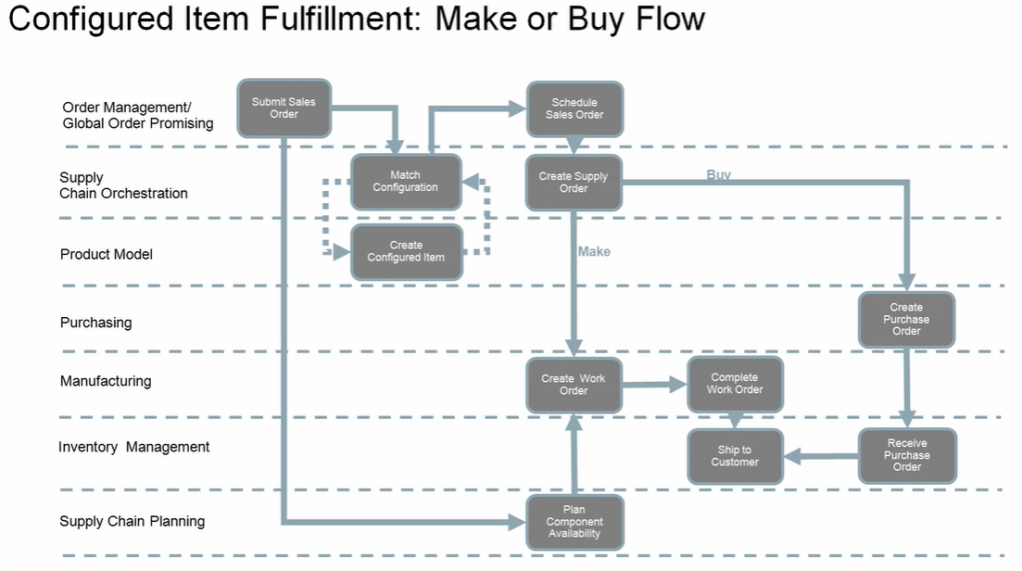
CTO (Configured to Order) Fulfillment Flow
Below item depicts fulfillment types of Configured Item, It either chooses
Make -> Work Order gets created.
Buy -> Purchase order gets created.
Sourcing Supply of CTO
View Supply order in Supply Chain Orchestration
Drill down to the supply order from the Order management Order Fulfillment Interface.
View the supply line details
View the execution documents and the Make or Buy details, noting the work order number.
Make Branch view work order in Manufacturing
Examine dynamic work order creation for configured items based on item definition, option items and transactional item attributes selected based on applicability rules
Complete work order product , receive into inventory.
Buy Branch -> View purchase order in Purchasing
Examine Purchase order creation
Complete Purchase order product receipt and put away
Fulfillment of CTO
View processing of supply order in Supply Chain Orchestration
view the status of the order tracking line
view the reservation against the customer order and note the reservation on-hand inventory
Ship the order in shipping
Create the shipment against the customer order and release the line
View the status of the supply order in Supply chain Orchestration
View the status of the fulfillment order in Order management customer
Exceptions Management for Configured Item during Order Creation
There are two categories of exceptions which happens
Error : If the configured item cannot be created then error is returned and Order processing fails.
Exception : If the configured item was created, but there was an issue with additional information for downstream processing, then order processing continue but supply chain Orchestration logs the failure as an exception
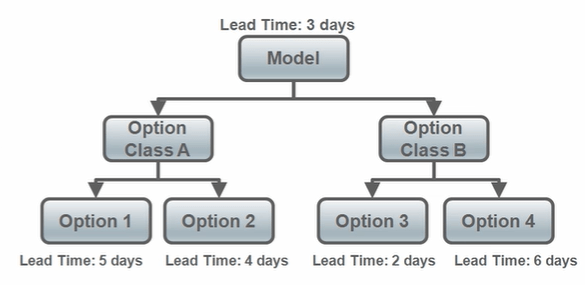
GOP use of Lead Time Determination for Promising
Global Order Promising calculates the longest path to determine the Lead time associated with a configured item.
Using below example, if Option1 and Option 3 are selected in a configuration then
Lead Time = Max[(Option 1+ Option Class A + Model), (Option 3 + Option Class B + Model)]
Lead Time = Max[(5+3),(2+3)] Days
Lead Time = Max[8, 5] Days
Lead Time = 8 Days
Using below example, if Option 2 and Option 4 are selected in a configuration then
Lead Time = Max[(Option 2+ Option Class A + Model), (Option 4 + Option Class B + Model)]
Lead Time = Max[(4+3),(6+3)] Days
Lead Time = Max[7, 9] Days
Lead Time = 9 Days
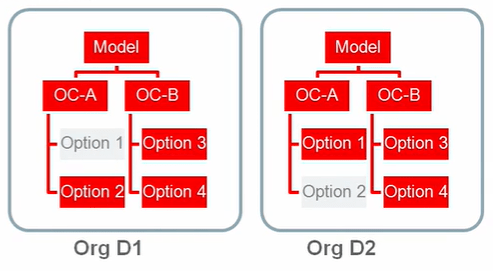
GOP uses Option Specific Sourcing
Global Order Promising applies Exclusion rules while making Sourcing Decisions for Configured Item.
In below case we have following sourcing rule exclusions
If Option 1 is selected then D1 cannot be a source.
If Option 2 is selected then D2 cannot be a source.
So for GOP fulfills a Configured-To-Order item with following
Option 1 is selected only from D2.
Option 2 is selected only from D1.
Forecasting ATO Models
Create and process Organization specific forecasts for ATO models in Oracle Planning Central Cloud.
Below are the different types of forecast models we have in planning central.
General statistical forecast for ATO models : uses shipment and booking history to forecast
Consume model forecasts : Sales orders for configured products uses consume model forecasts.
Explode remaining model forecast : Generate production forecasts for option classes and options.
Create supply for organization-specific forecasts: Source components and subassemblies using standard planning sourcing rules.
CTO Planning
Sourcing rules defined for the configured item are considered before sourcing rules for the base model when creating supply for the configured item
Forecast demand for a model includes only end demand for the model
It does not include dependent demand if it forms a component of another model
Planning percentages defined at the operation level within the work definition of the model are respected
Pick-to-order(PTO) models are planned
PTO represents customer-ordered configurations picked and shipped separately, to be assembled by the recipient.
Planning Central plans for the PTO model and the individual components.
Setups to be done for CTO Order
Set up 1: CTO Item Creation
Navigation : Setup and Maintenance -> Click on Search Button -> Enter Task “Manage Item Class“.
For Configured Item, we can use existing Item class or create our own new Item Class.
Ensure Item Creation Allowed is checked
Under Item Management, Number Generation, we will select
Item Number Generation Method = “User Defined”
Configured Item Number Generation Method = “Sequence”
Starting Number = “100” , all CTO Items will get created starting with sequence of “100”
Prefix type = If we select any value like “CTO”, all CTO items will have prefix value “CTO”. We can choose either of
User Defined
None
Model Item Number
Incremented By = “1”, what would be the next sequence of CTO items
Suffix type = We can choose either of
User Defined
None
Model Item number
Delimiter = We can choose either of
Underscore
Asterixis
Hyphen
Hash
None
ATO Child Items
ATO Option Classes.
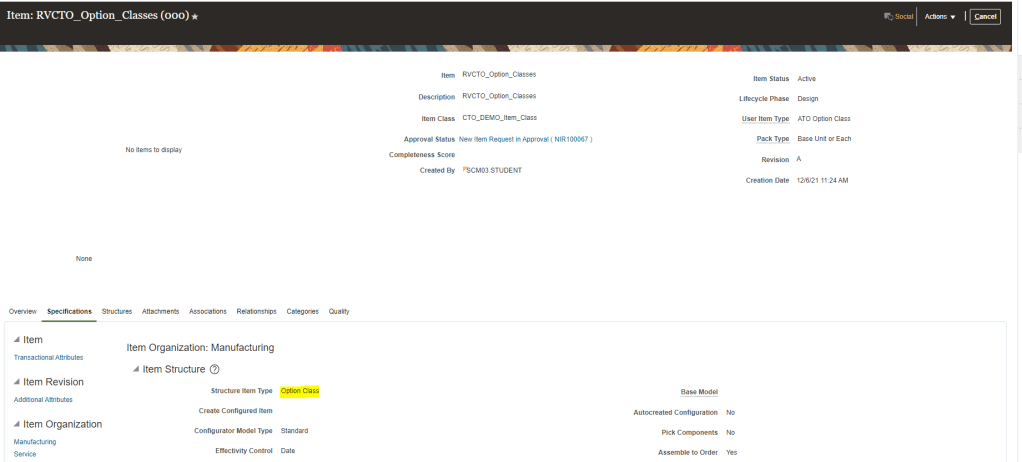
Structure Item Type is “Option Class”.
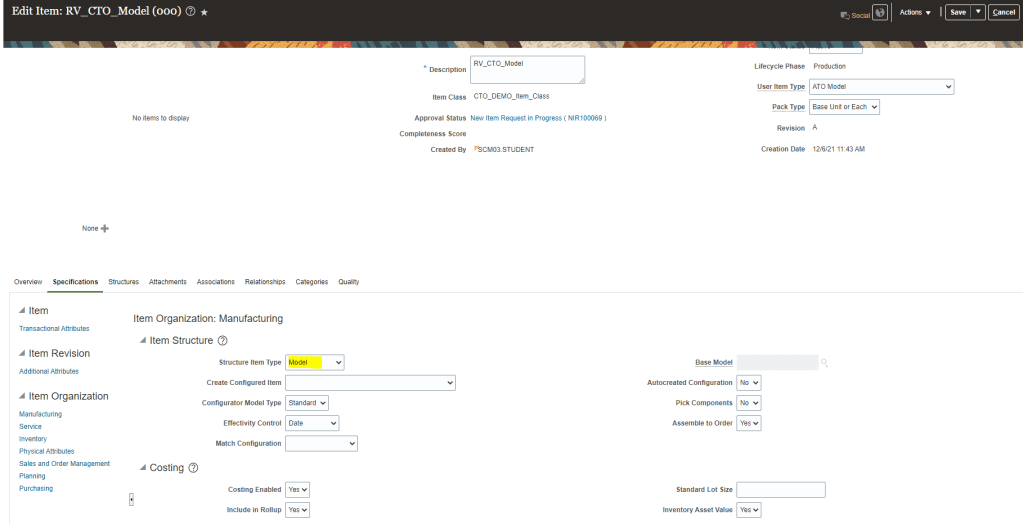
ATO Model
Structure Item Type = “Model”.
Model has below Structures
Item Model
After Model is created, create an Order with the Model Item. It should have option for Configure and Add while adding Model Item.
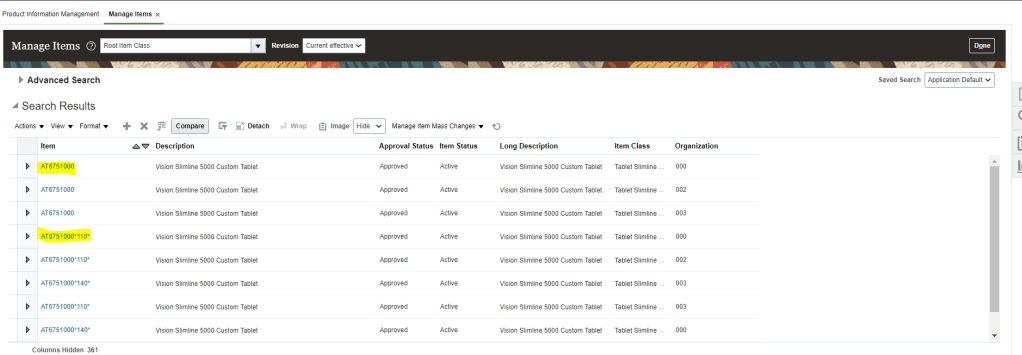
Item AT6751000 is a Base Model Item while AT675100*110*(Ending with Suffix) is Configured item
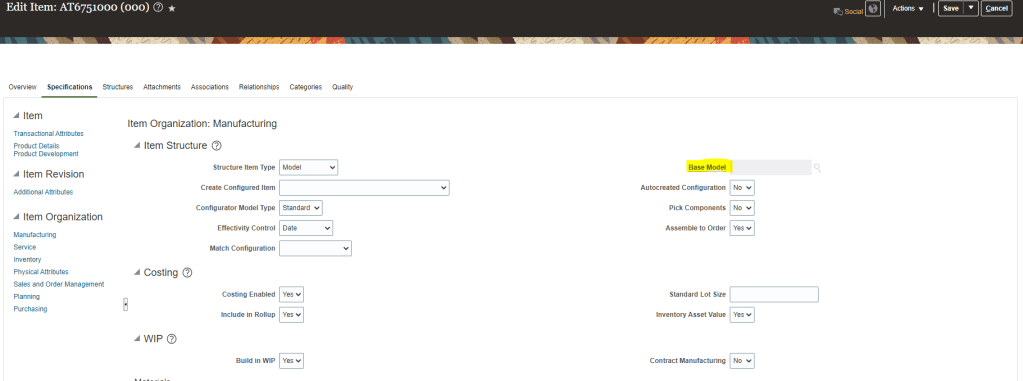
Under Item Structure Base Model field will be Blank for “ATO”, while for Configure Item , it will store Base Model value.
AT6751000 is a Assemble to Order Model Item so Base Model field is Blank.
AT6751000*110 is a Assemble to Order Configured Item so Base Model field stores value of Base Model Number.
Base Model Item has Structure , which is Primary. Expand the structure to see all Item Options Classes and Item Components which are part of Option Classes.
Screen is Option Classes
Configured Item will not have Structure
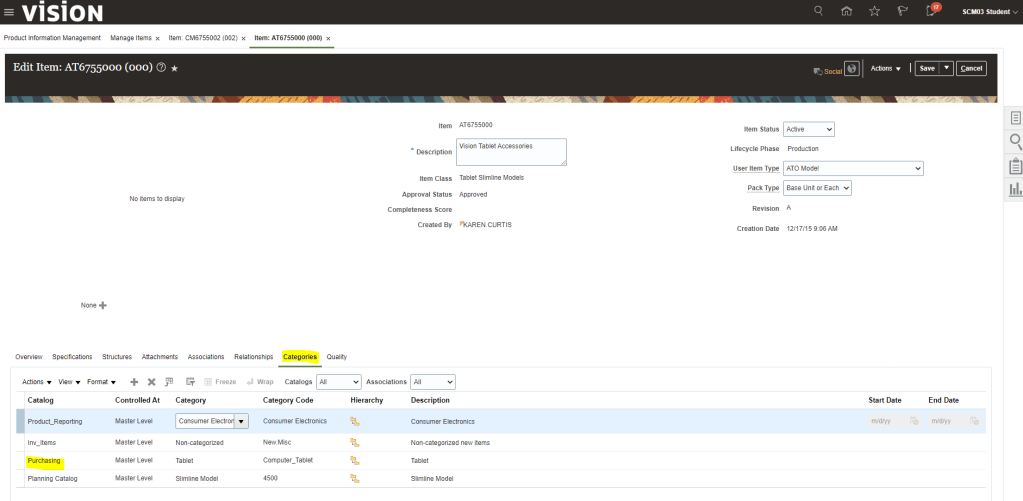
Categories could be Same or Different between Base Model and Configured Item Class.
Categories for Configured Item.
Creation of Configured Item at Run Time
Created in Item Master for Model and options selected on Sales Order
Copies item attributes from model item.
applies values set in configured item template.
Autocreated Configuration = YES.
Structure Item type = Standard.
Base Model = <model item>
Stores configuration information in Configure-to-Order Matches
All items are from base data structure except the red ones which gets populated from Model Structure data
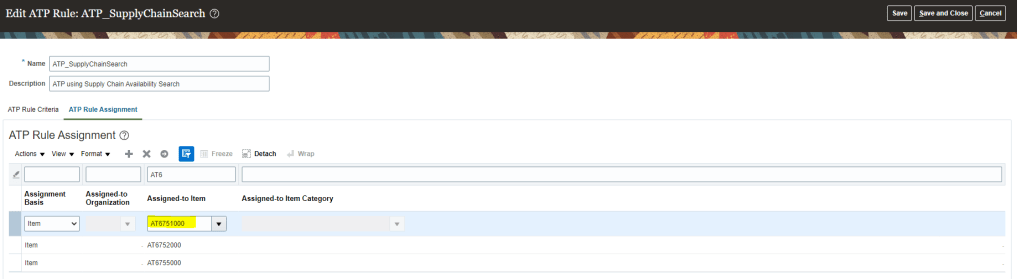
Define ATP Rules for ATO Models, Option Classes, and Options
Setup 3 : ATP, Sourcing Rules
Create ATP rules as required and ensure that Models, Option Classes, and Options as well as mandatory components are assigned to an ATP rule.
Ensure that models are assigned to an ATP rule at the category level
For Manufactured ATO models, enable “Search components and resources”.
Create ATP Rule for Model Items
Navigation : Order Management -> Global Order Promising -> on right side bar, select task “Manage ATP Rule“.
Enter ATP Rule “ATP_SupplyChainSearch” . It will give all the basic parameters set for the ATP Supply Chain Search type.
click on Tab ATP Rule Assignment to see on what level is the Item setup done
ATP rule “ATP_SupplyChainSearch” is configured for Item “AT6751000” is done at Item Level.
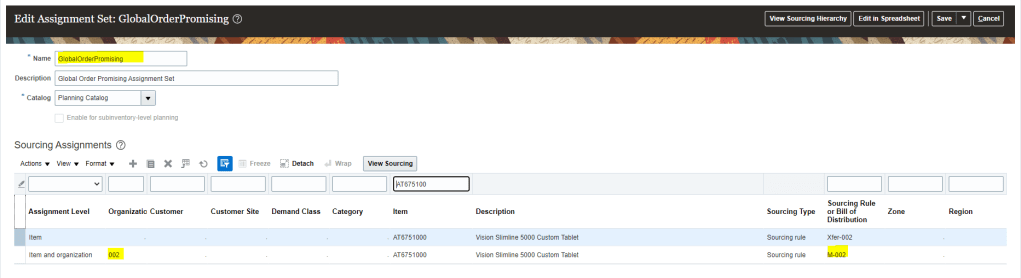
Create Sourcing Rules
Navigation : Order Management -> Global Order Promising -> on right side bar, select task “Manage Sourcing Rule“.
Enter Sourcing Rule “M-002” and verify details
Its Assignment type is “Local”.
Type = “Make All”
Organization = =”002″
Click on Exclude for Options and Option Classes, to set values for which you do not want this sourcing rule to be applied.
Click on View Assignment Sets to verify where this Sourcing Rule is applied. It is applied at
Planning
Global Order Promising.
Click on Global Order Promising assignment set, and filter by item “AT6751000”. It will show the assignment level and corresponding sourcing rule attached to this item.
Setup 4 : Refreshing GOP Data
GOP should refresh Data Periodically.
Collect item and other data into GOP at an established Interval as new configured Items created are not automatically refreshed.
GOP is only refreshed when job “Refresh and Start the Order Promising Server” is running. It can be triggered manually too.
Or we can manually run planning data to feed data into the system.
Dropship: It is an Order fulfillment strategy where the Seller does not keep product(s) in it inventory, but relies on suppliers or contract manufacturers to build, store and ship orders to end customers.
When a customer places on order for a drop shipped product, the seller issues a purchase order to the supplier/contract manufacture, for the item and provides instructions for shipping directly to the end- customer.
The Suppliers or Contract manufacturers ships the product and then sends Invoice to Seller as part of ASN(Advance Shipping Note).
Seller then send invoice to End Customer and get payment from Customer.
Different stages and communication happening in Drop Ship.
Stage 1: Interaction between Order Management(OM) and Global Order Promising(GOP).
Scheduling is the first step in Orchestration Process. OM sends request to GOP to schedule order.
GOP checks sourcing rules and to figure out Supplier based on suppliers lead time, supplier capacity etc. and then assign Supplier to the order and responds to OM.
OM knows that order will Drop Shipped.
Fulfillment line is set to Scheduled Status.
Stage 2: Interaction between Order Management(OM) and Supply Chain Financial Orchestration(SCFO).
OM sends request to SCFO for requisition Business unit and organization.
SCFO determine the Drop Ship financial flow.
SCFO returns requisition BU and Organization to OM which is used by OM for purchase request.
Stage 3: Interaction between Order Management, Procurement and Supplier.
OM sends a purchase request to Procurement which then creates a requisition.
Blanket Purchase agreement for Item and Supplier if exist, details are fetched from it to get the price amount etc.
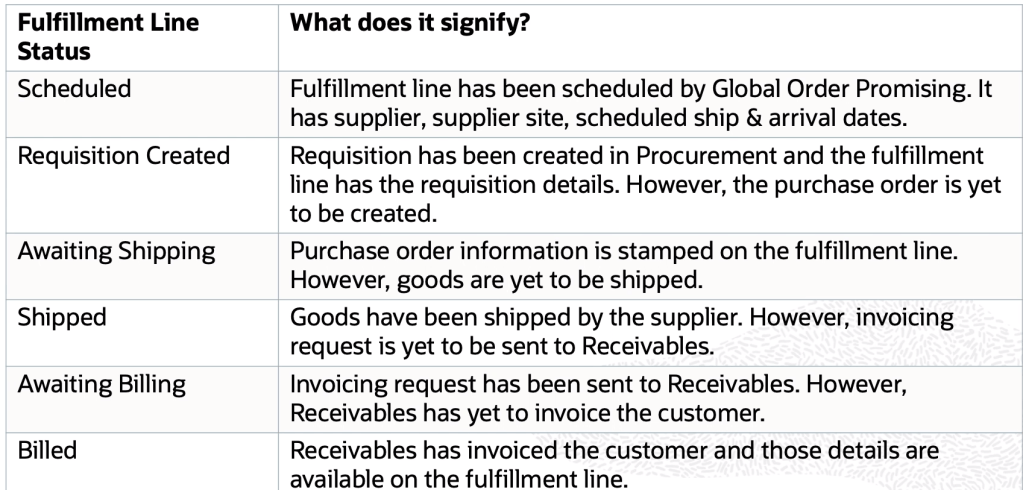
Fulfillment line status in OM, changes from “Scheduled” to “Requisition Created”.
Purchase order gets created and sent to supplier for fulfillment and notification is sent to OM.
Fulfillment line status changes to “Awaiting Shipping”.
Stage 4: Interaction between Order Management, SFO/SCFO, Supplier and Receiving.
Supplier ship goods against PO and creates Advance shipment Notice(ASN).
Oracle fusion Receiving records a logical receipt for ASN and notifies OM.
OM calls “getshipment” web service to gets shipment details from receiving such as ASN, WAYBILL, Bill of Lading, Item and Shipped Quantity .
If entire order quantity is shipped then Fulfillment line status changes to “Shipped”.
SFO identifies and execute the financial flow once ASN gets created.
Stage 5: OM and Receivables.
OM sends requests to Receivables to bill the customer.
Fulfillment line status changes to “Awaiting Billing“.
Receivables creates invoice and notifies OM, post which Fulfillment line status changes to “Billed“.
OM closes the fulfillment line once the customer is billed.
Drop ship Mandatory Setups
Below are the setups to be done for Drop Ship Order Fulfillment.
Setup 1 : Configure User profile to enable them to create BPA
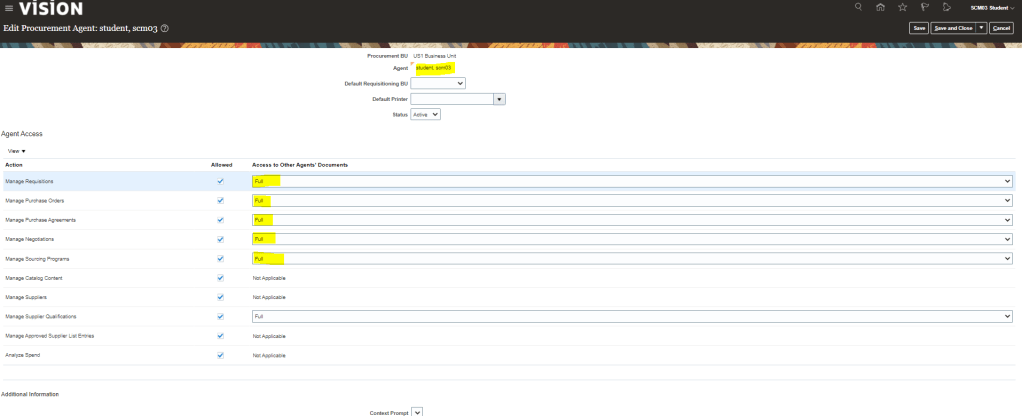
Navigation : Setup and Maintenance -> Click on Search task next to Task Carousel -> Enter task “Manage Procurement Agent“.
Ensure User profile is setup else while creating Purchase Agreement, Procurement BU, will not appear.
Navigation : Under same user profile of SCM03, Go to Procurement -> Purchase Agreement -> on right side “Create Agreement”.
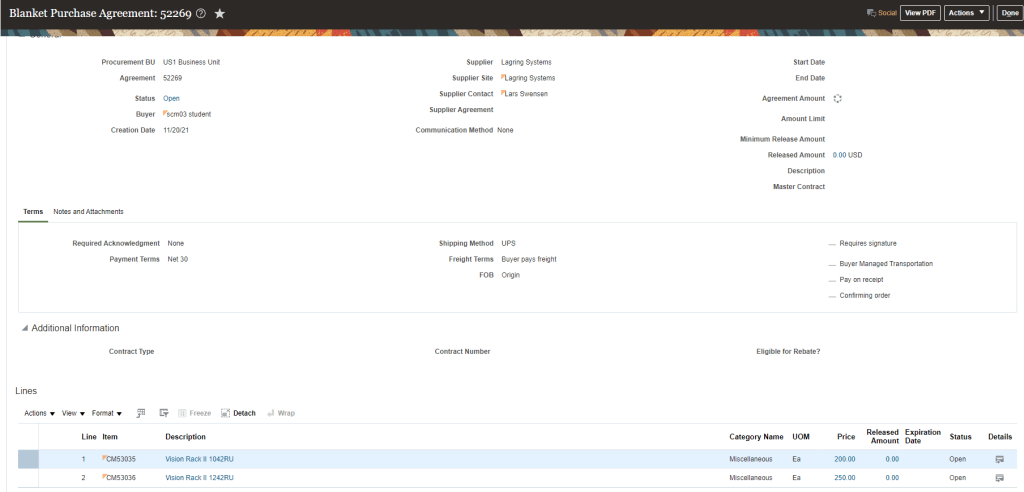
Create Agreement for Supplier “Lagring Systems”.
Add Items which needs to be added as part of BPA.
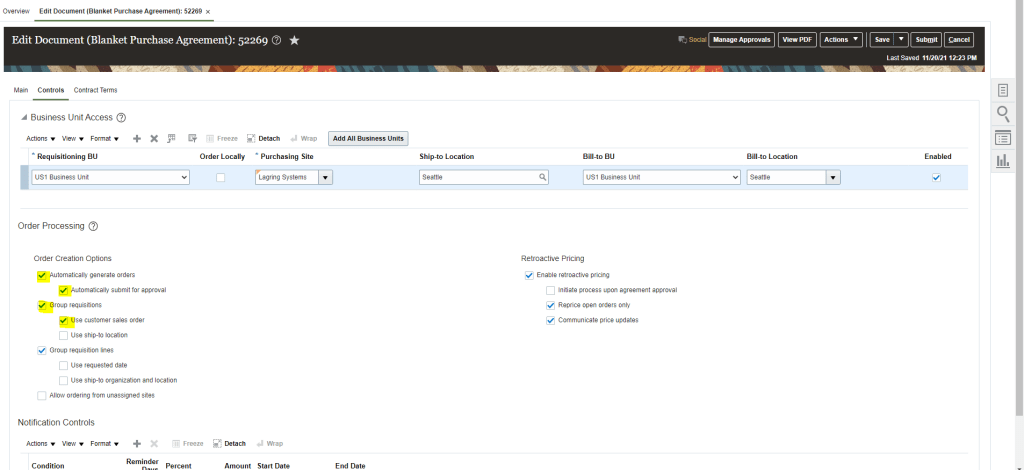
Under Control tab, ensure below boxes are checked.
Click on Submit and BPA gets created
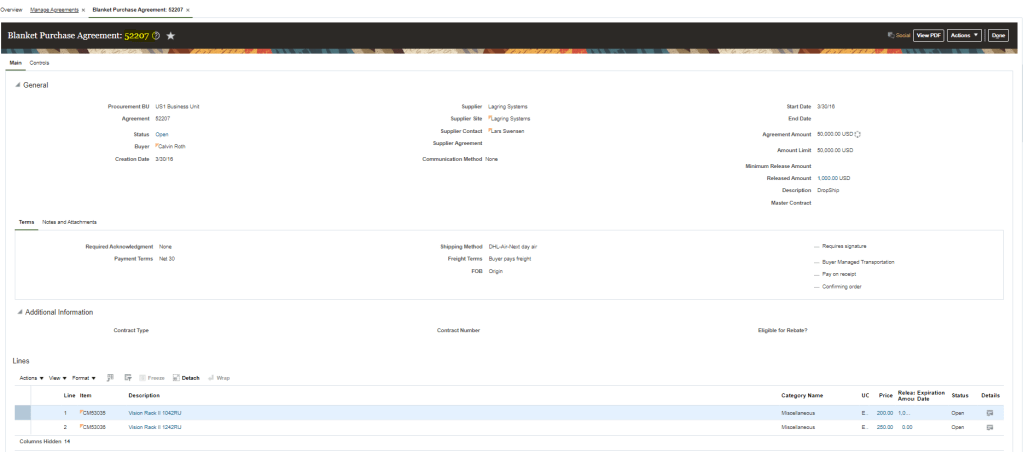
For our testing purpose we will be using BPA created for user profile “ROTH.CALVIN.” BPA number is “52207“.
Setup 3: Item should be Setup with Back to Back Enabled as “Yes”
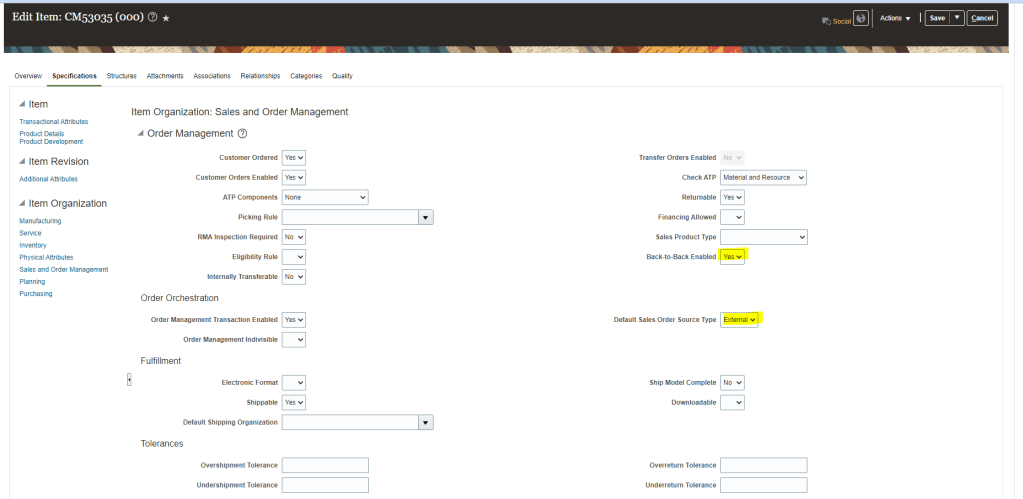
Navigation : Product Management -> Product Information Management -> Browse Item -> Specifications -> Sales and order Management
Back to Back Enabled should be “Yes“.
Default Sales Order Service Type = “Enabled”.
Under Purchasing Tab, ensure Purchasable as “Yes” and List price should have a value.
Under Planning Tab, ensure Planning Method is “MRP Planning”.
Setup 4: Global Order Promising Setup
Sourcing Rule Setup.
Sourcing Rules should be Setup with “Buy From” the supplier.
ATP rule
Create ATP rule which has all below setup
Assignment set.
Management Assignment set should be setup for the Item with Assignment level as “Item” and Sourcing rule which was setup in step 4. Due to assignment level of “Item”, Order Fulfillment becomes DropShip”. If we would had kept Assignment Level as “Item and Org”, it will become Order Fulfillment would become “Back to Back”.
Setup 5: Preparer should be setup in Order Management Parameters
Ensure Preparer is setup for the Business unit where transaction is taking place.
Setup 6: Sales Order Fulfillment is enabled in Procurement offerings
Navigation : Go to Setup and Maintenance -> select offering as Procurement -> Actions -> Change Feature Selection
Ensure Customer Sales Order Fulfillment is enabled.
Setup 7: Drop Ship should be enabled under Sales Order offerings
Navigation : Go to Setup and Maintenance -> select offering as Sales Order-> Actions -> Change Feature Selection.
Ensure Drop Ship is enabled.
Setup 8: Drop Ship Financial setup
Navigation : Go to Setup and Maintenance -> select task : “Manage Drop Ship Financials”.
Ensure setup exist.
Drop Ship Creation Process
Step 1: Create Sales Order
Create sales order for item “CM53036”
Set Receive date is 10 calendar days from today
Switch to Fulfillment View
Fulfillment Status is first set to “Not Started” thereafter it changes from Not Started -> Scheduled -> Requisition Created and then Awaiting Shipping.
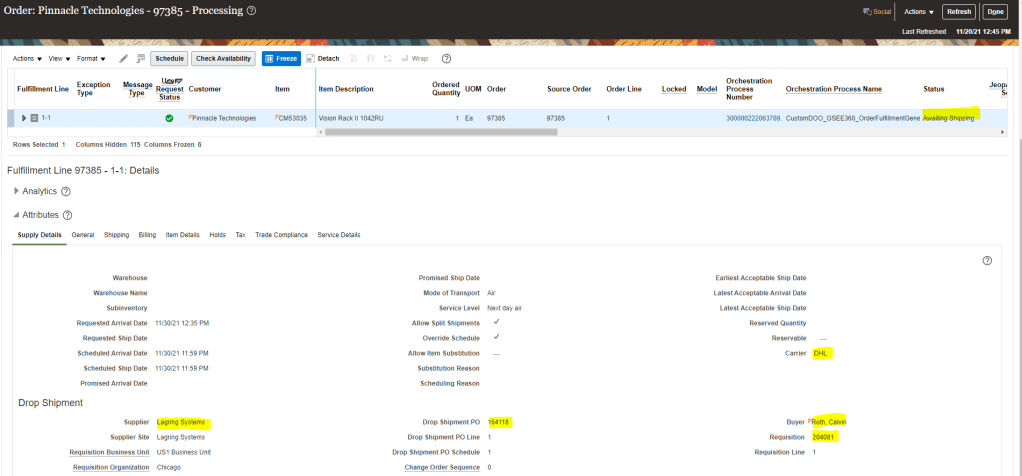
Under fulfillment line view -> Drop Shipment -> Supplier Name is set to “Lagring System”
Now fulfillment line Status change to “Awaiting Shipping”.
Drop Shipment PO number gets created
Supplier Remains the Same
Buyer Gets assigned
Purchase Requisition Number gets created
Click on Orchestration Process number to see the progress of each line.
Below are different statues of fulfillment lines and what they signifies.
Step 3: Verify status of Purchase order
Login as Calvin Roth to see details of Purchase order and Purchase Requisition
Screenshot of Purchase Order
Step 4: Create ASN (Advance Shipping Notice)
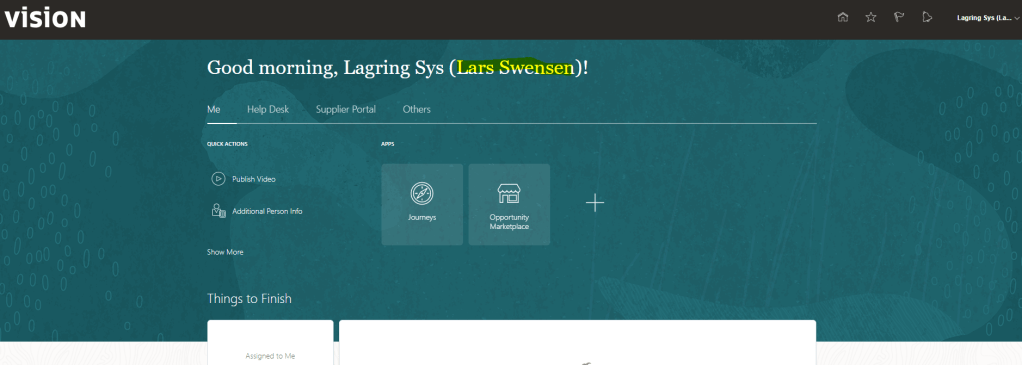
Logout and Login as supplier “Lars Swensen”.
Go to Supplier Portal and See Pending Action
Click on Create ASN below Shipments Tab.
Enter details for shipment and click on Submit.
This is how a sample Packing Slip looks.
Step 5: Verify status of Sales Order
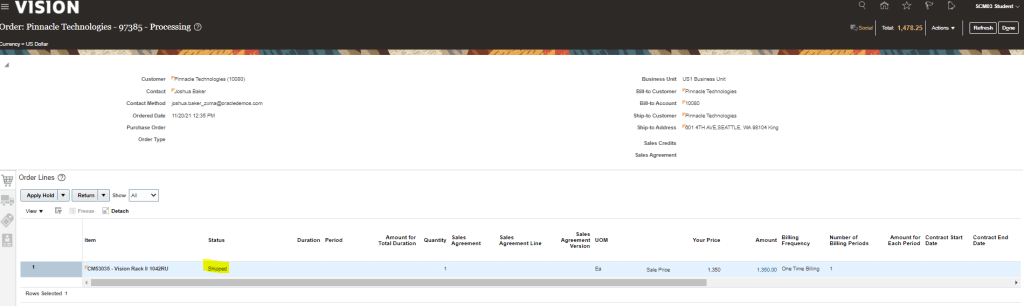
Log out of System, Clear Cache and then Login as SCM03.
Status first become “Shipped”.
Then status changes to “Awaiting Billing”
Status of Fulfillment Line also becomes “Awaiting Billing”
Orchestration Process status details to become “Shipped“.
Step 6: Verify status of Purchase Order
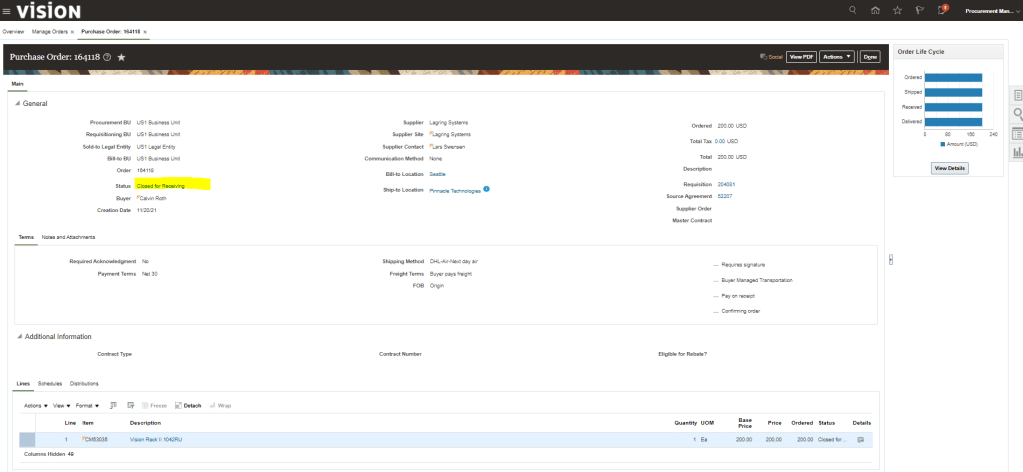
Login as user profile “Calvin Roth” to verify status of Purchase order. It should be in “Closed” status.
This post is in continuation to Ship Confirm Process but with a change where in Business do not want Picking to take place and as soon as Orders are released from Order Management, Shipping should take place.
This generally happens when shipment process happens in bulk which enhances the performance or so called operational efficiency.
Mandatory Setups for Quick Ship Process
Setup 1 : Ensure Pick Confirmation is unchecked in Organization where we do not want Picking to happen.
Navigation: Go to setup and Maintenance -> Enter task “Manage Inventory Organization Parameters”.
Go to tab Item Sourcing Details. Under Picking Defaults -> Ensure “Pick confirmation required” is not checked. i.e. we do not want picking to happen in this warehouse.
Setup 2 : Ensure Quick Ship is enabled in Shipping Parameters.
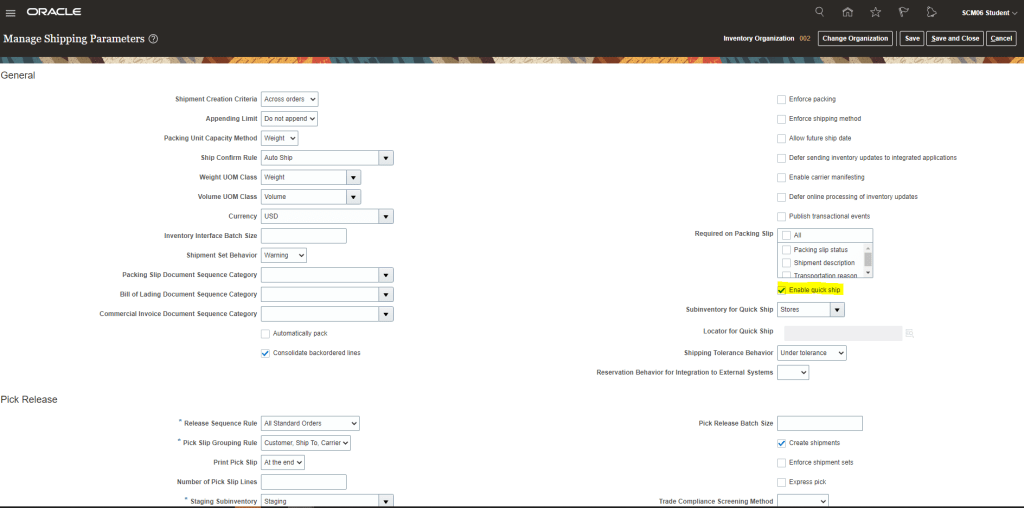
Navigation: Go to setup and Maintenance -> Enter task “Manage Shipping Parameters”.
Ensure “Enable quick Ship” is checked.
Subinventory for Quick Ship should be filled with Subinventory from where shipment happens.
Please Note: i.e this Subinventory should have all necessary quantity else it will be difficult for warehouse operator to manually change subinventory at time of Ship Confirm.
Setup 3 : Ensure Quick Ship is enabled in Shipping Parameters.
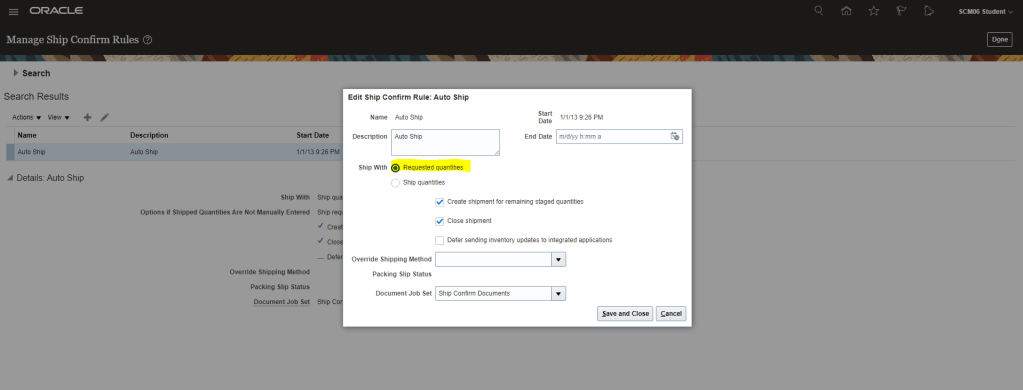
Navigation: Go to setup and Maintenance -> Enter task “Manage Ship Confirm Rules”.
For rule “Auto Ship“, Ship with section is defaulted for “Ship quantities”. In case we have Subinventory populated under “Subinventory for Quick Ship” in Setup 2, we should change it to “Requested quantities”.
Setup 4: Verify that Subinventory has enough stock of the Item which needs to be quick shipped.
Go to Supply Chain Execution -> Inventory Management -> Manage Item Quantities
Enter Item which we are going to order.
Verify we have On Hand quantity in necessary Subinventory “Stores”.
Process flow for Quick Ship
Step 1 : Create order
Create order and ensure Line status as Awaiting Shipping.
Step 2: Create Shipment
There are two ways to create shipment for any order.
Use Auto create shipment “OR”
Run ESS job
Using Autocreate Shipment
Go to Supply Chain Execution -> Inventory Management -> Task Panel on Right -> Go to Shipment -> Select Shipment Lines.
Enter Order Type, Order Number.
Click on Autocreate Shipment.
Using ESS job
Go to Tools -> Scheduled Process -> Enter Job “Create Shipments”
Enter Ship-from Organization “002”.
Create Shipment = “Yes”.
Shipment Creation Criteria = “Across Orders”.
Line Status = “All”
Submit the Job
Job completes and Shipment gets created.
For both lines
Shipment Number gets generated “63203”
Quick Ship Flag is NOT enabled for both the lines
Line status is “Ready to Release Status” so it is ready to be shipped.
Step 3: Stage the Shipment Lines.
Enter shipped quantity for both the lines
Select both lines, go to Actions and Click on Stage Lines.
Line status will be changed to Staged and Quick Ship Status will become enabled
Step 4: Ship Confirm Shipment Lines.
Select both lines, go to Actions and Click on Ship Confirm.
Line status will be changed to “Shipped“.
Step 4: Verify line Status of each Order Line.
Status of each Order lines become “Shipped” and later on “Awaiting Billing”.
Note: User can also use “Perform Shipment” FBDI in case you want to do above steps for multiple order in batches.