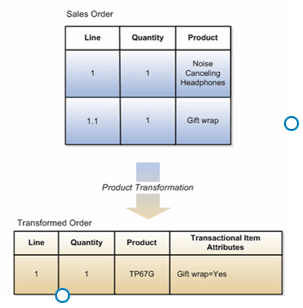
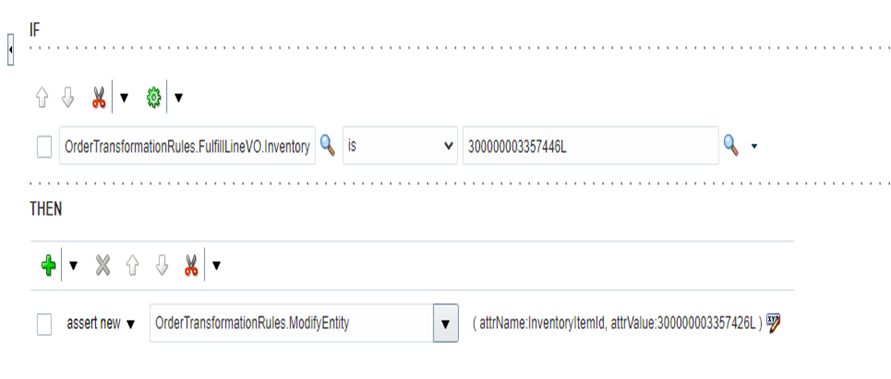
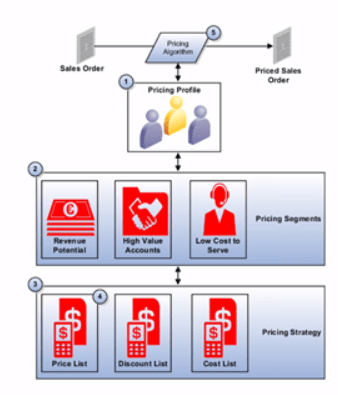
Crux of Pricing
- Lower level is Customer Pricing Profile, which determines what are spending habits of customer.
- Based on habits (value sets) customers are categorized under Pricing Segment.
- Based on Segments, Pricing Strategy Assignment will link Pricing Segment to Appropriate Pricing Strategy
- Within Pricing Strategy (Pricing rules, Shipping Rules, Guidelines are defined)
- Under Pricing Rules (Price list, Discount list etc. are defined)

Below components constitute Pricing:
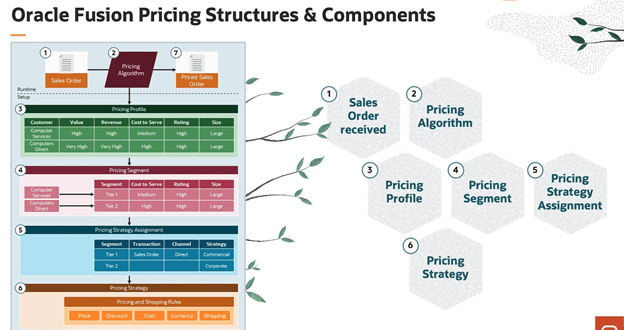
1. Pricing Profile. Categorize customers with similar characteristics. Example: Categorize a customer as large customer size, high customer value, medium customer rating, and high revenue potential.
2. Pricing Segment. Assign customers with similar buying practices to a pricing segment, and then associate this segment with a pricing strategy that meets the business and revenue goals that you set for this segment.
3. Pricing Strategy. Implement and enforce corporate pricing strategies and pricing objectives so they meet your business and revenue requirements. Group pricing rules in a pricing strategy to control pricing behavior.
4. Lists. Create lists, such as a price list, that include rules that calculate price and shipping charges for an item, and then reference these lists from the pricing strategy. You can:
- Apply multiple charges to an item. For example, you can define a charge for a one-time sales price for a desktop computer in one pricing rule, and then apply another charge for maintenance service for this desktop computer that recurs monthly in another pricing rule.
- Define currency conversion rules that manage pricing for different currencies. For more information about currency conversion lists, go to docs.oracle.com.
5. Pricing Algorithm. Set up the process that Pricing uses during pricing calculations, including pricing algorithms and service mappings. Pricing processes are extensible to model complex pricing scenarios. It is expected that you will extend them to accommodate your business practices.
When order is entered, Pricing Strategy is executed.
Oracle Fusion Pricing is the pricing solution used in Order Management. We can
- Create Pricing rules that meet our revenue and business objectives so that we can price items for each pricing segment
- Create Pricing Algorithms that support our corporate pricing practices.
- Modify predefined logic, so that we can implement a pricing algorithm that runs the pricing rules which deployment requires
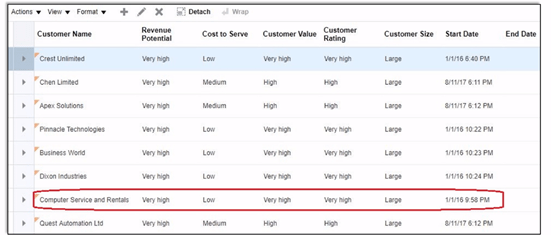
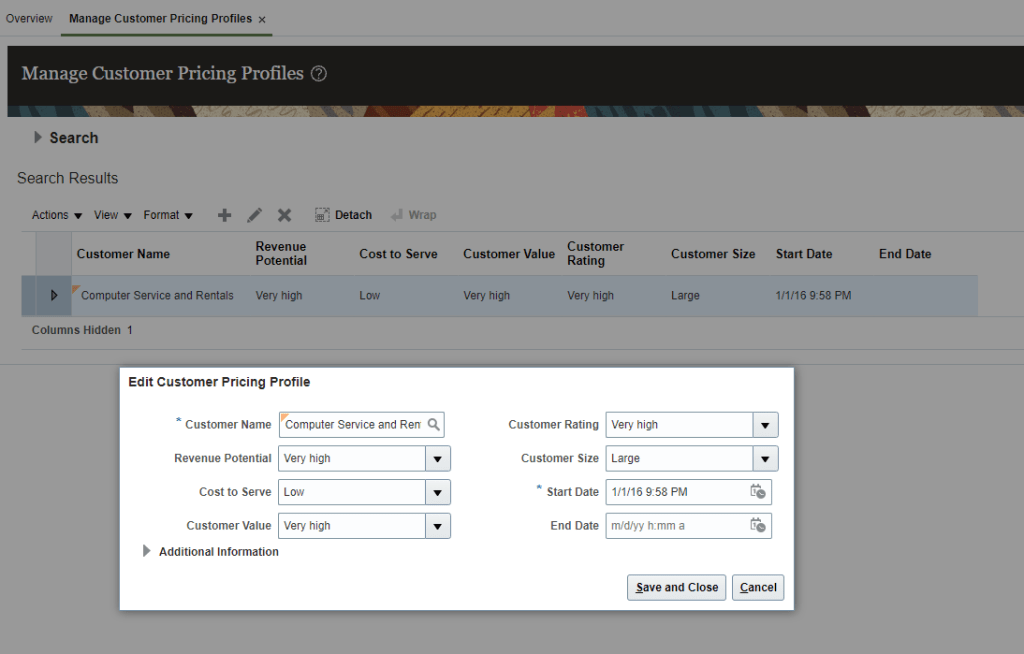
Step 1: Determine Pricing Profile of the Customer
- Figure out what are spending habit of each customer.
- Set of pricing-related attributes that describes a customer’s buying behavior
- Date-effective to accommodate changes in a customer profile
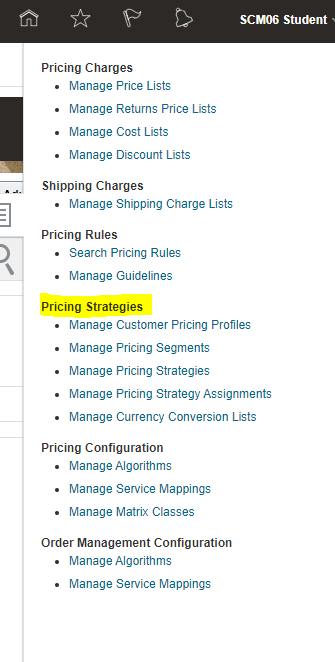
- Navigation -> Go to Order Management -> Pricing Administrator -> In Right Corner Reading Pane under section Pricing Strategies -> Manage Customer Pricing Profiles.
- Go to Search Results search for your customer or else under Actions -> Click on Create.
- Against each customer name, determine Revenue Potential, Cost to Server, Customer Value, Customer Rating and Customer Size.
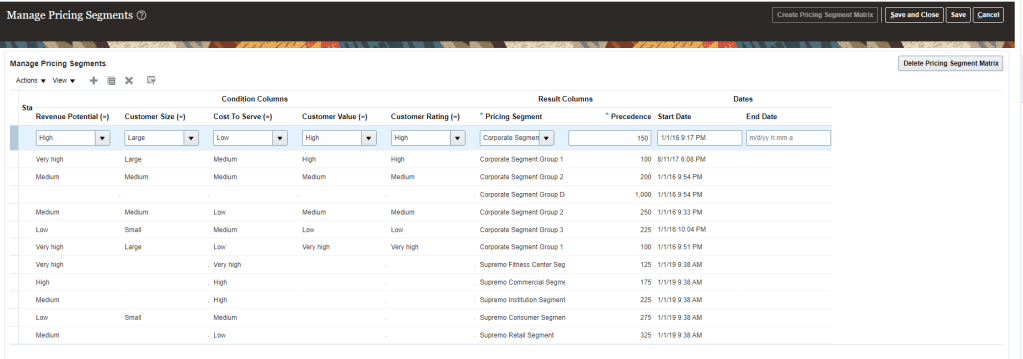
Step 2: Categorize each customer into Pricing Segment
- Based on spending habits (Value set) in Step1, customer is assigned to corresponding Pricing Segment.
- Pricing Segments is a grouping of customers who exhibit a common set of characteristics and similar buying behaviors
- Identifies targeted groups of customers in order to apply specific pricing strategies
- Leverages extensibility of Matrix

- Navigation -> Go to Order Management -> Pricing Administrator -> In Right Corner Reading Pane under section Pricing Strategies -> Manage Pricing Segments.
Step 3: Pricing Strategy
- Purpose is to have specific pricing criteria for each set of customers. It has subcomponents of Price list, Shipping list, Discount lists which should be suitable for right set of customers.
- It is configurable process to derive the pricing strategy using
- Customer pricing profile
- Pricing segment
- Pricing strategy assignment
- Pricing strategy is the container for the pricing rules which comprises of
- Price Lists
- Discount Lists
- Shipping Charge Lists
- Cost Lists
- Currency conversion lists
- Guidelines etc.

- Navigation -> Go to Order Management -> Pricing Administrator -> In Right Corner Reading Pane under section Pricing Strategies -> Manage Pricing Strategies.
- Search for existing Pricing Strategies or create a new one. In below case we took Corporate

- Click on Corporate Pricing Strategy Group1
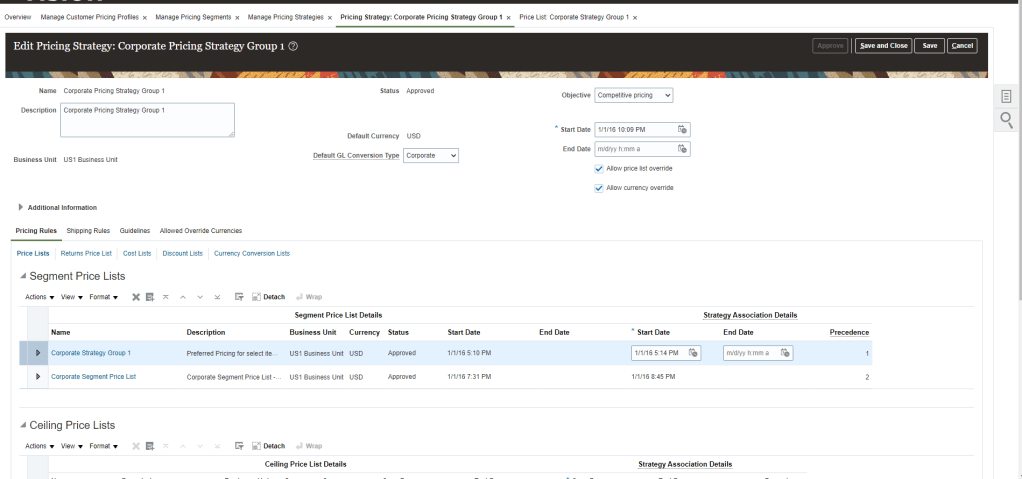
- Under Segment Price List, click on Corporate Strategy Group1
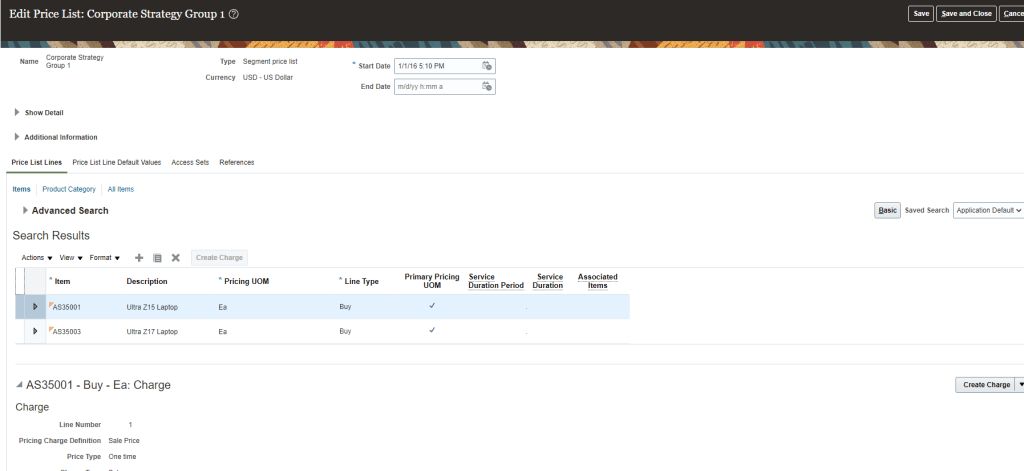
- Below setup has Item with unit price which was added by clicking on Create Charge and then unit price was added with Dates

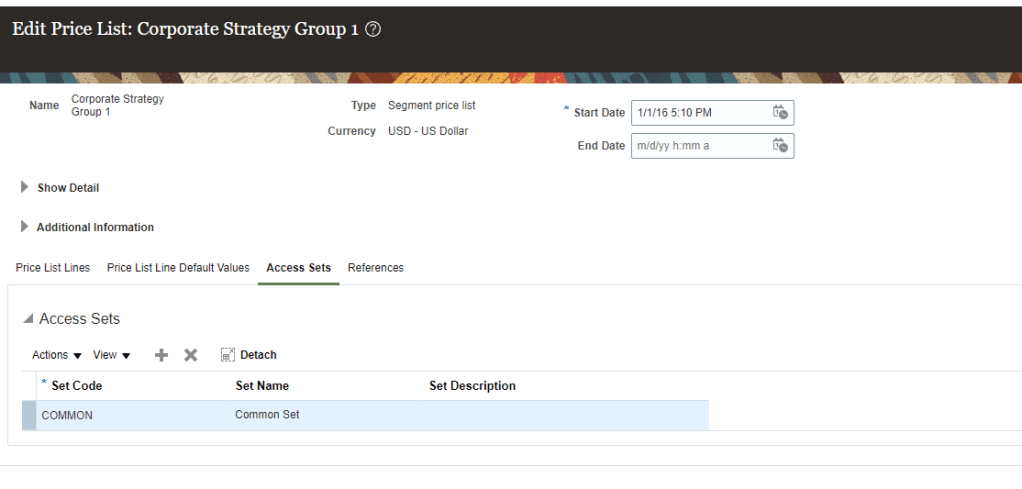
- Once all Setup completed under Additional Information click on Access Sets and enter Common
- Price list can also be created with Tiered Adjustment

- Similarly we can create Discount list under Pricing Strategy

Step 4: Pricing Strategy Assignment
- It is the assignment of Pricing Segment to the Pricing Strategy.
- It determines what pricing will be applied based on Channel Method. i.e for Same set of customers, Sales orders coming form Outside, different pricing will be applied, for Sales order coming from Dealer, different pricing will be applied.
- It Provides a mechanism to employ different pricing strategies for the same pricing segment in different selling scenarios.
- Pricing Segment Created in Step 2 is married with Pricing Strategy created in Step 3 using Pricing Strategy Assignment.
- It uses extensibility of the Matrix.
- Navigation -> Go to Order Management -> Pricing Administrator -> In Right Corner Reading Pane under section Pricing Strategies -> Manage Pricing Strategy Assignments.

Adjustment Applied
- Aggregation Method
- On Document -> Adjustment applied at Order Header
- On Line -> Adjustment applied at Line Level.
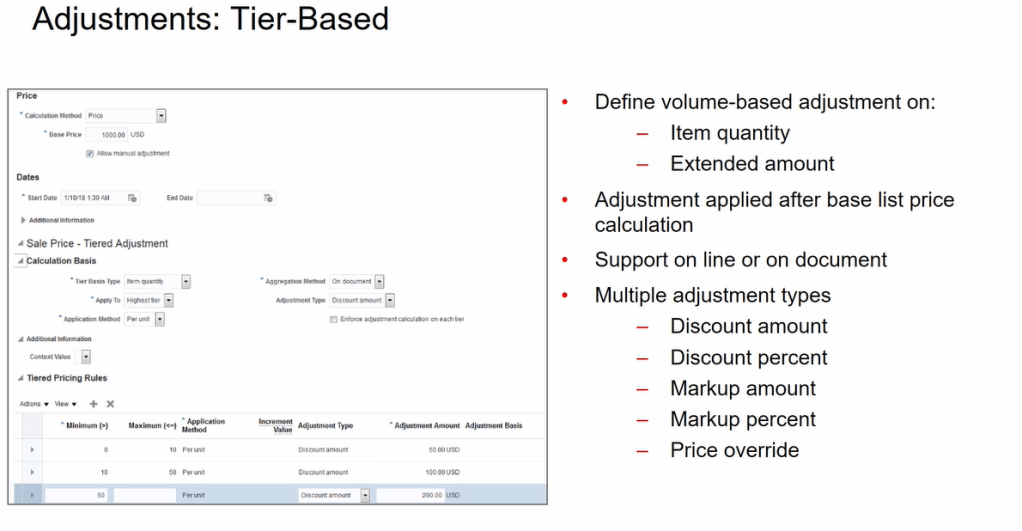
Adjustment Attribute Based
- Set up pricing rules based on a set of conditions or attributes
- Set up attribute-based pricing adjustments using matrix rules
- You can define charges based on the color, size or other attributes
- Example: you can define adjustments for a specific customer as shown below

Adjustments: Manual
In pricing Administration, determine whether to let order entry specialists apply manual adjustments in Order management. Specifically, you can let them:
- Adjust net price according to:
- Percentage of the list price or Net Price
- Amount
- Set a new value for the net price(price override).
- Apply one or more price adjustments to a charges for each order line
- Specify a reason for the price adjustment.

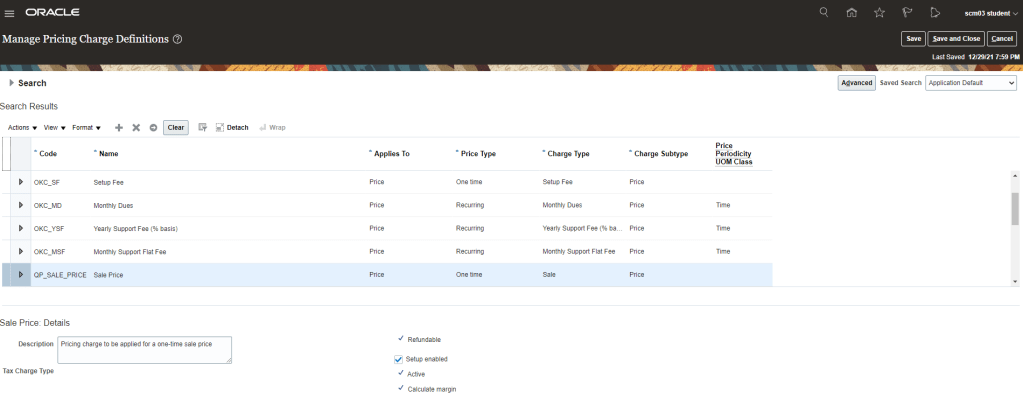
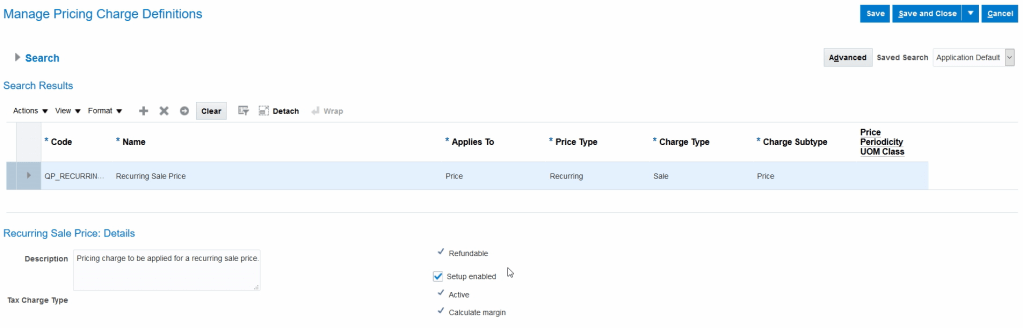
One time Price Charge Setup
- Navigation : Go to Others -> Setup and Maintenance -> Search for Task “Manage Pricing Charge Definitions“.
- Setup Sale Price which is one time price charge setup.
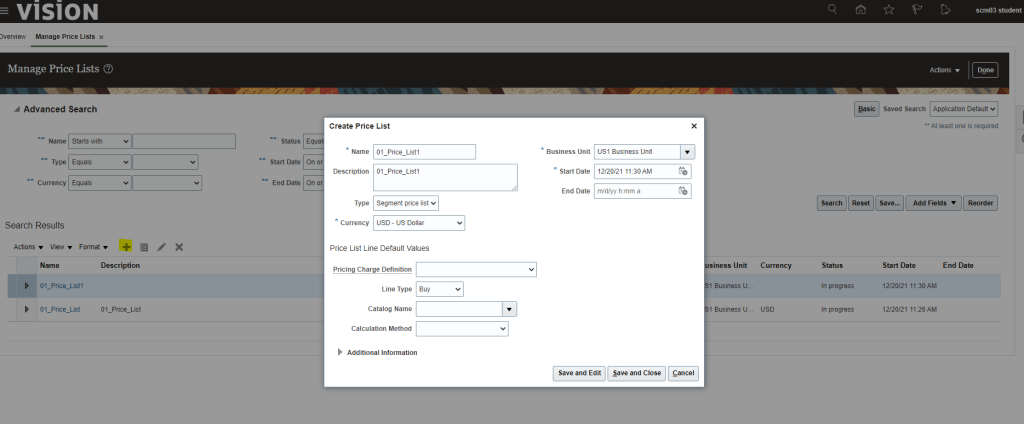
Creating Price List
- Navigation : Go to Orders and Management -> Pricing Administrator -> Click on Manage Price Lists.
- Click on “+” button to create Price List
- Create Price List screen opens, enter following
- Name
- Business Unit
- Start Date
- Type -> Choose anyone from below
- Segment Price List
- Floor Price List
- GSA Price List
- Ceiling Price List
- Pricing Charge Definition
- Set Up Fee
- Monthly Dues
- Yearly Support Fee
- Monthly Support Flat Fee
- Sale Price
- Recurring Sale Price
- Data Storage
- Warranty/Service- Recurring Charge
- Usage Time(Hours)
- Line Type
- Spaces
- Buy
- SL Bill Only
- Catalog Name
- Calculation Method
- Price
- Cost
- Source Document Cost
- Covered Item Price Percent
Recurring Price Charge Setup
- Navigation : Go to Others -> Setup and Maintenance -> Search for Task “Manage Pricing Charge Definitions”.
- It will show definition of Recurring charges.
Recurring Price List for Items
- Navigation : Go to Orders and Management -> Pricing Administrator -> Click on Manage Price Lists. Click on “+” button to create Price List
- Add item with Recurring Price Charge Definition and Price Periodicity which could be Week, Monthly or Yearly.

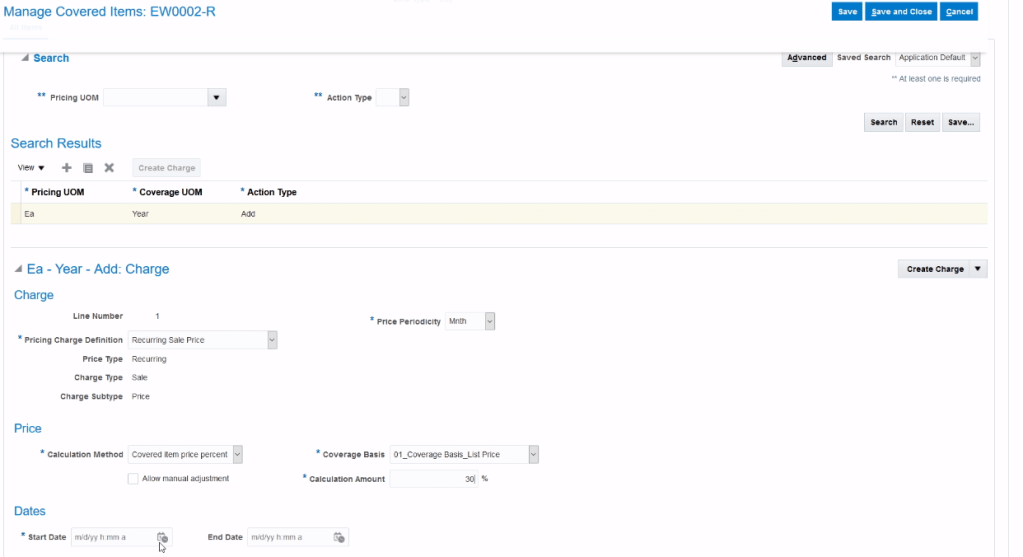
Creating Coverage Bases
- It is to add criteria for Charge.
- Navigation : Go to Others -> Setup and Maintenance -> Search for Task “Manage Pricing Bases”.

Pricing of Coverage Items
- Coverage Item : An item that adds value by providing coverage for a covered item. Provides a service to another item.
- When you define coverage items you include a duration and period which are
- Characterized by Service Duration Type, Service Duration and Duration Period
- Service Duration Type
- Fixed
- Variable
- Open-Ended

Pricing of Subscription Items
- Subscriptions have service duration and period.
- Define subscription items
- Include a duration and period
- Characterized by Service Duration Type, Service Duration and Duration Period
- Service Duration Type
- Fixed
- Variable
- Open-Ended
- Calculate duration Extended amount
- Define one-time and recurring charges
- Define tier-based and attribute-based adjustments

Pricing of Configurable Items (Models)
- Define charges for a configured item and its components. Charges are then rolled up to the root at runtime to provide the price of entire configuration.
- Define adjustments only at the root.
- Define price for a model component in a price list, and apply this price to all configurator models.
- Manage Model-specific, component-level charges through:
- Hierarchical view
- Summary view
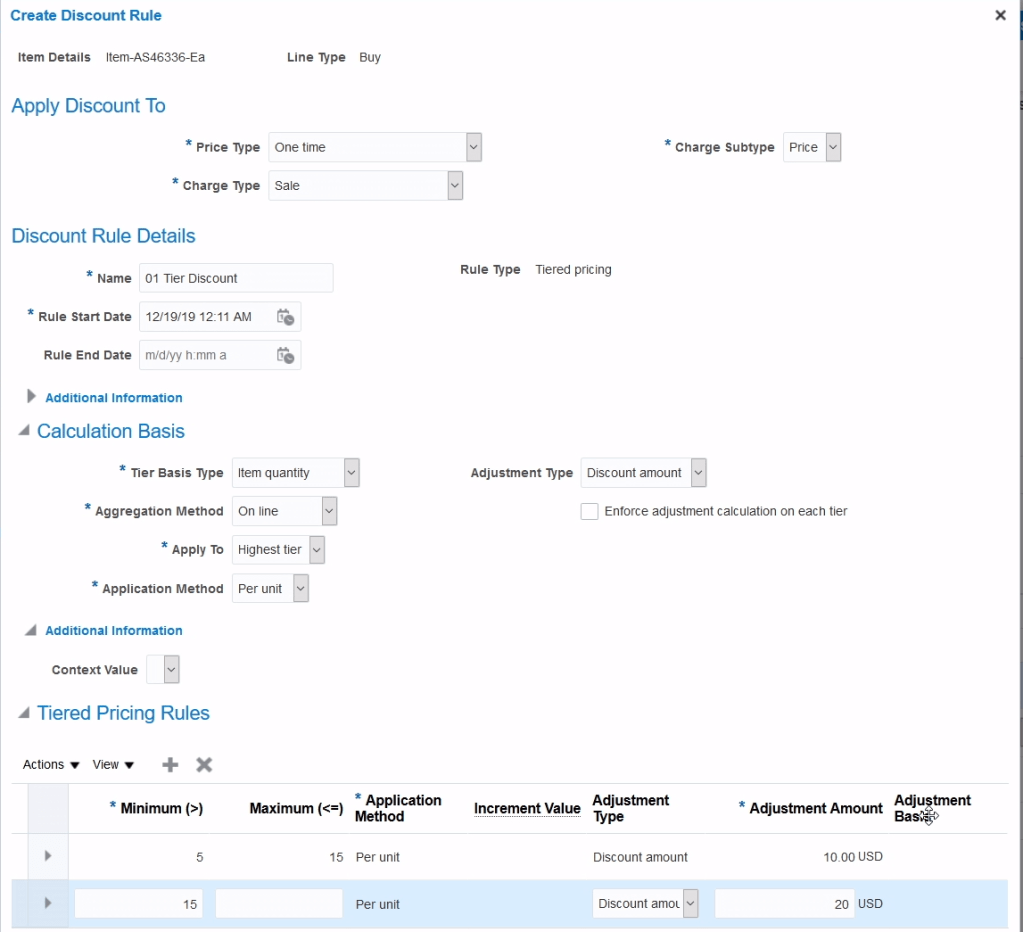
Discount Lists
- Navigation : Go to Orders and Management -> Pricing Administrator -> Click on Manage Discount Lists. Click on “+” button to create Discount List.
- Simple Discount List


- Tier-Based Discount List
- Attribute-Based
- Manual
Discounts for Configurable Models
We can define Discount rules as following
- Define Discount Rules for the root and for the components
- Choose where to discount the charges
- Root Item
- Component
- Rollup Charge
- Define Tier-based and attribute-based adjustment
- At the root
- Not supported for the component
- Manage Component-level rules through
- Hierarchical view
- Summary view
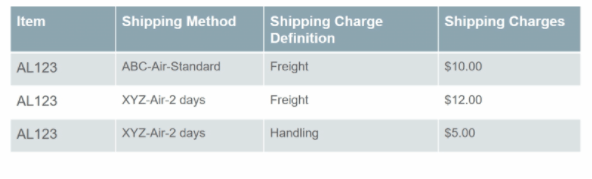
Shipping Charges
- Shipping Charge Lists
- It capture Shipping Charges based on Shipping Method.
- Multiple Shipping Charges exists for one or more Items.
- Item-based Shipping Charges.
- Assign to pricing strategy.
- Item Based Shipping Charges
- An item can have multiple shipping charges, each for a different shipping method
- Date effectivity for item, shipping method, and shipping charge definition combination
- When a configured item is priced, only the shipping charges at the root model item are applied
- Navigation : Go to Orders and Management -> Pricing Administrator -> Click on Manage Shipping List.
- For same item “AS46336” we have two separate shipping charges based on type of shipment.

Pricing Guideline
- Guidelines are used to enforce organization’s pricing policies.
- Guidelines are assigned to a Pricing Strategy.
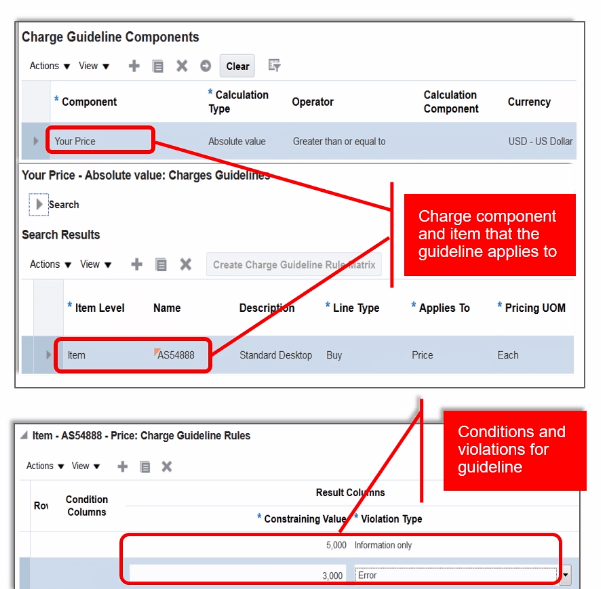
- Setup for Guideline

- Enable element by checking “Used in Pricing Guidelines”.

- Navigation : Go to Orders and Management -> Pricing Administrator -> Click on “Manage Guidelines”.
- Below setup has any manual adjustment done for more than $500 will be treated as error.