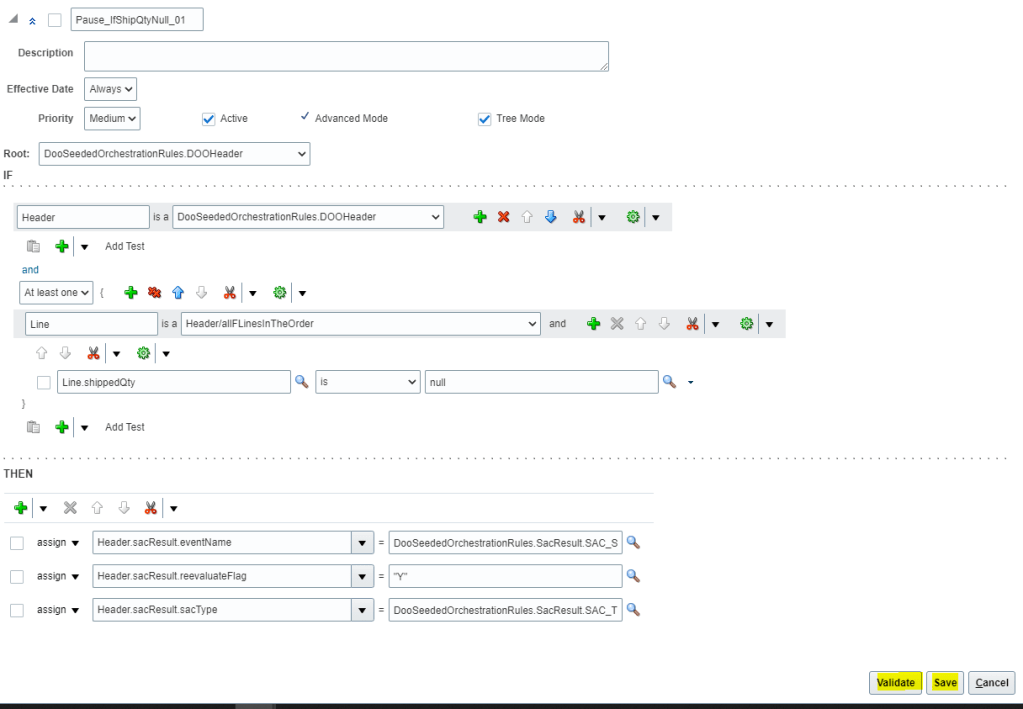
Global Order Processing a.k.a GOP is a heart of planning within order orchestration process which will help in taking note of current inventory stocks we have in our system. It uses collections to fetch details from various systems to know current level of inventory stocks and whether it will be able to meet the shipping date as per customer request Or what is the best case scenario which can be achieved on requested shipping date.
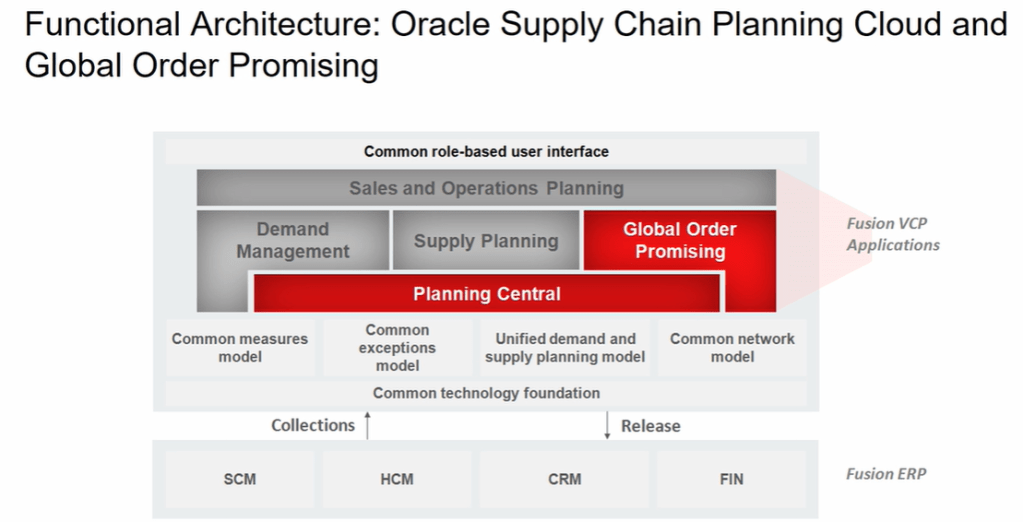
Below snapshot depicts two components which communicate with each other on Regular basis.
- Order Management
- Gets Demands in form of Orders, inquiries and returns from
- E-commerce site
- Stores
- Mobile Apps
- Call centers
- It reaches to Oracle Supply chain Planning to
- Check the availability of Items, whether we have sufficient stocks of item to fulfill the order.
- Perform Scheduling Requests. Based on stock availability, it determines what could be best suited shipping date for the item.
- Gets Demands in form of Orders, inquiries and returns from
- Supply Chain Planning
- Gets current stocks of Items from
- Open Purchase Orders
- Supplier Requisitions
- On-Hand Inventory
- Internal Requisitions
- In-Transit Supplies
- It further provide information back to Order Management about
- Fulfillment Sources
- Promise Dates
- Gets current stocks of Items from

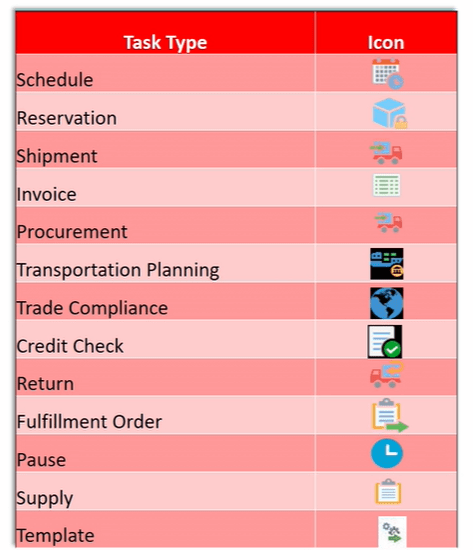
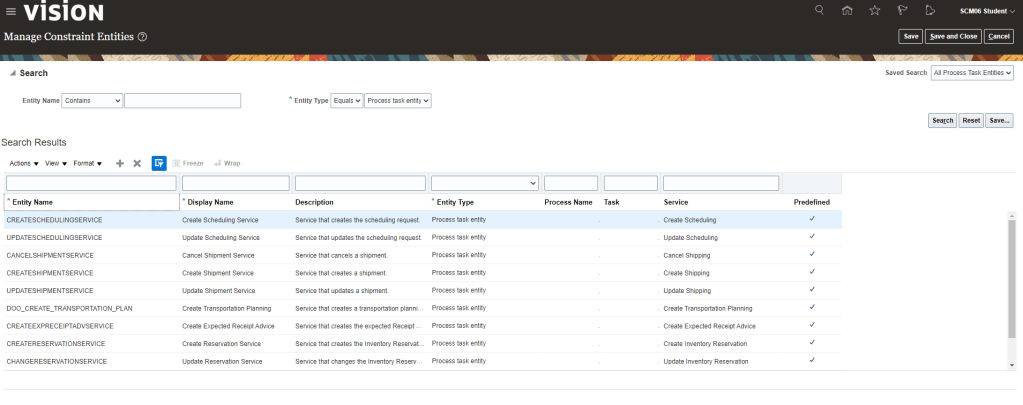
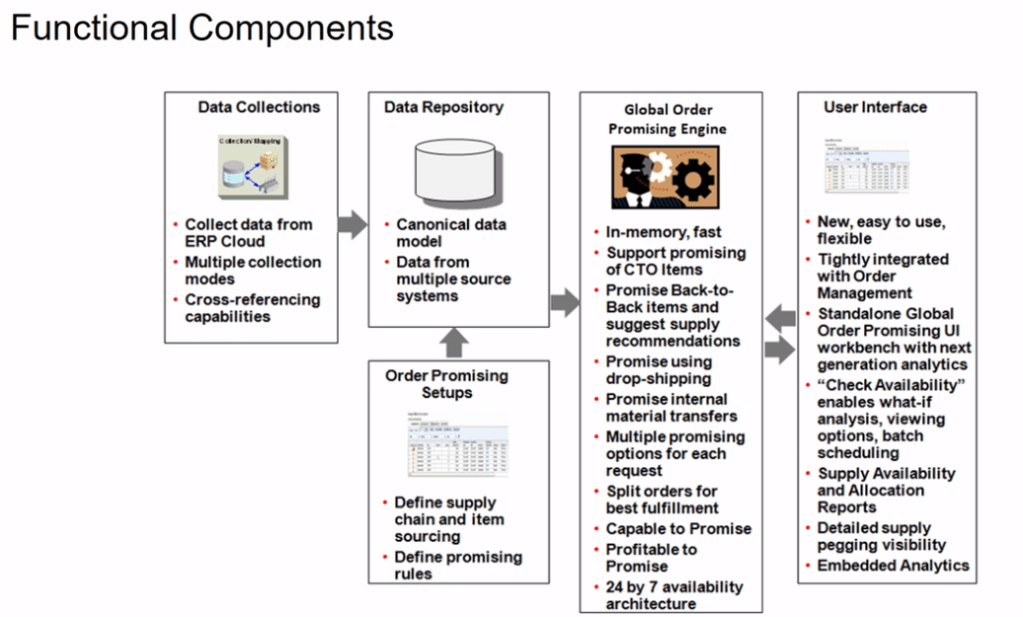
Functional Component of GOP
- It collects Data from Different systems using different collection method.
- Stores collected data from different systems in a Data Repository.
- Take Snapshot of current status of each items.
- Promising engine uses Snapshot to fulfill the order. Since Snapshot is getting used, its quite faster as it do not query different systems, at run time, to get the status thereby eliminating any time delay.
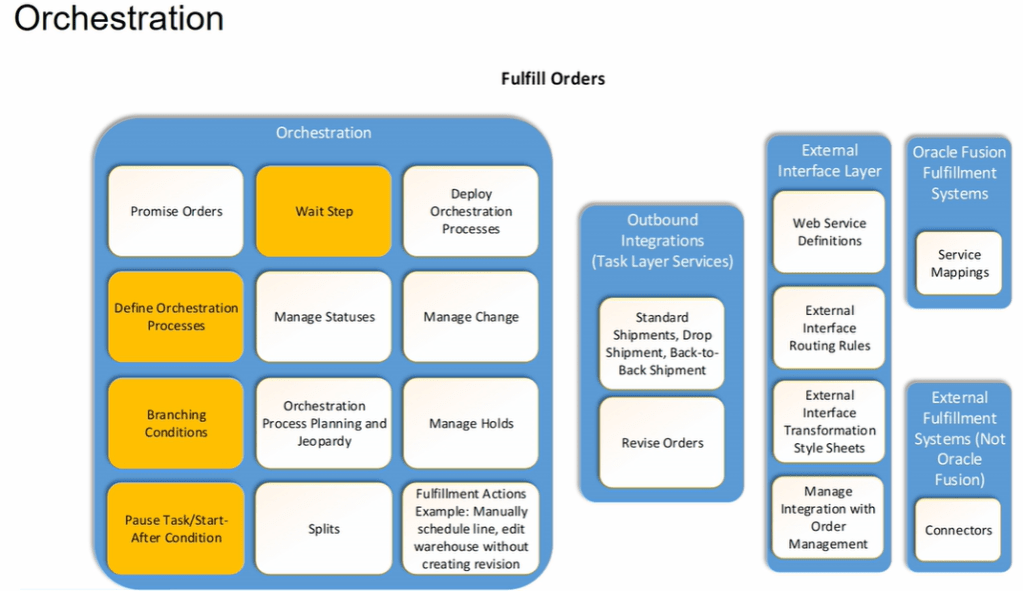
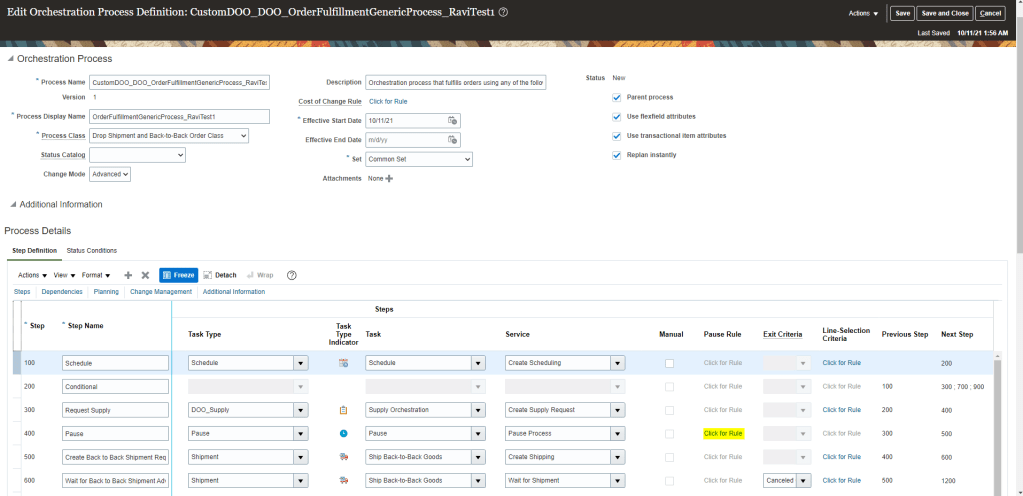
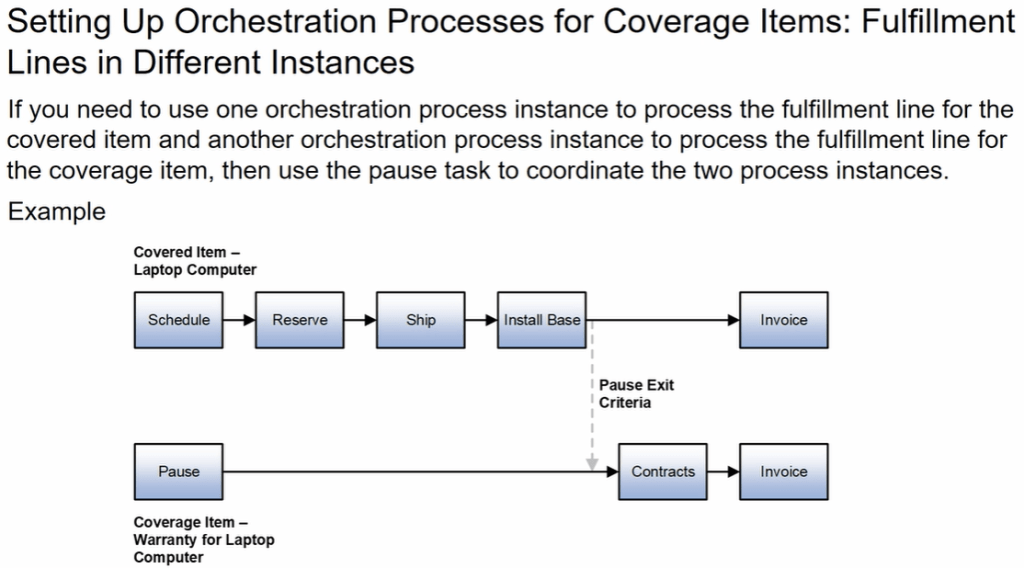
How Order Orchestration Communicate with GOP
Below diagram depicts interaction between Order Orchestration Process and Global order Promising.

GOP has 3 Major Components
- Sourcing Rules : It determines, for specific product or family of product, where can we get the item in case we do not have sufficient stock on hand. What is the Hierarchy to be followed to source it. Whether we should procure the item or always manufacture the item or look for in transit.


- Available to Promise(ATP) Rules and Allocations Rules : It determines what is the availability based on the source. Different rules can be used based on different methods. It not only consider what sources to reach out to when we do not have adequate supply but also how to promise/allocate hand inventory we have at particular location.

We can use any promising mode while using ATP rule.

- Assignment Set : It associate Sourcing rule to the Item or Organization.
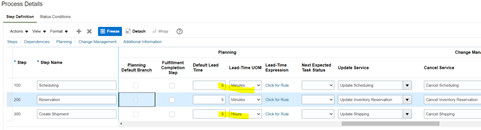
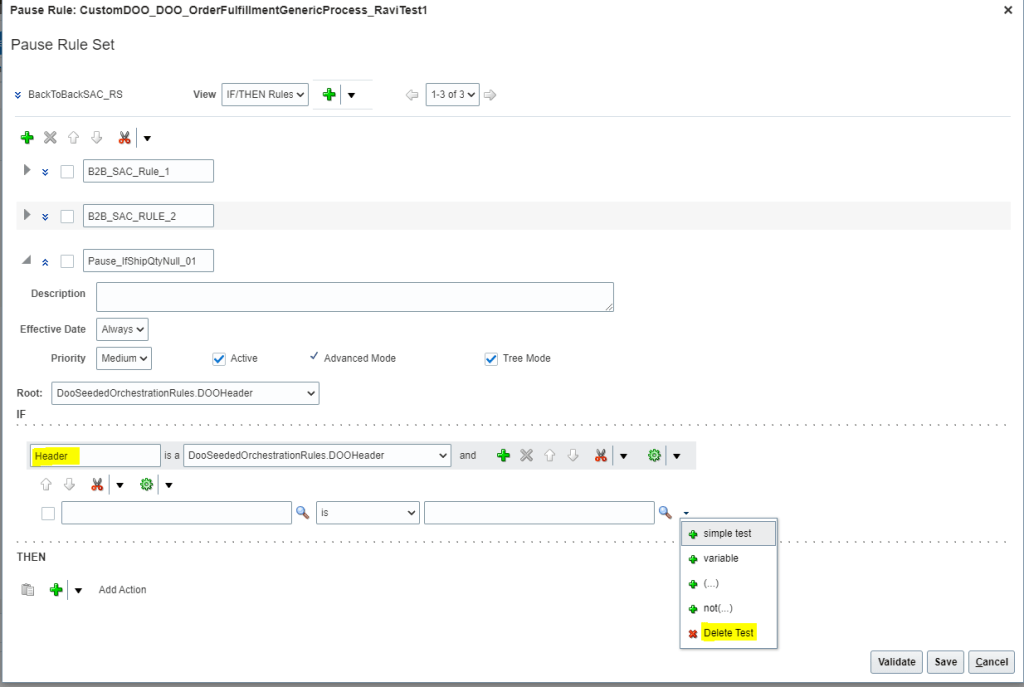
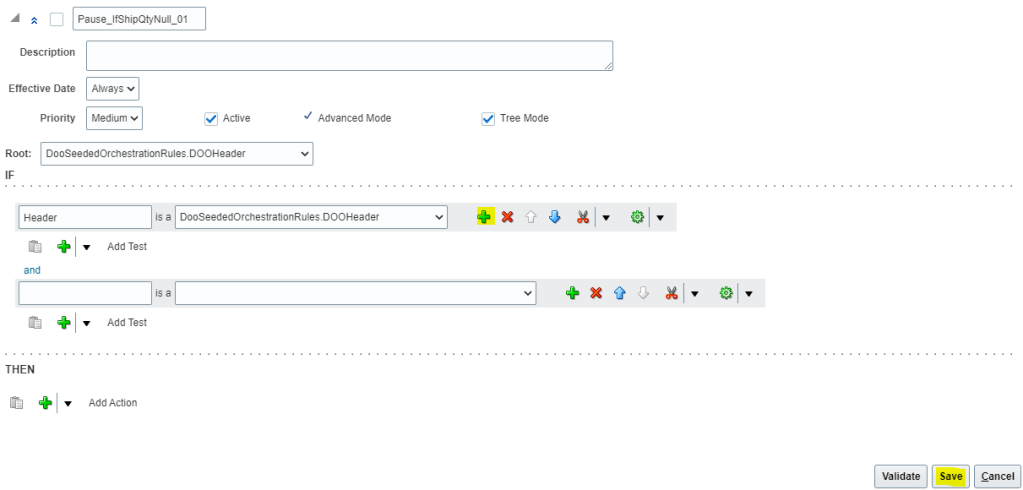
Steps involved in GOP
Step1: Create Sourcing Rules
Sourcing rule is created at Global or at Item level.
- Global
- For Item
- For Category
- Local only for Item.
- Navigation: Go to Global Order Promising In Order Management -> Click on right corner of Task Panel -> Manage Sourcing Rules

- Go to Action Button -> Click on Create Rule
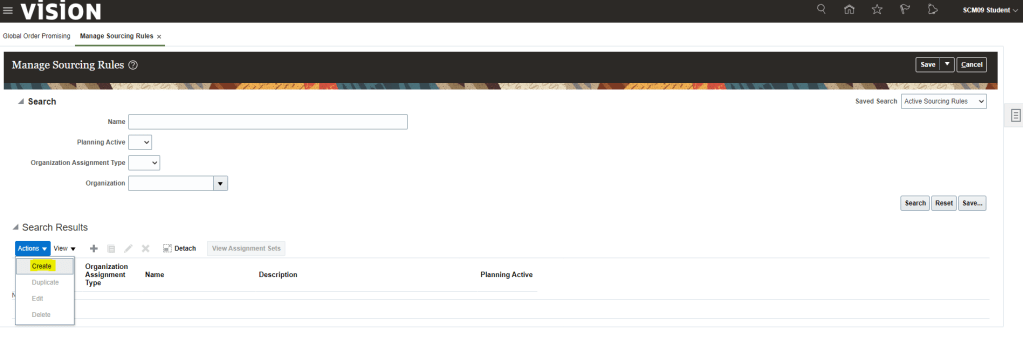
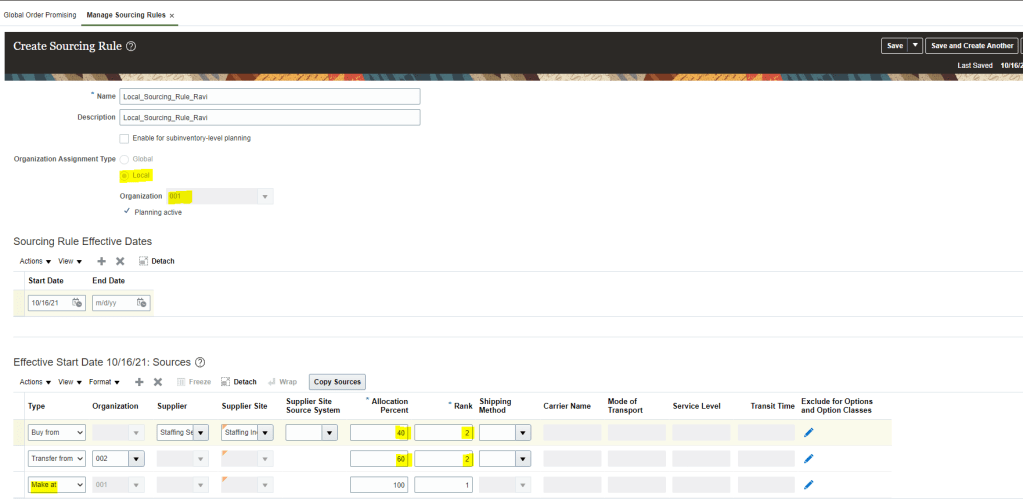
- Enter Name, Description, Start Date(When Sourcing Rule will come into effect).
- Organization Assignment Type -> Choose either Global or Local.

- In Type Section
- Buy From -> Enter Supplier Name , Supplier Site, Allocation Percent an Rank 1.
- Transfer From -> select Organization as 001, Allocation 100% and Rank 2.
- Click on Save and Close(Under Drop down menu of Save).
- In case we chose Assignment Type as Local,
- Organization needs to be filled .
- We get Sourcing option of “Make at”, which will be Organization we chose at header level. It is protected value and we cannot change it.
- We have Sourcing option of Buy from and Transfer from. We can keep both at same Rank but allocation percent can be divided based on Business demand.
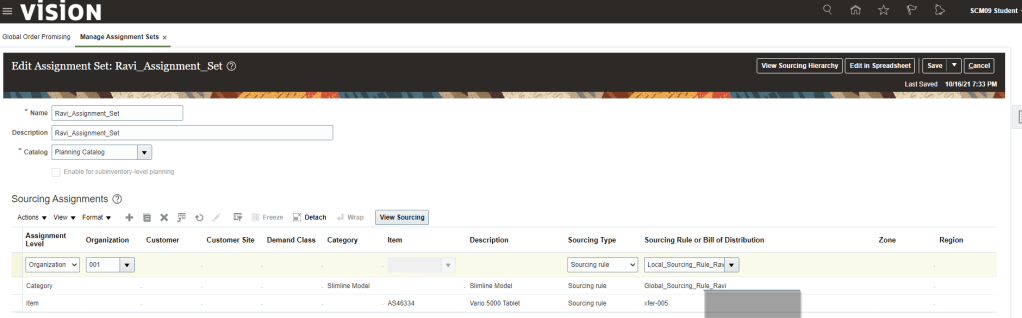
Step2: Create Assignment Set
- Navigation: Go to Global Order Promising In Order Management -> Click on right corner of Task Panel -> Manage Assignment sets

- Go to Action Button -> Click on Create

- Enter Name, Description, Catalog. Beneath Actions Button click on Add Row.

- Go to Sourcing Assignment , Click on Action -> Add Row
- Assignment Level =Category , Item = slimline Tablet, Sourcing Type = Sourcing Rule , Sourcing Rule = Global_Sourcing_Rule_Ravi
- Assignment Level = Item, Item = “AS46334”, Sourcing Type = Sourcing Rule , Sourcing Rule = “Global_Sourcing_Rule_Ravi”
- Assignment Level = Organization , Organization = 001, Sourcing Type = Sourcing Rule , Sourcing Rule = Local_Sourcing_Rule_Ravi
Step3: Create ATP Rule
- Navigation: Go to Global Order Promising In Order Management -> Click on right corner of Task Panel -> Manage ATP rules

- Go to Action Button -> Click on Create -> Enter Name, Description

- We can choose any Promising Mode. Select Promising Mode as Lead Time Based and provide Lead Time value.
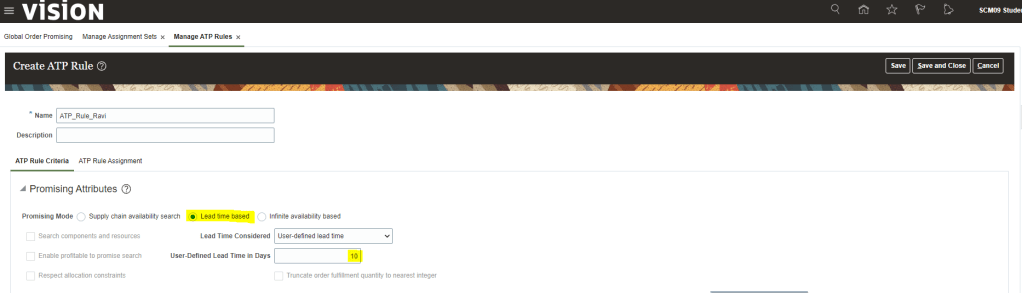
- Under ATP Rule Assignment Tab , Click on Action -> Add Row
- Enter Assignment Basis = Category , Assigned-to Item Category = Slimline Laptop
- Enter Assignment Basis = Item , Assigned-to Item = “AS46334”
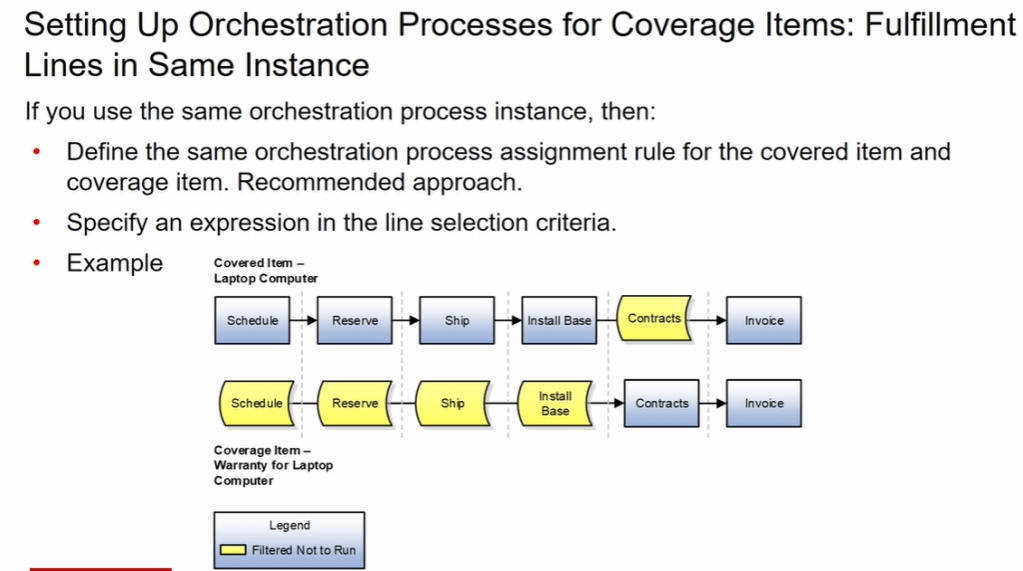
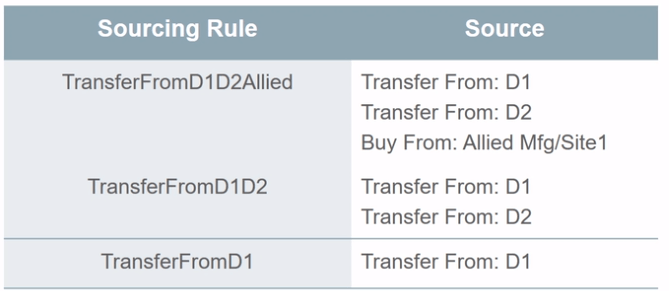
Business Scenario on Applicability of Sourcing rules and Assignment sets.
Below scenarios depicts Global Sourcing rules and Assignment sets used to fulfill Product item or family of Item from the fulfillment sources.

To fulfill above requirement we will have following sourcing rules
Assign above created Sourcing rules at different Assignment levels within same assignment set.

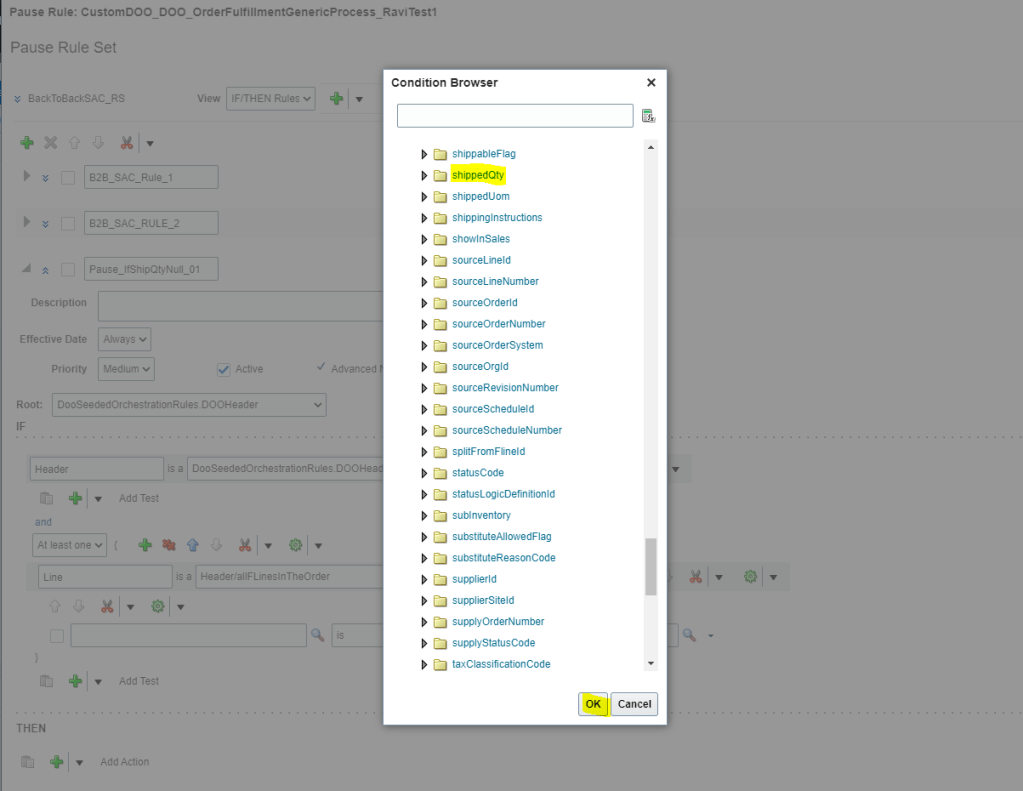
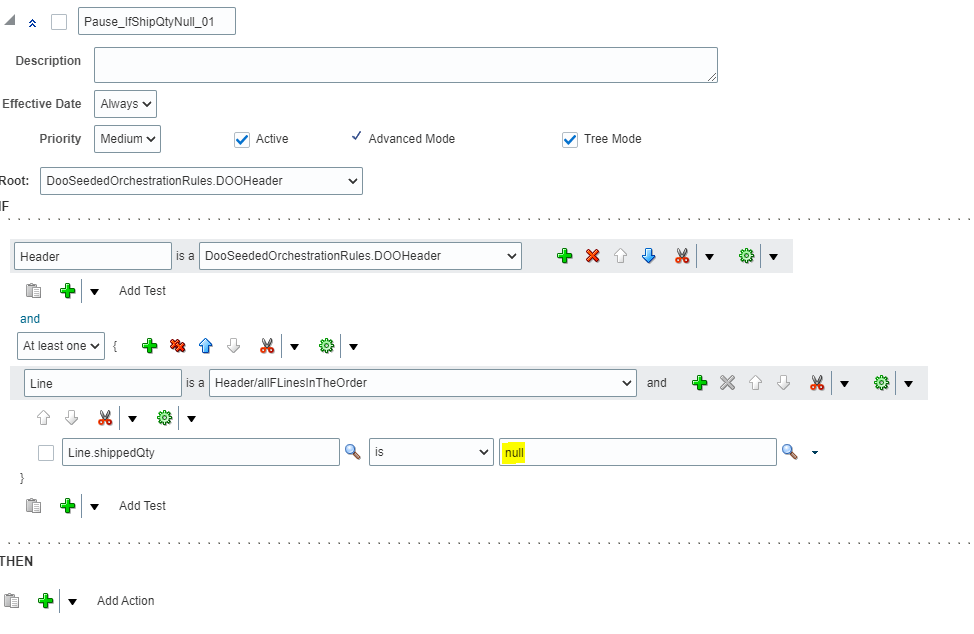
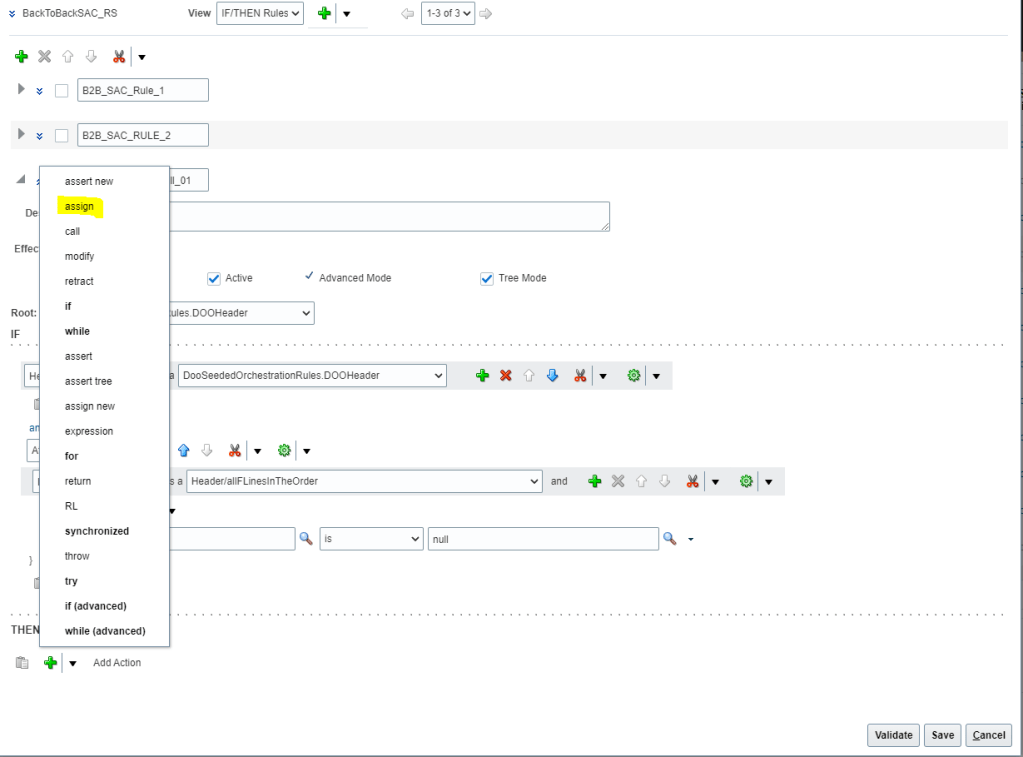
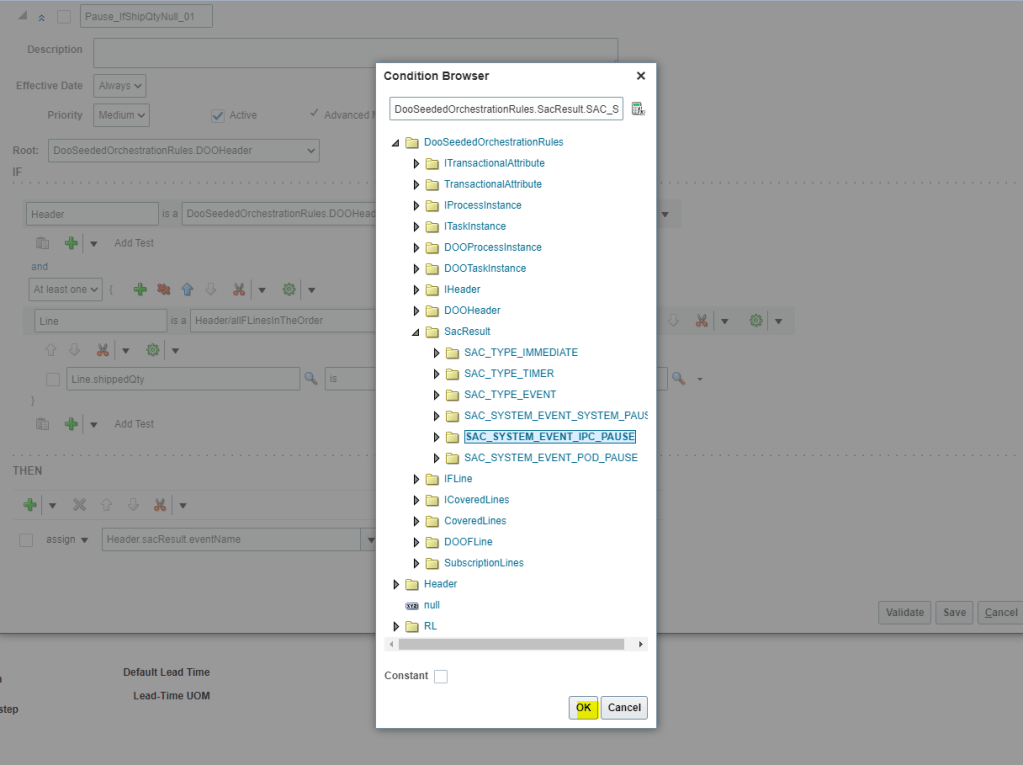
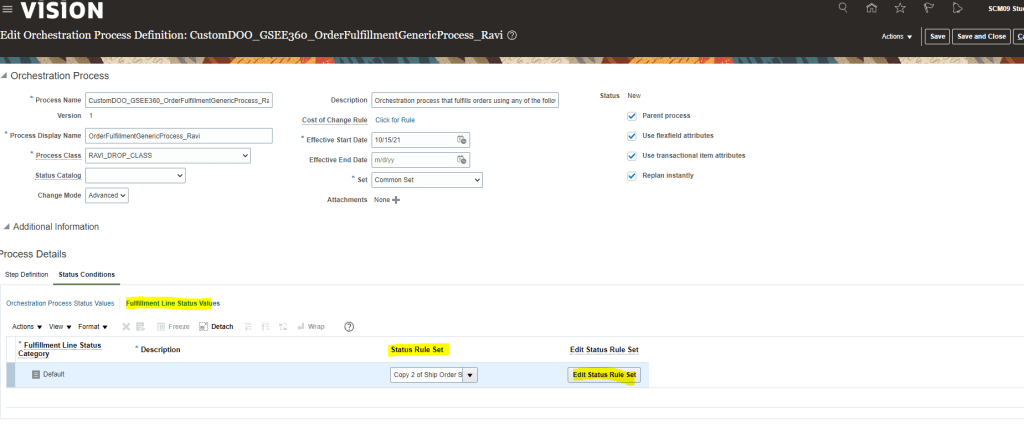
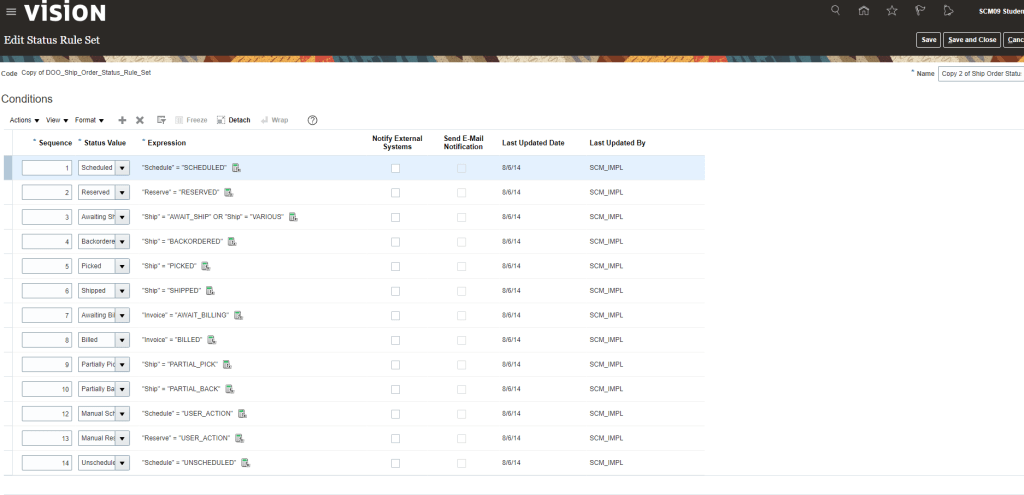
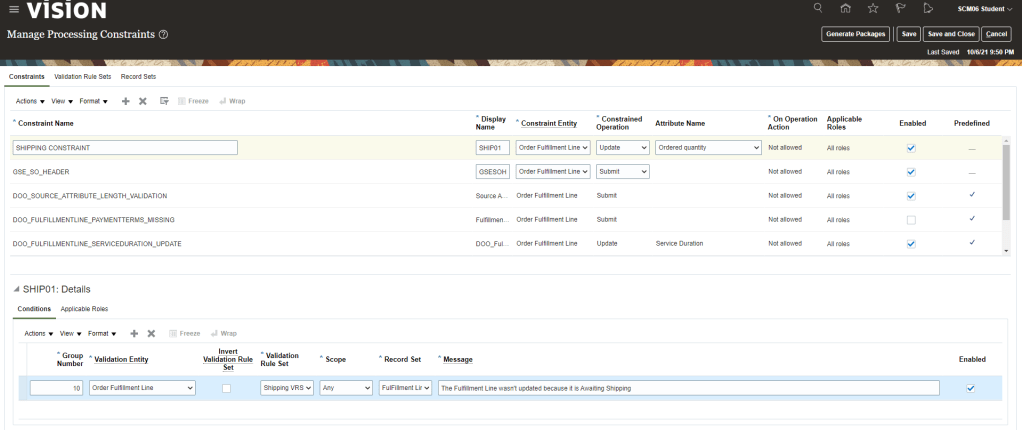
View Promising Rules which got applied to an Order line.
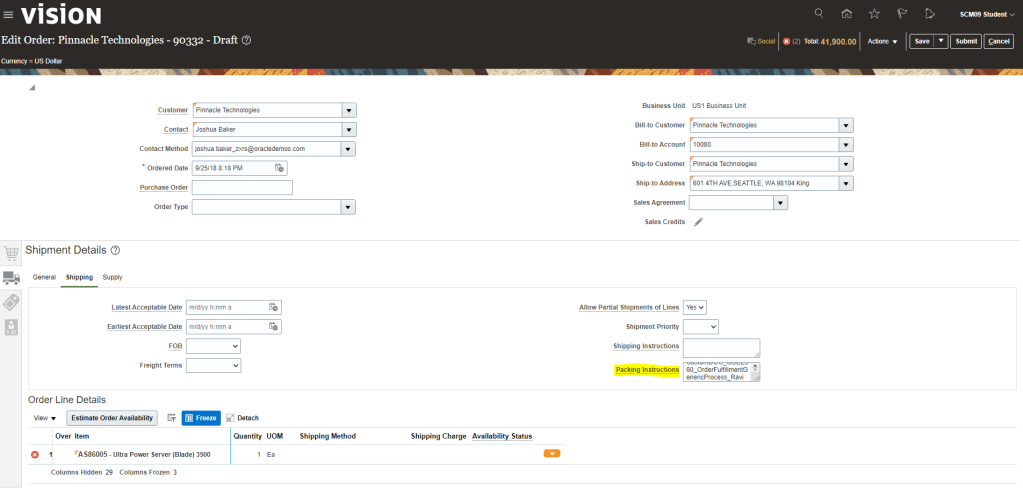
- Navigation: Go to Order Management -> Actions -> Switch to Fulfillment View
- Click on Line -> Click on Fulfillment Lines
- Under Fulfillment Lines -> Click on Check Availability

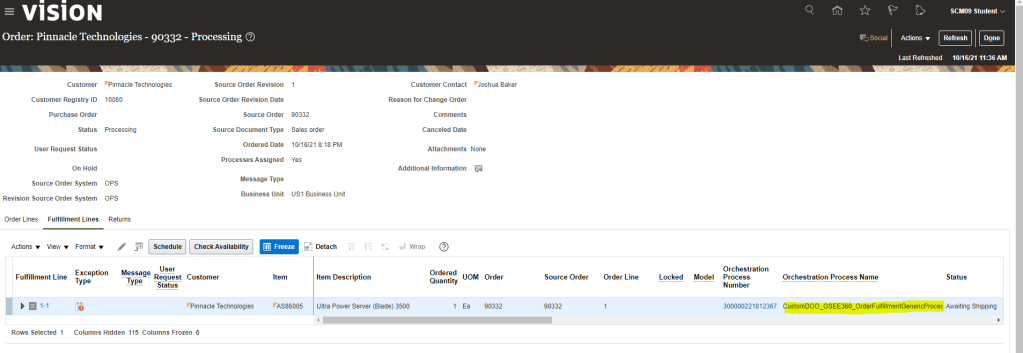
- Select Line -> Actions-> Order Promising rules -> View Sourcing Rules
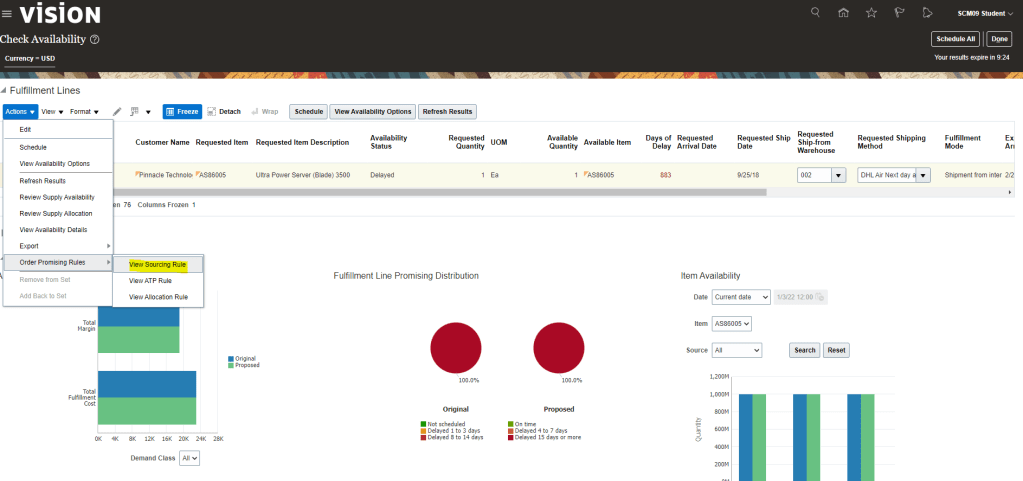
- Below sourcing rule is applied to the Line.
- Please note: Below screenshot is of existing order so it does not contain Sourcing Rule created by me.

- Similarly we can choose option View ATP Rule -> View Allocation Rule to verify applicable ATP rule.

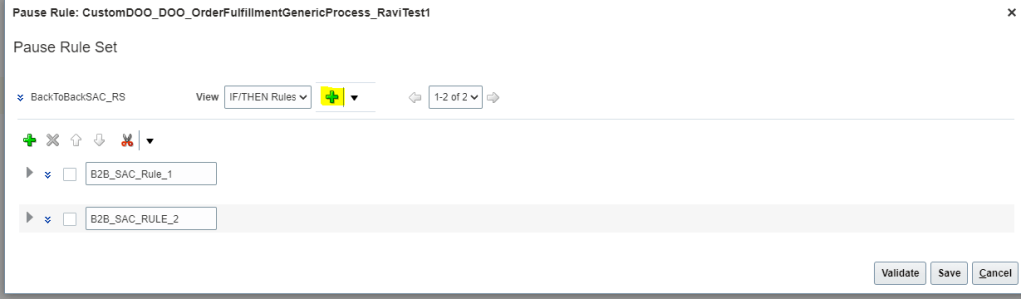
Restarting GOP Engine
Run job to restart GOP Engine and refresh its data. All data which are already collected in GOP can be refreshed. Even during refresh process, GOP continues to promise the orders.
- Navigation -> Setup and Maintenance -> Scheduled Process -> Run job “Refresh and Start the Order Promising Server”.
- Select specific Entities and Click on Submit

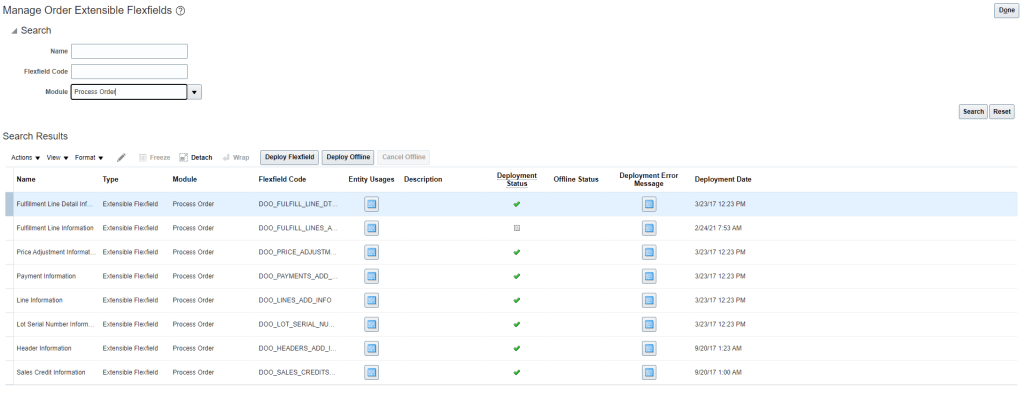
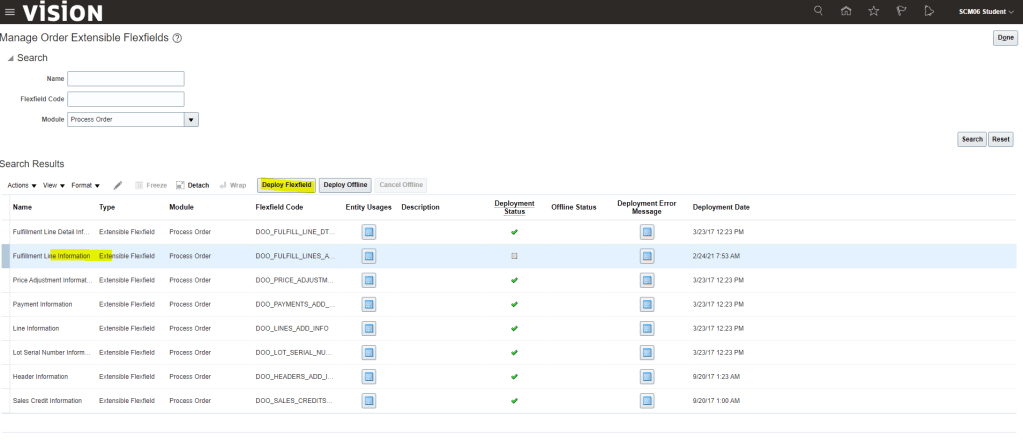
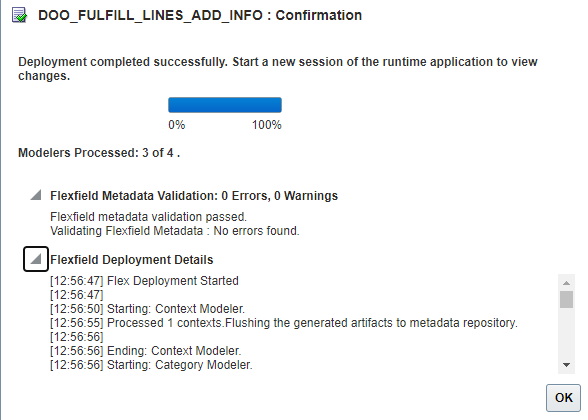
Data collections of Global Order Promising
- Below diagram very well depict data collection done by Supply Chain Planning from different Sources in order to have one repository.
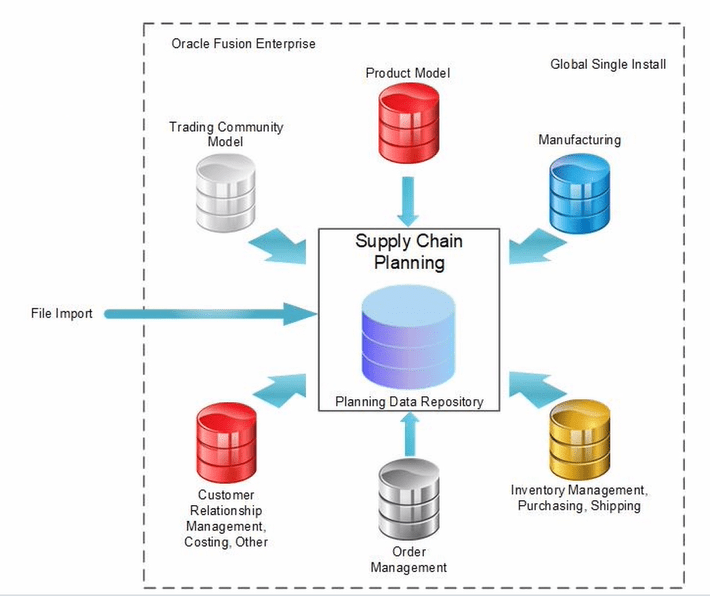
- Data which gets collected are

- Data Collections using File-Based Import. Data which gets collected are
- Customer-Specific Item Relationships
- Item Costs
- Demand Classes
- Planning allocation rules and their assignments
- ATP rules and their assignments
- Real-Time supply update rules
- Sourcing rules and assignments
- Cross-reference mapping information
- Supplier Capacity and approved supplier lists
- Planned Order Supplies
- Payment Methods
- Receipt Method
- Shipping Priority
- Return Reason
- Document Categories
- Activity type
- Tax Classifications
- Tax Exemption reasons
- Sales Credit types
- Freight Terms

- Configuration required for Data Collection
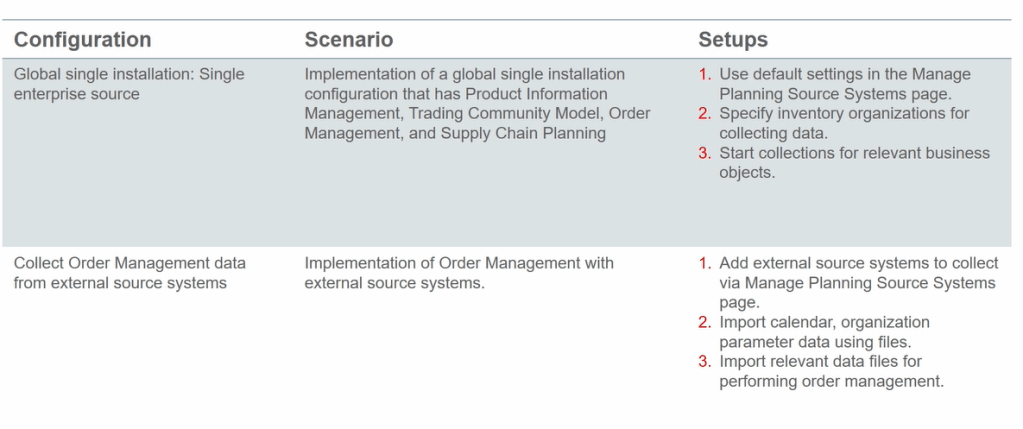

- Below are the External Source Setup which needs to be done
- Define Item Organizations in Product Model
- Define External Source system as Collection Source
- Load Organization and Calendar Data using File Import
- Commence collections for Order Management using File Import
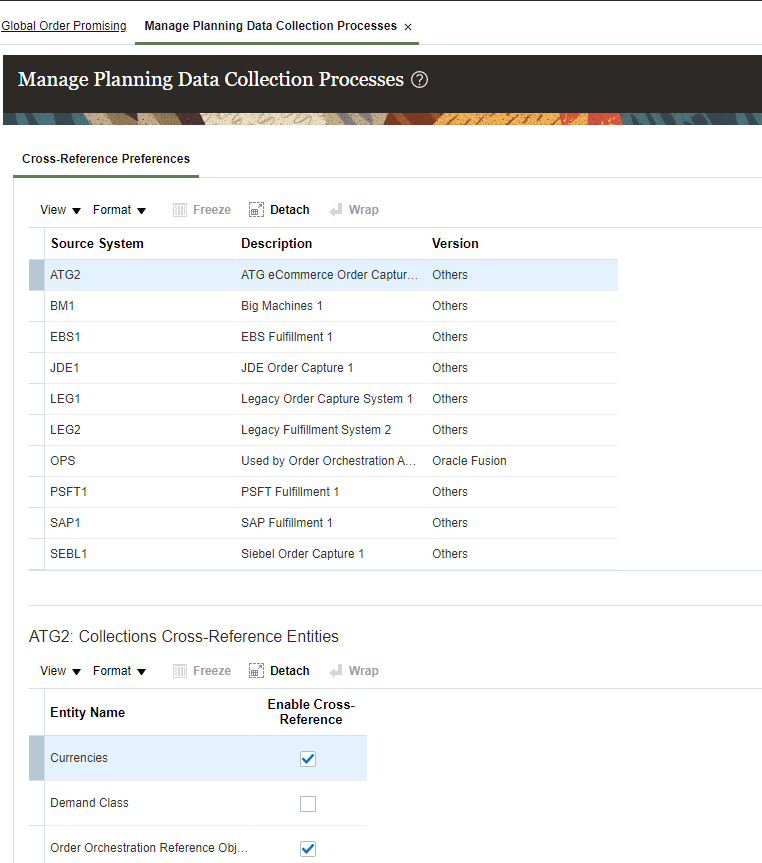
- Under Global Order Promising -> use Manage Planning Data Collection Process to collect data from external source setup